
User's Manual


75.5786.01 900 MHz TX-RX 20140723 Page 3 of 4
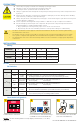
All Transmitters
Removing Transmitters
Single Transmitter
1
x2
2 1
Press BOTH learn buttons until
red LED flashes once (~2 s).
Press BOTH learn buttons until
blue LED illuminates (~10 s).
Press transmiter TWICE within
10 seconds.
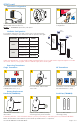
SETUP (cont.)
Push Plate Configuration
21
1 2 3
ON
3
Connect transmitter
1
to push plate
(NO & COM) and insert into box.
Follow steps 1-3 in Hand Held
Configuration
Install push plate.
NOTES: 1: 10TD900PB required for push plates
Vestibule Configuration
RECEIVER TRANSMITTER LEARN
1
Outer
outer (1) No Delay
inner (2) Delay
vestibule (4) No Delay
Inner
outer (1) Delay
inner (2) No Delay
vestibule (3) No Delay
Battery Replacement
Push Plate (TD900PB)Handheld (TD900HHx)
1
3 V
2
AAA Battery
AAA Battery
1
Remove back screws and
disassemble.
Replace 2 AAA batteries
observing polarity.
Replace 3 volt (CR2032) battery
observing polarity and reassemble.
Low Battery Indicator - After transmitter button is pressed, low battery is indicated by three (3) transmiter LED blinks.
OUTER
RECEIVER
1
2
3
INNER
RECEIVER
4
Signal Strength Indicator - Pressing and holding transmitter button for 3 seconds activates signal strength tri-color LED
on receiver. Green = strong signal, Yellow = medium signal, Red = weak signal.
For vestibule applications, program each receiver to the appropriate
transmitters according to the chart below and the picture to the right.
NOTE: All transmitters must ONLY be powered with provided batteries or equivalent.