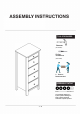
ASSEMBLY INSTRUCTIONS TOOLS REQUIRED (Not Included) Phillips Screwdriver (Not Included) 2 - Persons Recommended ASSEMBLY RATING 0000® EASY----DIFFICUL T The Assembly Rating is a 5-point system showing the level of effort needed to assemble a specific product.
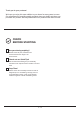
Thank you for your purchase! We hope you enjoy this new addition to your home for many years to come. Our commitment to providing quality products does not simply end when you purchase our product. We fully stand behind our products from start to finish. CHECK BEFORE STARTING Are you missing anything? Double-check all parts, hardware and accessories listed on Page 6 are accounted for. Check out our Quick Tips! We recommend reviewing the pre-assembly handouts.
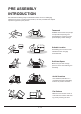
PRE ASSEMBLY INTRODUCTION We understand building ready-to-assemble furniture can be a challenging experience for some. To help avoid confusion, we have provided some helpful tips that may speed up the process. Teamwork ALWAYS have at least two people to help with transporting and assembling the product to avoid potential injury and/or damage. Suitable Location Assembling near the area of the intended location is highly recommended.
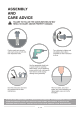
IT IS THE USER'S RESPONSIBILITY TO MAINTAIN THE FURNITURE. THE HARDWARE MAY LOOSEN OVER TIME AND MAY CAUSE THE FURNITURE TO BE WOBBLY AND UNABLE TO SUPPORT ITS INTENDED WEIGHT CAPACITY. THIS MAY LEAD TO COLLAPSE AND MAY CAUSE SERIOUS INJURY.
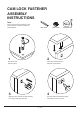
CAM LOCK FASTENER ASSEMBLY INSTRUCTIONS Note : Every cam lock bolt must have a cam lock connector in order to fasten the parts together. cam bolt cam lock screwdriver 1 2 Screw the cam bolt into panel. Insert the cam bolt into the bolt hole of joint panel. 3 4 Align the cam lock with its side opening (or arrow) pointing to cam bolt. Turn the cam lock clockwise gently until it will not turn any more.
The Restraint Strap Small Screw Bracket
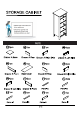
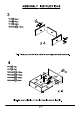
Please refer to page 5 on how to tighten cam locks (#B) onto cam bolts (#A).
Apply a small dab of glue on the end of the dowels (#D) before inserting the dowels (#D) to dowel holes on the panels.
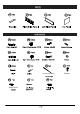
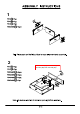
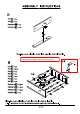
#K #L 2pcs #L #M #N #N #O #K #O #M #20 #K #5 #L #M #10 #N #O #19 #10 #10 #10 ASSEMBLY COMPLETED Please ensure the furniture rests on an even and flat surface. If the product wobbles or feels loose, double-check all bolts and/or screws are properly tightened and secured. Keep this handy! Please retain this instruction manual and any order-related information for future reference. 1) Align product to the wall, than mark the wall on where the wall mount is going to be placed.
/ 13