
User's Manual

Quick Setup Guide
1) Ensure the POWER switch is set to OFF before you begin.
2) Fully charge the battery for 4 hours or use external power.
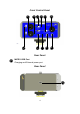
3) Mount the DXA-MICRO PRO+ adapter to the camera.
4) Connect the supplied SC35 cable from the OUT jack on the
adapter to the MIC input jack on the camera.
5) Connect your microphones to the adapter inputs.
6) Set the GAIN switches to HI.
7) Set the MONITOR switch to REC.
8) Set the PHANTOM switch as follows:
a) OFF if phantom power is not required on the XLR input
channel
b) ON if the mic on the XLR input channel requires 48 volt
phantom power
9) Set the M/S switch to M for mono when using one channel or to S
for stereo when using two channels.
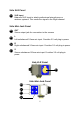
10) Turn the adapter PWR switch on. The power LED should indicate
green.
11) Adjust the LEFT and RIGHT level controls for each channel so the
level indicators flash green when capturing audio.
12) Plug your headphones into the PHONE jack on the adapter and
adjust the VOLUME control to a comfortable level. Ensure that you
hear audio on both channels from the connected microphones.
13) See Advanced Operation on how to setup the camera gain.
14) Do a test recording and playback on the camera to ensure that the
captured audio is satisfactory.
2