FX2600 Fax Adapter User Guide
FX2600 Fax Adapter User Guide Version 1.0 Beam Communications Pty Ltd 8 Anzed Court, Mulgrave, Victoria, 3170, AUSTRALIA Information furnished by Beam Communications Pty Ltd (Beam) is believed to be accurate and reliable. However, no responsibility is assumed by Beam for its use, or for any infringement of patents or other rights of third parties, which may result from its use. No license is granted by implication or otherwise under any patent or patent rights of Beam.
Contents INTRODUCTION .................................................................................................................................. 4 IRIDIUM FAX SERVICE OVERVIEW: ............................................................................................... 4 FAX – MO TO PSTN.......................................................................................................................... 4 FAX – MT TO PSTN........................................................................
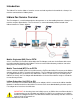
Introduction The Iridium Fax Service allows a fax to be sent or received anywhere in the world via a Group 3 fax machine connected to an Iridium phone. Iridium Fax Service Overview The Fax Adapter is a small hardware device that operates as an intermediary between a Group 3 fax machine and your Beam device. The Fax Server is a store-and-forward platform located at the Iridium Gateway in Tempe, Arizona.
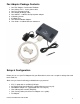
Fax Adapter Package Contents 1. 2. 3. 4. 5. 6. 7. 8. 9. One FAX Adapter, Part Number FAX0601 One 2 Meter, RJ-11, 2 wire, phone cable One RJ11 Emergency Plug One DB9(M) to DB9(F) cable One 100VAC ~ 240VAC dual input power adapter 3 Mounting Screws 4 Rubber Feet One DB9 Null Modem Adapter User Guide – including Warranty Statement Setup & Configuration Before you can use your Fax Adapter with your Beam device, there are a couple of settings that need to be made first.
Connecting to the Fax Adapter with Hyperterminal To configure your Fax Adapter, some settings need to be set using a PC / laptop running Hyperterminal or an equivalent application. The follow steps guide you through setting up a Hyperterminal connection to your fax adapter. If you currently have the power applied to the Fax Adapter, disconnect it before continuing. 1. Connect the Serial Cable and Null-Modem Adapter between the PC COM port and the Fax Adapter. 2.
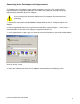
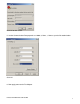
Click OK on this screen. 5. Set the Communication Port properties to 19200, 8, None, 1, None as per the illustration below: Click OK. 6.
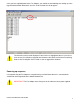
Once you have applied power to the Fax Adapter, you should see the following text coming up in the Hyperterminal window. Note that it can take 15-20 seconds for it all to appear: The firmware version will be displayed in the first line as highlighted above. If you do not have at least V.010R please upgrade the firmware to the latest version before continuing. Refer to the Fax Adapter User’s Guide on how to upgrade the firmware.
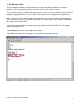
1. Set Country Code The Fax Adapter by default is configured to work correctly with North American fax machines, however can be changed to support fax machines from a range of other countries. This is done by entering a command in Hyperterminal. If you are unsure on how to connect to the Fax Adapter using Hyperterminal, see the section Connecting to the Fax Adapter with Hyperterminal. Make sure you know your country code before continuing.
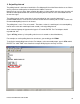
2. Set polling interval The polling interval is the interval at which the Fax Adapter will check the Beam device to see if there are any new faxes waiting to be received from the Iridium Fax Server. Note that if you are in a voice / data call when the device is due to poll for new messages that the call will not be interrupted and will wait until the next polling interval after the call is terminated to check for new messages.
3. Setup String NOTE: YOU WILL NOT BE ABLE TO RECEIVE FAXES IF YOU DO NOT COMPLETE THIS STEP. The Fax Adapter utilises a setup string to inform the Fax Adapter of your MSISDN (Iridium Phone Number), your service type and your SIM type. The setup string is stored in non-volatile memory within the fax adapter and will retain its value through power cycles.
Country Support Fax machines are configured to work correctly in the country in which they are sold. The Fax Adapter, by default, is configured to work correctly with North American fax machines.
Firmware Updates Every time the Fax Adapter is used, its firmware version is communicated to the Fax Server. If the Fax Server determines that the Fax Adapter requires a firmware update, it will command the Fax Adapter to automatically retrieve and install the firmware update without the need for user intervention. Manual Firmware Update Procedure Connect to your Fax Adapter as per the instructions outlined in the “Connecting to the Fax Adapter with Hyperterminal” section of this document.
Current Firmware Version The Flash is now complete! NOTE: If the Fax Adapter stops responding, you can use the “RJ11 Emergency Plug” to get the Fax Adapter to respond to HyperTerminal commands. The “RJ11 Emergency Plug” is a short (2 inch) piece of wire with an RJ11 connector at one end, as shown in the Fax Adapter Package Contents section of this guide. ⇒ Remove Power to the Fax Adapter. ⇒ Insert the RJ11 Emergency Plug into the RJ11 jack. ⇒ Apply Power to the Fax Adapter.
LED Status Indicators on the Fax Adapter FAX LED lights GREEN after first page of an Mobile Originated Fax is received. FAX LED lights RED when an SMS notification (Mobile Originated Fax Failure, Mobile Terminated Fax, and Over the Air Firmware Update) is received. PWR LED lights GREEN when power is applied. TD/RD LED’s flash while communicating with the Beam device.
Beam Product Compatibility List The below table is a list of Beam Terminals that can currently be used with the Fax Adapter. The following pages explain how to connect the Fax Adapter & Group 3 fax machine to each of the below Beam units.
Sending / Receiving Faxes Mobile Originated FAX (ISU to PSTN) On your Group 3 Fax Machine, enter: <∗> The Fax will be sent to and stored in the attached Fax Adapter. The Fax Adapter will then dial the Iridium Fax Server and send the Fax. Mobile Originated FAX (ISU to ISU) At the Fax Machine, enter: <∗> The Fax will be sent to and stored in the attached Fax Adapter. The Fax Adapter will then dial the Iridium Fax Server and send the Fax.
Connecting the Fax Adapter – RST100 RemoteSAT One end of the supplied 2-wire RJ11 cable is plugged into the RJ11 port on the Fax Adapter, and the other end is plugged into Power The supplied Serial Data Cable connects from the 9-pin serial connection on the back of the Fax Adapter to the COMM Port on the rear of the Beam RST100 RemoteSAT. DO NOT use the Null Modem adapter in this setup! Before applying power to the Fax Adapter, make sure the RST100 is first powered on and registered on Iridium Network.
Connecting the Fax Adapter – RST310 IntelliDOCK One end of the supplied 2-wire RJ11 cable is plugged into the RJ11 port on the Fax Adapter, and the other end is plugged into Power The supplied Serial Data Cable connects from the 9-pin serial connection on the back of the Fax Adapter to the COMM Port on the rear of the Beam RST310 IntelliDOCK.
Connecting the Fax Adapter – RST978 Hands-free Kit One end of the supplied 2-wire RJ11 cable is plugged into the RJ11 port on the Fax Adapter, and the other end is plugged into Power The supplied Serial Data Cable connects from the 9-pin serial connection on the back of the Fax Adapter to the 9-pin Data Port on the side of the Beam Hands Free Interface (HFI).
Connecting the Fax Adapter – RST620 TranSAT One end of the supplied 2-wire RJ11 cable is plugged into the RJ11 port on the Fax Adapter, and the other end is plugged into Power The supplied Serial Data Cable connects from the 9-pin serial connection on the back of the Fax Adapter to the 9-pin Data Port on the side of the Beam Hands Free Interface (HFI).
Connecting the Fax Adapter – RST600 DataMODEM One end of the supplied 2-wire RJ11 cable is plugged into the RJ11 port on the Fax Adapter, and the other end is plugged into Power The supplied Serial Data Cable connects from the 9-pin serial connection on the back of the Fax Adapter to the 9-pin plug on the RST600 Data Cable. DO NOT use the Null Modem adapter in this setup! Before applying power to the Fax Adapter, make sure the RST620 is first powered on and given time to register on Iridium Network.
Connecting the Fax Adapter – RST075 Basic Cradle One end of the supplied 2-wire RJ11 cable is plugged into the RJ11 port on the Fax Adapter, and the other end is plugged into Power The supplied Serial Data Cable connects from the 9-pin serial connection on the back of the Fax Adapter to the 9-pin Data Port on the back of the Cradle. DO NOT use the Null Modem adapter in this setup! Before applying power to the Fax Adapter, make sure the handset is first powered on and registered on Iridium Network.
Connecting the Fax Adapter – RST625 RapidSAT One end of the supplied 2-wire RJ11 cable is plugged into the RJ11 port on the Fax Adapter, and the other end is plugged into Power The supplied Serial Data Cable connects from the 9-pin serial connection on the back of the Fax Adapter to the RS232 Data port on the inside of the RapidSAT pelican case.
Connecting the Fax Adapter – RST825 SatRADIO Portable One end of the supplied 2-wire RJ11 cable is plugged into the RJ11 port on the Fax Adapter, and the other end is plugged into Power The supplied Serial Data Cable connects from the 9-pin serial connection on the back of the Fax Adapter to the Data port on the inside of the SatRADIO pelican case.
Connecting the Fax Adapter – RST820 SatRADIO Fixed One end of the supplied 2-wire RJ11 cable is plugged into the RJ11 port on the Fax Adapter, and the other end is plugged into Power The supplied Serial Data Cable connects from the 9-pin serial connection on the back of the Fax Adapter to the COMM Port on the rear of the Beam RST820 terminal.
Connecting the Fax Adapter – RST805 / RST810 SecurePLUS Due to the complexity of the RST805 / RST810, advanced setup configuration is required to integrate your Fax Adapter. Please contact Beam for more information.
USB to Serial Adapter Please Note: Issues have arisen where USB to Serial Adapters have caused unexpected results and failures in some applications. Careful consideration of this should be noted when using a USB to Serial adapter with the Fax Adapter. Beam’s USB to Serial adapter has been tested and certified to work with the Fax Adapter, should such a scenario require.
Frequently Asked Questions Q. What is a Group 3 Fax machine? A. Group 3 and 4 faxes are digital formats, (as opposed to Group 1 and 2 faxes which are analogue and no longer manufactured) and take advantage of digital compression methods to greatly reduce transmission times. The fax page(s) are converted into a compressed TIFF (Tagged Image File Format) graphical image and then transmitted. Q. How do I check the currently set Country Code, Polling Interval or Configured MSISDN in the Fax Adapter? A.
Q. Can I queue up more than Mobile Originated (MO) Fax at a time? A. No. Only one fax can be sent at a time. If another fax is attempted to be sent while another is in progress, the user will hear a tone on the fax machine, similar to that of an engaged tone. Q. What happens if I send more fax pages than the Fax Adapter can handle? A. Once the memory in the fax adapter is full, it will truncate any further data, which will be lost respectively.