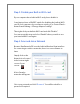
Windows XP Guide Step 1: Install Software Do not connect BearExtender PC’s USB cable yet If you have already connected it, please disconnect it. Insert the CD-ROM into your computer. When the Autorun menu appears, click “Windows XP”. It may take up to 30 seconds for the Autorun menu to appear, depending on the speed of your CD drive. If the Autorun menu does not appear, Navigate to your CD drive, then right-click it and select “Open.” Then double click the Setup program to begin.
Depending on your version of Windows XP Service Pack, you may not see a message saying the installation has completed. Instead, you may see the Windows Hardware wizard. If the Windows Hardware wizard appears on your screen, on the first screen select "No, not this time." Then on the next screen select "Install software automatically (Recommended)".
The hardware wizard will then complete the installation. Depending on your processor speed, this process can take up to 2 minutes. Once completed, click the Finish button and proceed to the next step. Step 2: Disable your Built-in Wi-Fi card If your computer has a built-in Wi-Fi card, please disable it. Some laptops have a ON/OFF switch for disabling the built-in Wi-Fi card. If your computer does not have a switch, go to Control Panel > Network Connections.
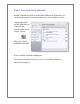
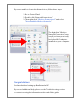
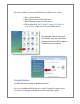
Step 3: Scan and Join a Network Because BearExtender PC uses the built-in Windows XP interface for connecting to wireless networks, there is no new software to learn. Simply right-click on the Network icon located in the bottom right corner of your screen: Then select “View Available Networks”. A list of nearby networks will appear. Select your network and click “Connect.” You will be asked for a password if required.
If you are unable to locate the Network icon, follow these steps: 1. Go to Control Panel 2. Double click “Network Connections” 3. Then right-click “Wireless Connection 2” and select “View Available Wireless Networks” The digit after "Wireless Network Connection" may vary if you have previously had other Wi-Fi adapters installed on your computer. Congratulations You have finished setting up BearExtender PC.
Troubleshooting 1. I do not see any connection icon in the bottom right of my screen, and when I follow the instructions to go to the device in the Control Panel > Network Connections I am not able to see the device there either. Be sure you have run the Setup program from the CD in its entirety. If you have, and BearExtender PC is connected to your computer, please contact BearExtender support for further assistance. 2.
If you have confirmed your internal network card is disabled, the other possibility is there may not be any other Wi-Fi networks in range. Unlike 3G/cellular data service, which you have to pay for, WiFi does not have a monthly service fee but you do need to be within range of a wireless network in order to use it.
Windows Vista Guide Step 1: Install Software Do not connect BearExtender PC’s USB cable yet If you have already connected it, please disconnect it. Insert the CD-ROM into your computer. When the Autorun menu appears, click “Windows Vista”. It may take up to 30 seconds for the Autorun menu to appear, depending on the speed of your CD drive. If the Autorun menu does not appear, Navigate to your CD drive, then right-click it and select “Open.” Then double click the Setup program to begin.
Step 2: Disable your Built-in Wi-Fi card If your computer has a built-in Wi-Fi card, please disable it. Some laptops have a ON/OFF switch for disabling the built-in Wi-Fi card. If your computer does not have a switch, go to Control Panel > Network and Sharing > “Change Adapter Settings”. Then right-click your built-in Wi-Fi card and click “Disable.” You can repeat this step and select “Enable” when you wish to use your internal Wi-Fi card again.
If you are unable to locate the Network icon, follow these steps: 1. Go to Control Panel 2. Click “Network and Sharing Center” 3. Click “Manage network connections” 4. Then right-click “802.11n Wi-Fi adapter” or “Wireless Connection 2” and select “Connect/Disconnect” The digit after "Wireless Network Connection” may vary if you have previously had other Wi-Fi adapters installed on your computer. Congratulations You have finished setting up BearExtender PC.
Troubleshooting 1. I do not see any connection icon in the bottom right of my screen, and when I follow the instructions to go to the device in the Network and Sharing center I am not able to see the device there either. Be sure you have run the Setup program from the CD in its entirety. If you have, and BearExtender PC is connected to your computer, please contact BearExtender support for further assistance. 2.
computer is not using it. Please follow the steps outlined in Step 2 of this document to ensure your internal card is disabled. If you have confirmed your internal network card is disabled, the other possibility is there may not be any other Wi-Fi networks in range. Unlike 3G/cellular data service, which you have to pay for, WiFi does not have a monthly service fee but you do need to be within range of a wireless network in order to use it.
Windows 7 Guide Step 1: Install Software Do not connect BearExtender PC’s USB cable If you have already connected it, please disconnect it. Insert the CD-ROM into your computer. When the Autorun menu appears, click “Windows 7”. It may take up to 30 seconds for the Autorun menu to appear, depending on the speed of your CD drive. If the Autorun menu does not appear, Navigate to your CD drive, then right-click it and select “Open.” Then double click the Setup program to begin.
Step 2: Disable your Built-in Wi-Fi card If your computer has a built-in Wi-Fi card, please disable it. Some laptops have a ON/OFF switch for disabling the built-in Wi-Fi card. If your computer does not have a switch, go to Control Panel > Network and Sharing > “Change Adapter Settings”. Then right-click your built-in Wi-Fi card and click “Disable.” You can repeat this step and select “Enable” when you wish to use your internal Wi-Fi card again.
If you are unable to locate the Network icon, follow these steps: 1. Go to Control Panel 2. Click “Network and Sharing Center” 3. Click “Change adapter settings” 4. Then right-click “802.11n Wi-Fi adapter” or “Wireless Connection 2” and select “Connect/Disconnect” The digit after "Wireless Network Connection” may vary if you have previously had other Wi-Fi adapters installed on your computer. Congratulations You have finished setting up BearExtender PC.
Troubleshooting 1. I do not see any connection icon in the bottom right of my screen, and when I follow the instructions to go to the device in the Network and Sharing center I am not able to see the device there either. Be sure you have run the Setup program from the CD in its entirety. If you have, and BearExtender PC is connected to your computer, please contact BearExtender support for further assistance. 2.
If you have confirmed your internal network card is disabled, the other possibility is there may not be any other Wi-Fi networks in range. Unlike 3G/cellular data service, which you have to pay for, WiFi does not have a monthly service fee but you do need to be within range of a wireless network in order to use it.
Continued on next page
Continued on next page
Continued on next page
FCC STATEMENT 1. This device complies with Part 15 of the FCC Rules. Operation is subject to the following two conditions: (1) This device may not cause harmful interference. (2) This device must accept any interference received, including interference that may cause undesired operation. 2. Changes or modifications not expressly approved by the party responsible for compliance could void the user's authority to operate the equipment.