
Use and Care Manual
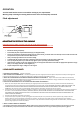

Parts List
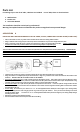
For awnings up to a size of 10’ wide, 2 brackets are included. For 12’ wide, there are three brackets.
1. Wall brackets
2. Rocker Arm
3. Instruction Manual
The installation should be carried out by professional!
Warning! Incomplete fasteners will weaken the product strength and cause potential danger.
APPLICATION A
INSTALLING WALL MOUNTING BRACKETS TO FLAT SIDING, STUCCO, CEMENT OR CULTURED STONE (OF ANY TYPE):
• Place a safe ladder on a flat, dry, stable surface at both ends of where the awning will be installed
• Using a chalk-line and a string level (or a laser level) mark a horizontal line at your
chosen height above the patio.
• Using a stud finder, mark the center of all the studs along the line where the awning will be installed. Failure to center bolts in
structural studs will cause premature failure and result in awning collapse and possible injury.
• Mark both ends of where the awning will be installed on that line.
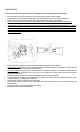
There should be one bracket each next to the lateral arms (between the roller/end bracket and the pitch bracket). ALWAYS INSTALL
THE WALL BRACKETS ON THE OPPOSITE SIDE OF THE PITCH BRACKETS where the arms fold in. The arm should be on the one side
and the bracket will be on the other side of the pitch bracket. Choose the appropriate studs or rafters to install your brackets onto.
Hint: short studs above windows and doors are structural and may be used to secure bracket as well as full length studs.
• Cultured stone surfaces may require a grinder to flatten off the area where the brackets are to be installed
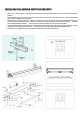
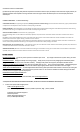
• Using the bracket as a template (the top of the bracket has a ridge on it), mark the holes. Place the bottom of the bracket on the
chalk line. BRACKETS WILL BE THE LOWEST POINT OF THE AWNING.
• For stucco or cultured stone: Use a 5/16” masonry bit to get through the surface. Drill a pilot hole into the stud beyond it with a
3/16” wood/metal bit. For wood, cement or hardboard surfaces drill a pilot hole into the stud with a 3/16” wood/metal bit. Using
a ratchet, install (2) 5/16”x3” lag screws and (2) 5/16” washers to secure the bracket to the wall.
• For concrete surfaces: Use a 5/16” masonry bit to drill 3” deep holes into the surface. Insert two 5/16”X3” wedge anchors into the
hole. Install a washer on each anchor. Place the bracket so the anchors come through the mounting holes. Install another washer
and fully tighten the nuts.
• For flat siding: The easiest way is to mount a 1" x 5”- 6" treated/painted timber beam (the same length as your awning width)
through the siding into the studs using (2) 5/16”x3” lag screws and (2) 5/16” washers. Then you mount the awning to the studs
through the timber beam. Or mount a 2" x 5”- 6" treated/painted timber beam (the same length as your awning width) through
the siding into the studs.
• Repeat the process for the remaining brackets.
• Seal around each bracket with a clear paint-able silicone caulking.
WALL
BRACKET
WALL
STUD