
Use and Care Manual

APPLICATION B
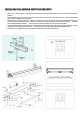
INSTALLING WALL MOUNTING BRACKETS TO ALUMINUM, VINYL, HARDBOARD OR LAP SIDING
• Place a safe ladder on a flat, dry, stable surface at both ends of where the awning will be installed
• Using a chalk-
line and a string level (or a laser level) mark a horizontal line at your chosen height above the patio.
• Using a stud finder, mark the center of all the studs along the line where the awning will be installed.
• Failure to center bolts in structural studs will cause premature failure and result in awning collapse and possible injury.
• Mark both ends of where the awning will be installed on that line.
• There should be one bracket each next to the lateral arms (between the roller/end bracket and the pitch bracket). ALWAYS
INSTALL THE WALL BRACKETS ON THE OPPOSITE SIDE OF THE PITCH BRACKETS where the arms fold in. The arm should be
on the one side and the bracket will be on the other side of the pitch bracket. Choose the appropriate studs or rafters to
install your brackets onto. Hint: short studs above windows and doors are structural and may be used to secure bracket as
well as full length studs.
• Using the bracket as a template, mark the holes. Place the bottom of the bracket on the chalk line
• For aluminum or vinyl: Mark a 5-1/2”x5-1/2” square (centered on the stud left to right and on the bracket vertically) where the
bracket will be placed. Cut the siding with a sharp utility knife.
• For all other siding: Mark a 5-1/2”x5-1/2” square (centered on the stud left to right and on the bracket vertically) where the
bracket will be placed. Cut the siding with a circular saw set at the depth of the siding. Corners may need trimmed with a
hammer and a sharp chisel.
• Make the appropriate number of 5-1/2”x5-1/2” wood blocks made from a piece of 2x6 lumber.
• Using the brackets as a template (the top of the bracket has a ridge on it), drill (2) 5/16” holes in the blocks. Sand the corners
and paint the blocks to match your exterior paint color.
• Drill a pilot hole into the stud with a 3/16” wood/metal bit.
• Using a ratchet, install (2) 5/16”x4-1/2” lag screws (9/16” socket) and (2) 5/16” washers to secure the bracket to the stud
behind the block.
• Seal around each block with clear paint-able silicone caulking.
• Repeat the process for the remaining brackets.
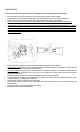
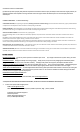
BRACKET
BLOCK