
Warranty


Page | 11
d) Finish assembling the panels with the (i) Right Panel. Make sure the right side of the (i) panel is
the side/lip hanging down over the (d2) Right Side Frame. This will cover the right side of the
awning frame when staring at the awning face forward.
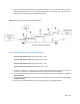
Figure C1:Layout of Panels for Houstonian 4ft Example
Step 5: Input the Sheet Screws for the Panels
Parts you will need for a 5ft: 18-(f) Sheet Screws, 1- Drill
Parts you will need for a 6ft: 20-(f) Sheet Screws, 1- Drill
Parts you will need for a 7ft: 22-(f) Sheet Screws, 1- Drill
Parts you will need for an 8ft: 24-(f) Sheet Screws, 1- Drill
a) Now that the panels are in place, you will need to insert the (f) Sheet Screws into the holes and
drill them in. The holes are available on the tops and bottoms of the panel’s edges.
b) First, insert and drill the (f) Sheet Screws into the attached (c1) and (c2) Front Bars first. Refer to
figure D1 below.
c) Second, insert and drill the (f) Sheet Screws into the attached (b1) and (b2) Full Top Bars. Refer
to figure D2 below.
d) Third, insert and drill the (f) Sheet Screws into the (d1) Left and (d2) Right Frames