BEC 9800VN GigaConnect® Wireless-N VoIP Active Ethernet Point-to-Point Fiber Gateway Quick Start Guide Version 1.
BEC 9800VN Wireless-N VoIP Active Ethernet Fiber Gateway PLEASE READ THE QUICK START GUIDE AND FOLLOW THE STEPS CAREFULLY. THIS QUICK START GUIDE WILL HELP YOU INSTALL THE DEVICE PROPERLY AND AVOID IMPROPER USAGE. IF YOU NEED MORE INFORMATION ON THIS SOFTWARE CONFIGURATION, PLEASE REFER TO THE USER MANUAL ON CD-ROM.
Quick Start Guide Front Panel LEDs LED STATUS DESCRIPTION Green System is up and ready Red Boot failure Lit up BEC 9800VN is successfully connected with a broadband connection device.
BEC 9800VN Wireless-N VoIP Active Ethernet Fiber Gateway Rear Panel Connectors 3 4 5 6 10 7 1 1 0 2 8 PORT 9 0 MEANING 1 Antenna Screw the supplied Wi-Fi antennas onto the antenna connectors on both sides. 2 Phone (1~2) Connect your analog phone to the phone port with a RJ-11 cable. 3 USB Connect an external USB dongle / hard drive for storage, network sharing, etc 4 SFP Cage Insert and gently push the SFP module until it snap into the slot tightly.
Quick Start Guide Hardware Connection SFP (direct connection to fiber) Mode Broadband Router Mode 4
BEC 9800VN Wireless-N VoIP Active Ethernet Fiber Gateway Hardware Installation 1. Power Connection 1.1 Using the DC Power Adaptor Plug in the supplied power adapter to the wall jack, the other side to the 9800VN then power ON the 9800VN by pressing the Power On/Off button. . 1.2 Using a PoE Injector Connect a RJ-45 Ethernet cable to LAN Port 4 (known as the PoE port) and the other side to a PoE injector then power OFF the 9800VN. IMPORTANT: The PoE Injector / device MUST comply with IEEE802.
Quick Start Guide 2. LAN Connection Connect the supplied RJ-45 Ethernet cable to one of the Ethernet ports, and the other side to the PC’s Ethernet interface. 3. WAN Connection 3.1 SFP Interface Insert then gently push the Mini-GBIC SFP module into the SFP cage until it us tightly locked to the cage, and then connect the fiber cable to the module. 3.
BEC 9800VN Wireless-N VoIP Active Ethernet Fiber Gateway 4. Phone Connection Connect RJ-11 cable to the router’s “Phone_1” or “Phone_2” when connecting to an analog phone set. Both ports (“Phone_1” and “Phone_2”) can make VoIP calls simultaneously.. 5. USB Connection FTP or Samba Server attached to the USB port. Simply plug in an external USB HD and do a setup in the GUI.
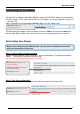
Quick Start Guide Connecting to the Router The default IP of modem is 192.168.1.254 with subnet 255.255.255.0. Make sure the attached PC to this router is in the same subnet and has an IP address in the range between 192.168.1.1 ~ 192.168.1.253. Open a web browser and type http://192.168.1.254 in the URL address bar. URL Address bar: type http://192.168.1.254 The login prompt will appear. Input the default username (admin) and password (admin) for Account type, Administrator.
BEC 9800VN Wireless-N VoIP Active Ethernet Fiber Gateway Step 3: Setup Wireless Connection Access Point: select Activated SSID: Assign an unique name Channel: pick from 1~11 Security Type: select a mode - Disable (No security) - WPA - WPA2 (Most secure one) - WPA / WPA2 (auto detect WPA mode with wireless clients) - WEP (Less secure one) Pre-Shared Key: key for wireless authentication - WPA / WAPA2 Share Key: Assign a key between 8 ~ 63 characters.
Quick Start Guide Try the default login and password, please refer to User Manual. If this fails, you can restore your router to its factory settings by holding the Reset button on the back of your router for 6 seconds or more. 3. Can’t ping any PCs on the LAN. Check the Ethernet LEDs on the front panel. The LED should be on for a port that has a PC connected. If it is off, check the cables between your router and the PC. Make sure you have uninstalled any software firewall for troubleshooting.