Becker® MAP PILOT Operating guide
Contents >>> >D > GB >F >I >E >P CONTENTS Contents Safety instructions The Becker® MAP PILOT Usage Unpacking the Becker® MAP PILOT 2 4 5 5 Checking the delivery Delivery contents Complaints Dealing with the packaging 5 5 6 6 Description of unit Battery USB connecting cable > NL Map update/Additional functions Registration Repairs Emissions and disposal General operation Maintenance and care Battery quality declaration Commissioning Power supply Memory card Unit holder Basic operation > DK >S >N > F
CONTENTS Map toolbox Route guidance Cancelling route guidance Entering/deleting a stopover Setting route options Skipping a destination Muting announcements My Route Displaying the entire route TMC on the route Point of interest on the route Blocking a route Map display Position display Repeating an announcement 36 36 36 37 37 37 37 37 38 38 39 40 41 41 42 Settings Route guidance settings 43 43 Route options Reality view Signposts Lane recommendations Announcements Country information 43 44 44 44 45 45
>>> SAFETY INSTRUCTIONS Safety instructions >D !Safety instructions > GB • Operation of the unit is permitted only if traffic conditions are suitable and you are absolutely sure that you, your passengers or other motorists are not endangered, obstructed or inconvenienced. In all cases, all applicable road traffic regulations must be obeyed. Destinations may only be entered when the vehicle is stationary. • The navigation system is only an aid. Errors may occur in individual data items/entries.
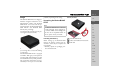
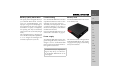
THE BECKER® MAP PILOT Usage problems, depending on the setting. The Becker® MAP PILOT is a high-performance navigation module for use in Mercedes-Benz vehicles. The Becker® MAP PILOT can be used with the optional equipment "Pre-fitting for Becker® MAP PILOT" and "Becker® MAP PILOT (incl. pre-fitting). The unit and the accessories are to be protected against moisture and dirt. Unpacking the Becker® MAP PILOT The Becker® MAP PILOT Note: Your Becker® MAP PILOT is delivered in stable packaging.
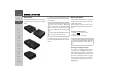
>>> >D > GB >F THE BECKER® MAP PILOT Complaints Description of unit Please check first on www.beckermappilot.com (FAQs, software updates) for possible solutions. If this should not lead to success, please contact your dealer. The Becker® MAP PILOT consists of the basic Becker® MAP PILOT unit and the supplied accessories in the delivery contents. Dealing with the packaging Note: The basic unit and the accessories must not be opened or modified in any way.
THE BECKER® MAP PILOT >>> Registration >D You can register your product using our software service. We will then inform you of any new updates and other news. > GB >F You can register online on the Becker homepage www.beckermappilot.com. >I >E The “Map and Software update” menu item is located under “Service”. >P > NL Repairs > DK The unit must not be opened in the event of damage. Please contact your dealer.
>>> GENERAL OPERATION Maintenance and care General operation >D >F The unit is maintenance-free. For proper care, a commercially available cleansing fluid for electrical devices may be applied using a soft damp cloth. >I !Danger! >E Danger to life by electrocution. Always switch off the unit and disconnect the mains power supply unit before cleaning the unit, supplied components or accessories.
GENERAL OPERATION Battery quality declaration Commissioning Memory card The capacity of the rechargeable battery in your Becker® MAP PILOT decreases with every charging/discharging cycle. Improper storage at excessively high or low temperatures may also cause a gradual deterioration of capacity. Consequently, the operating time may be substantially reduced even in the case of a fully charged battery.
>>> GENERAL OPERATION Unit holder >D The Becker® MAP PILOT is inserted in the holder in the vehicle’s glove compartment. > GB >F >I >E >P > NL To remove the Becker® MAP PILOT from the holder, push the slide at the front of the holder. Note: The slide can be pulled out. When the slide is pulled out, the Becker® MAP PILOT cannot be unlocked. This can serve as an additional protection against theft. To unlock the Becker® MAP PILOT the slide can only be inserted one way.
GENERAL OPERATION To select a menu item, you must first turn the rotary control/push button to highlight the item and then press the rotary control/push button. Note: The rotary control/push button can also be moved in 8 different directions. This is dealt with separately in the guide. Delete function In input menus you can delete characters by pressing the C button. Note: The C button is located to the right of the rotary control/push button.
>>> GENERAL OPERATION >D The navigation satellites currently available are shown in the bottom right corner. > GB If route guidance is already active, the current destination address is displayed in the bottom line. >F Using the input menu Some applications require input using the input menu. Entering characters Characters are input by selecting them with the rotary control/push button.
GENERAL OPERATION Selecting from a list Once a few letters of the desired selection have been entered, you can select your destination from the selection list. > In the input menu, push the rotary control/push button downwards. Selecting a character set/special characters You can also select different character sets for the input menu. >>> Switching between upper and lower case During free text entry, it is possible to switch between upper/lower case and the automatic function.
>>> GENERAL OPERATION Malfunctions >D Should there be a malfunction in the operating system or in the unit, they will be displayed accordingly. You can even try to correct the malfunction: > Remove, as described under “Unit holder” on page 10, the Becker® MAP PILOT from the holder. > Wait a while and insert the Becker® MAP PILOT again. or > Press (e.g. with a ballpoint pen) the reset button on the front of the inserted Becker® MAP PILOT. The Becker® MAP PILOT then restarts.
GENERAL OPERATION >>> Note: If installation does not start automatically, start the Setup.exe file in the “Content Manager” directory on the removable storage medium. >D > GB >F > Follow the instructions of the software. The Content Manager Becker® MAP PILOT can be started immediately after installation. This completes the installation procedure.
>>> NAVIGATION MODE What is navigation? Navigation mode >D The term “navigation” (lat. navigare = to travel by sea) is generally understood to mean the location of a vehicle, the determination of the direction and distance from the desired destination and the required route. Stars, prominent landmarks, compass and satellites etc. are used as navigation aids. With the Becker® MAP PILOT, the location is determined by the GPS receiver.
NAVIGATION MODE Last destinations In the last destinations, the most recent destinations and stored destinations are displayed and can be selected directly. > Select Last destinations from the main menu. If you have already entered your home address, you can start route guidance to your home address in the last destinations (Home). The destination list containing the destinations most recently travelled to as well as stored destinations is displayed in the lines below this.
>>> NAVIGATION MODE Option Meaning Show details The data for the destination is displayed. From this screen you can display the destination on the map, display the route or start the route guidance. Name entry The destination can be renamed. If the destination is given a name it is automatically protected. Protect entry The destination is protected against automatic deletion. This function is only available in the case of unprotected destinations.
NAVIGATION MODE Destination input You can enter a destination in a number of ways. > Select Enter destination from the main menu. The destination input menu will appear. Structure of the destination input menu • Enter address The various steps from selecting an address to starting route guidance can be carried out using Enter address. See “Entering an address” on page 19.
>>> NAVIGATION MODE Selecting a country >D Note: If a country of destination has already been entered it will remain until you select a different country. > GB >F Selecting an address and starting route guidance >I >E >P > NL > Select the entry containing the country of destination to access the country selection list. The selection list will appear. > DK >S >N > FIN > TR > GR > PL > Select the desired country.
NAVIGATION MODE When sufficient letters have been entered it will automatically switch to a list from which you can select the city. However, you can switch to the list before this by pushing the rotary control/push button downwards. You can then select the city from the list. Selecting the street In the Street menu field the street and house number can be entered separately.
>>> NAVIGATION MODE >D Selecting a house number After entering the destination city and street, you can enter a house number so as to further limit the choice. > GB Note: Instead of entering the house number, you can also enter an intersection. However, it is not possible to enter both at the same time. >F >I >E >P > Select No. The input menu for the house number will appear. > Enter the house number. > Select from the automatically displayed list the desired house number.
NAVIGATION MODE Showing the destination on the map > In the address input menu, push the rotary control/push button to the right. > Select On map. The map display is opened and the destination is displayed. Storing a destination > In the address input menu, push the rotary control/push button to the right. > Select Save. > Enter the desired name. The destination is transferred to the last destinations and protected.
>>> NAVIGATION MODE Entering an address using speech You can start address entry using speech from the address input menu by selecting or from the main menu by selecting PTT. Is your vehicle equipped with a steering wheel button for voice control, you can also press this button. >D > GB >F >I >E Notes: • Only one address can be entered using the voice entry function. Lists for more precise selection cannot be operated using speech. • The destination country cannot be entered using speech.
NAVIGATION MODE The following example shows a list in which a city can be selected. Points of interest Points of interest (POI for short) include airports and ferry ports, restaurants, hotels, petrol stations, public buildings. You can use points of interests as navigation destinations. > Select Enter point of interest from the destination input menu. >>> POI nearby/POI near destination > In the POI menu, select POI nearby for a POI nearby.
>>> NAVIGATION MODE >D If you have selected the category, any points of interest belonging to relevant category and available within the area in question will now be displayed. > GB >F >I >E >P The name, distance as the crow flies and the address is displayed for each entry. > Select the desired point of interest. > NL > DK Note: Push the rotary control/push button to the right for further control options. Note: If you have already entered an address, this address will appear by default.
NAVIGATION MODE Entering a POI directly > In the POI menu, select POI search by name. > Enter the desired point of interest or part of the name. > To confirm the previous input, select or press and hold the rotary control/push button. The Becker® MAP PILOT displays in a list all the points of interest corresponding to the name entered. Note: The search radius is limited to 200 kilometres around your current position. A maximum of 50 points of interest are displayed.
>>> NAVIGATION MODE >D > Select 1 to set the direction required for the geographic latitude. > From the numbers indicated by 2 select the required numbers. > GB Notes: By selecting 3 you can switch from degree to decimal input and vice versa. >F >I >E > Select . > Enter the geographical longitude as described earlier. >P > NL Route planning The route planning menu allows you to create and select individual routes. To do this, enter the individual destination points for the desired route.
NAVIGATION MODE > Select Calculate. Note: You can also select a stage in the route here. The route is then started from this stage. > Select the start point or your current position as the start point for route guidance. Note: When a start point is selected, this is only used for the purposes of displaying a route. The individual stages are calculated. A map of the stages will then be displayed. The total distance and estimated total journey time are displayed on the lefthand side.
>>> NAVIGATION MODE Editing a route > Select the route you wish to edit. > Highlight the stage that you wish to edit. > Push the rotary control/push button to the right. The edit menu will be displayed. The following options are available: >D > GB >F >I >E Option Meaning Start Start route guidance guidance from the selected stage. Show details The data relating to the stage destination is displayed. Move up / The stage is moved forwards/backwards by one Move down position.
NAVIGATION MODE Displaying TMC messages Once you have connected the Becker® MAP PILOT to the unit holder, your Becker® MAP PILOT will receive up-todate traffic announcements and dynamic route calculation will be enabled (traffic jam diversion). You can also view traffic announcements directly. Settings for TMC can be made as described under “TMC settings” on page 47. > Select TMC from the main menu. The message list appears. Reading a message > Select the desired message in the message list.
>>> NAVIGATION MODE >D Taking announcements into consideration when calculating routes > GB Your Becker® MAP PILOT can take traffic announcements into consideration when calculating a route. You have the option of setting this function to automatic, manual or never under “TMC settings” on page 47. >F >I >E >P Automatic recalculation If your route is affected by a traffic problem, the Becker® MAP PILOT checks whether a diversion to bypass the problem is feasible.
NAVIGATION MODE The map display The map display is used primarily for route guidance. However, you can also use the map display without route guidance to show your current position and, for example, to receive warnings about exceeding the speed limit. Note: The map display can show signs (e.g. speed limits). Please note that this is additional information in the map data. The reality may differ from those signs.
>>> NAVIGATION MODE Map display with route guidance >D 1 10 > GB 2 9 8 >F >I 3 6 4 7 >E 5 1 Road signs, which you should follow 2 Speed limit on the road currently be- >P > NL 3 4 > DK >S >N 5 6 > FIN 7 > TR > GR ing driven on (display not available for all roads) Driver alerts Number of satellites currently being received Display of TMC status Vehicle position Current road or Traffic lane recommendation (only appears on some multi-lane roads; green arrows = recommended lanes) Note: F
NAVIGATION MODE Split screen with route guidance 3 Note: Following the traffic lane recommendations allows you to perform the next driving manoeuvre without changing lanes.
>>> >D > GB >F >I >E >P > NL > DK >S NAVIGATION MODE Using the map display Map toolbox Route guidance Map zooming If the Autozoom function is enabled as described under “Map display” on page 41 or “Autozoom” on page 45, the map is enlarged or reduced according to these settings. However, you can also enlarge or reduce the map at any time during route guidance by turning the rotary control/push button.
NAVIGATION MODE Entering/deleting a stopover With this function, you can enter a stopover or delete an entered stopover. > In the route guidance menu, select Add stopover. You can now enter a destination as a stopover as described in “Destination input” on page 19. You also have the option of selecting a destination in the last destinations using Select from last destinations. Once you have entered the desired stopover, the route is recalculated. The entered stopover is marked on the map as a red flag.
>>> NAVIGATION MODE Displaying the entire route You can display the entire route to the destination on the map. You also have the option of displaying the complete directions and blocking particular sections/ roads of the route permanently. As a further option you can display the various routes that you can set in the route options and also select them if you wish. > In the My Route menu, select Show route. >D > GB >F >I >E >P > NL > DK >S >N The entire route is displayed.
NAVIGATION MODE The TMC messages located on your route are displayed. Once you have selected a message you can decide e.g. whether or not to divert around the hold-up. Please also refer to the description in “Traffic announcements using TMC” on page 30. Note: If you have selected the automatic function under “TMC settings” on page 47, you cannot decide whether or not to divert around the hold-up.
>>> NAVIGATION MODE >D Point of interest near destination/on complete route > Select More.... > GB >F >I >E > Select Search POI on route. or > Select POI near destination. > Select the desired category. > Then select the desired point of interest. > Start navigation to the selected point of interest. >P > NL > DK >S >N Blocking a route You can block a stretch of road ahead. This determines a certain stretch of road that should not be used. The Becker® MAP PILOT then attempts to calculate a diversion.
NAVIGATION MODE Map display You can select whether the map is to be displayed in 3D or 2D mode, in a split screen with 3D or 2D display or in arrow mode. You can also select the map angle in 3D mode and decide whether or not available 3D places of interest and house models should be displayed. > Select Map in the map toolbox. > Select the basic display using Full map, Map with Turn-By-Turn, Split screen or Turn-By-Turn. > Select the type of map display using 2D or 3D.
>>> NAVIGATION MODE By selecting Save you can store your current position in the last destinations. By selecting Country-Info you can display country-specific information such as the maximum permitted speed for the country you are currently in. >D > GB >F >I By selecting GPS-Info you can view information regarding the GPS reception. >E >P > NL > DK >S You can see how many satellites are being received, and whether the satellite reception is good enough for navigation.
SETTINGS To call up the settings, select Settings from the main menu. Settings The Settings menu appears.
>>> SETTINGS Option >D Short > GB >F Meaning With this option, the shortest route in terms of mileage is calculated. > Select 3 to exclude various types of road (e.g. motorways, ferries and toll roads) from the route calculation.
SETTINGS Announcements You can specify whether street names are to be announced and whether the updated time of arrival is to be announced. Note: This function is not available for all languages/voices. If the function is not available, the function cannot be selected. Map settings >D The map settings contain the settings that are relevant to the map display. > In the settings menu, select Map settings. > Select Announcements in the route guidance settings. > Switch the desired function on or off .
>>> SETTINGS >D After selecting Advanced you can specify whether all POI symbols or only a set of POI symbols selected by you are to be displayed on the map. > GB >F Driver alerts You can have signs displayed, e.g. for dangerous curves or steep gradients, provided this information is stored in the map data. Speed limits >I You can select whether speed limits are displayed in parallel to the navigation. You can also receive an audible warning about exceeding the speed limit.
SETTINGS TMC settings System settings You can make settings for the reception and processing of TMC traffic announcements. > In the settings menu, select TMC settings. You can change various basic settings for the Becker® MAP PILOT. > In the settings menu, select System settings. 1 1 2 2 >>> >D > GB >F >I > With 1 specify whether new TMC messages are to be read out automatically (on or off ). > With 2 tune to the desired TMC station. >E >P > NL The system settings are displayed.
>>> >D > GB >F >I >E SETTINGS Design variants Map update reminder You can choose between two different design variants for displaying the day design. > Select Design variants in the system settings. > Select the desired variant. You can turn off the automatic reminder for a map update. > Select Map update reminder in the system settings. > Switch the automatic reminder on or off .
SETTINGS >>> Factory reset You can reset your Becker® MAP PILOT to the factory settings. All settings apart from the language are reset to their factory settings. The last destinations and your home address are also deleted. > Select Factory reset in the system settings. > Select Yes. The Becker® MAP PILOT is reset to the factory settings.
>>> GLOSSARY GMT (Greenwich Mean Time) Central European time Standard time at degree of longitude 0 (the degree of longitude through Greenwich, Great Britain). This time is used all over the world as the standard time for synchronising data acquisition. Glossary >D > GB >F >I >E GPS (Global Positioning System) GPS uses satellites to calculate your current geographical position. It is based on a total of 24 satellites orbiting the Earth and emitting signals.
Index INDEX Numerics E L 3D display . . . . . . . . . . . . . . . . . . . . . 41 Last destinations . . . . . . . . . . . . . . . .17 Alternative routes . . . . . . . . . . . . . . . . 22 Economical route . . . . . . . . . . . . . . . . 43 Entering a city . . . . . . . . . . . . . . . . . . 20 Entering an address . . . . . . . . . . . . . . 20 Entering an address using speech . . . . 24 B F A Blocking . . . . . . . . . . . . . . . . . . . . . . 40 Blocking a route . . . . . . . . . . . . . . . .
>>> INDEX R Restrictions Ferries . . . . . . . . . . . . . . . . . . . . Motorways . . . . . . . . . . . . . . . . Toll roads . . . . . . . . . . . . . . . . . Route guidance Cancelling . . . . . . . . . . . . . . . . . Starting . . . . . . . . . . . . . . . . . . . Route guidance settings . . . . . . . . . . Route options . . . . . . . . . . . . . . . 37, Route planning . . . . . . . . . . . . . 19, >D > GB >F >I >E >P 44 44 44 36 23 43 43 28 > NL Stopover Deleting . . . . . . . . . . . . . . . . . .
NOTICE >>> Dear customer, In conformance with current EC guidelines, any person may operate this unit. This unit conforms to the current valid European or harmonised national standards. This designation is your guarantee that the unit conforms to the applicable specifications regarding electromagnetic compatibility. This means that interference with other electrical/electronic devices caused by the unit, or interference with this unit caused by other electrical/electronic devices is largely prevented.
>>> NOTICE Disposal >D Customer information on the disposal of electrical and electronic devices (private households) In accordance with the self-imposed principles of Harman/Becker Automotive Systems GmbH, its product was developed and made from high-quality, recyclable materials and components. This symbol on the product and/or accompanying documents means that at the end of their life electrical and electronic products must be disposed of separately from domestic waste.
NOTICE >>> Disposal of the battery >D Duty to supply information according to battery legislation (BattV) > GB Batteries must not be disposed of in household waste. It is the duty of the user to return used batteries. Please only dispose of batteries via specialised dealers or at battery collection points. In this way, you make a positive contribution to environmental protection.
>>> NOTICE >D > GB 2 >F 1 >I >E 3 >P > NL > DK >S >N > Completely discharge the battery. > Press the battery cover on the underside of the unit 1 lightly and push the battery cover in the direction of the arrow. > Lift the battery 2 by the tab 3 . > Remove the battery 2 . > FIN > TR > GR Note: Do not reconnect a unit that you have opened to the power supply.