OPERATING GUIDE
Contents >>> CONTENTS Warranty Safety instructions The Navigation device Operating manual contents Use of the product Navigation >D > GB >F Images* Telefon (selected models) >I > PL Unpacking the Navigation device 9 10 10 Checking the contents Overview of functions Scope of delivery Complaints Handling the packaging 10 10 11 11 11 Description of the device 11 The basic unit Cable for power supply from cigarette lighter Battery USB connection cable Unit bracket Accessories Mains power supply uni
CONTENTS Content Manager Installing the Content Manager Starting the Content Manager Transferring pictures Faults Navigation Mode What is navigation? Selecting Navigation Home address Smart Guess Last destinations list The destination list Icons used Operating the last destinations list Start with existing destination Scrolling through stored destinations Displaying or editing a destination Personal destinations Contacts Selecting a destination from Personal destinations Editing Personal destinations Sele
>>> CONTENTS >D Traffic announcements using TMC (depending on the model) Displaying TMC messages on the map Using TMC Reading a message Taking announcements into consideration when calculating routes Automatic recalculation Manual recalculation > GB >F >I > PL The map display Calling up the map display Structure of the map display Map display without route guidance Map display with route guidance The Information box Split screen with route guidance Route guidance with arrow display Map display with Jun
CONTENTS Country information Blocking a section of the road permanently Trip computer (depending on model) Settings Selecting system settings The system settings menu Operation Selection options Closing the settings menu The individual menu items Battery Automatic on/off Day/night display Brightness Design by day Design by night Setting the colour Language Sounds Driver profiles (depending on model) Renaming driver profile Deleting driver profile Service information Factory settings Calibration Technical t
Warranty >>> WARRANTY 24-month warranty >D The company United Navigation GmbH, Marco-Polo-Str. 1, 73760 Ostfildern, Germany, provides a world-wide, 24-month warranty (battery: 6 months) for BECKER units, beginning on the day of delivery to the final customer (buyer).
SAFETY INSTRUCTIONS >>> Safety instructions ¤ >D Safety instructions • Use of the device is only permitted if the traffic conditions are suitable and you are absolutely sure that its use presents no risk, distraction or inconvenience to you, your passengers or other road users. Traffic laws and regulations will apply in each and every case. Destinations may only be entered when the vehicle is stationary.
>>> SAFETY INSTRUCTIONS >D • It is forbidden to exceed the supply voltages (Volts) specified for the mains adapter, the motor vehicle charging adapter and the product. In case of non-observance, the product or the charger may be damaged, or the battery may explode. > GB • Do not open the product or the battery under any circumstances. No modifications of the product are permitted, any such modification leads to the loss of the operating permission. >F >I • Only use original BECKER accessories.
THE NAVIGATION DEVICE The Navigation device Operating manual contents Use of the product Navigation This operating manual contains the description of your Becker navigation equipment. This manual contains descriptions for different model versions in a single document. Therefore, some of the functions described here might not be available for your equipment under certain circumstances. This product is a high performance PND (Personal Navigation Device) for use in vehicles.
>>> THE NAVIGATION DEVICE Telefon (selected models) >D Your Navigation device is equipped with Bluetooth® wireless technology. Via Bluetooth®, you may connect to a cell phone equipped with Bluetooth® wireless technology. > GB >F Your Navigation device can then be used as a very comfortable hands-free unit. You also have the option to read out the address book or phonebook of the cell phone and to read any received short messages.
THE NAVIGATION DEVICE Complaints Scope of delivery In case of complaints, please consult your dealer. The equipment may be sent directly to United Navigation in its original packaging. 2 2 Handling the packaging 4 1 3 Navigation device Device console with carrier plate (depending on model) 3 USB cable 4 Motor vehicle adapter power supply 12/24 V for cigarette lighters with built-in TMC antenna (depending on model) 1 2 Keep the original packaging in a dry place, at least for the warranty period.
>>> THE NAVIGATION DEVICE The basic unit >D The basic unit consists of the complete electronic unit: • Integrated antenna • a TMC receiver for receiving traffic messages (depending on the model), • Touchscreen • an integrated loudspeaker • a microphone (dependingon the model). On the side of the unit, there are also various connections and ports.
THE NAVIGATION DEVICE Cable for vehicle integration (for certain models only) With a 4-pin 2.5mm jack cable you can integrate your Navigation device seamlessly into your vehicle. Details of the connection can be found under "Cable for vehicle integration (depending on model, optional)" on page 21. Information about the documentation Quick Start Guide The Quick Start Guide is designed to provide a brief introduction to operating your Navigation device.
>>> OVERVIEW OF THE SCOPE OF DELIVERY >D > GB 3 >F 3 >I > PL 4 2 Scope of delivery 1 Basic device – PND (Personal Navigation Device) 2 USB connection cable 3 Unit holder with carrier plate (the design depending on the model) 4 Cable for power supply via the vehicle cigarette lighter (12/ 24 Volt) with integrated TMC-antenna (depending on the model) Overview of the scope of Delivery 14 1
OVERVIEW OF THE NAVIGATION DEVICE >>> >D 2 > GB >F >I > PL 3 4 5 1 Front of unit with controls and displays 1 Back button Press = Back function in most applications Press and hold = Open the main menu 2 Touch screen showing the main menu selected 3 Touch screen key Press = activates the corresponding key command 4 Microphone (depending on the model) Overview of the navigation device 5 Rear of unit 15
>>> OVERVIEW OF THE NAVIGATION DEVICE >D > GB >F >I > PL 1 Top of the unit 1 ON/OFF switch 16 2 3 Underside of the unit 2 Slot for Micro SD card 3 Mini USB connection / connection for power supply
GENERAL OPERATION Maintenance and care General operation The unit is maintenance-free. For proper care, a commercially available cleansing fluid for electrical devices may be applied using a soft damp cloth. ¤ Danger! Danger to life by electrocution. Always switch off the unit and disconnect the mains power supply unit before cleaning the unit, supplied components, or accessories. Note: Do not use any aggressive or abrasive substances or cloths which may damage the surface.
>>> GENERAL OPERATION >D > GB >F >I > PL 18 Battery quality declaration Display quality declaration The capacity of the rechargeable battery in your mobile navigation system decreases with every charging/ discharging cycle. Improper storage at excessively high or low temperatures may also cause a gradual deterioration of capacity. Consequently, the operating time may be substantially reduced even in the case of a fully charged battery.
GENERAL OPERATION Using the battery Connection for the cigarette lighter The internal power supply is via the integrated rechargeable battery. The rechargeable battery is maintenancefree and does not require any particular care. Note: If the cigarette lighter has recently been used and is still hot, wait until the lighter socket has cooled down. Note: Note that if the battery is completely discharged, it may take up to a minute before the device can be switched on again.
>>> GENERAL OPERATION Connection to the mains outlet >D ¤ > GB Danger! Make sure that your hands are not wet and that the power supply unit is dry. Only connect the power supply unit to a permissible mains power supply. >F >I > PL Connecting to power supply Connection to the public mains grid is achieved using the optionally available mains power supply unit.
GENERAL OPERATION Cable for vehicle integration (depending on model, optional) With a 4-pin 2.5mm jack cable you can integrate your Navigation device seamlessly into your vehicle. • connect your Navigation device to the phone mute function of your audio system. If the cable is connected correctly, your audio system will mute the car radio during navigation announcements. • connect your Navigation device to your audio system for output of the audio signal.
>>> GENERAL OPERATION Inserting the memory card > Remove the memory card from its packaging without touching or soiling the contact bar. > Hold the memory card so that the contact strip is facing towards the rear of the unit. > Guide the memory card into the card slot. > Exert a little pressure and slide the memory card into the card slot until it snaps in. >D > GB >F >I > PL Ejecting the memory card The card slot ejects the card so that you can pull it out with two fingers.
GENERAL OPERATION 7 2 3 6 4 1 2 3 4 6 7 1 Suction surface Base Lever Fastening screw Carrier plate Release button 7 2 6 1 3 4 >>> On the windscreen The unit holder can be attached directly to the windscreen using the suction mechanism. > Press the carrier plate onto the four retaining lugs of the unit holder. > Select a suitable spot to attach. > Loosen the fastening screw 4 slightly. > Press the base 2 with its suction surface 1 against the windscreen.
>>> GENERAL OPERATION Adjusting the unit holder’s position > Loosen the fastening screws 4 and 5 until the carrier plate 6 can be moved without using excessive force. > Move the carrier plate 6 to the required position and hold it in this position. > Tighten the fastening screws 4 and 5 sufficiently so that the Navigation device is held securely in place when the vehicle is in motion.
GENERAL OPERATION > Press the button for the required language. > The selection is confirmed by pressing OK. > Then select the desired voice. Note: for models with TTS Voices with a (TTS) tag support the textto-speech function (e.g. announcing roads and reading out text messages). A short example announcement is given. > Confirm your selection by pressing the OK button. The following prompt appears shortly afterwards: > If you agree to the request contained in this prompt, press the OK button.
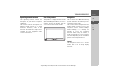
>>> GENERAL OPERATION >D Basic information about the touch screen > GB The Navigation device is fitted with a touch screen. >F >I > PL Operation When you touch a button on the touch screen, the button in question is briefly shown outlined in red to confirm the selection. If you touch a button that is not active at the moment, a short signal tone sounds. Calibration If the touch screen starts responding imprecisely, calibration should be undertaken.
GENERAL OPERATION You can tell whether a telephone is already connected by the symbol on the Phone button. 2 1 1 2 Entries made with the entry menu >D Some applications require entries to be made via the entry menu. The entry menu is operated in a similar way to a keypad. > GB >F Telephone connected Telephone not connected A satellite symbol on the left-hand side of the New destination button indicates whether there is currently any GPS reception.
>>> GENERAL OPERATION >D Entering characters Characters are entered by pressing the keys in the central area. > GB >F >I > PL Once the entry is complete, the process is concluded by pressing the key and the entry passed on to the Navigation device for processing. When a navigation destination is entered, the Navigation device compares the data with the stored data. Only those letters that are still possible area vailable for selection. Characters that cannot be selected are displayed greyed out.
GENERAL OPERATION The selection list appears. >>> Other character sets Different character sets can be selected for the keyboard of the Navigation device. >D > GB >F > Press the arrow keys on the right hand side of the screen to scroll through the list. > Press the destination you want. The destination is adopted and the selection list is closed. Special characters and accent marks Special characters and accent marks do not have to be used when entering the names of towns and streets.
>>> GENERAL OPERATION Entering numbers Switch to the numbers keyboard in order to enter figures. > Press the button. The numbers keyboard is displayed. >D > GB >F Switching between upper and lower case: During free text entry, it is possible to switch between upper/lower case and the automatic function. Deleting characters To delete the last character, use the back key. >I > PL > In order to return again to the keyboard for entering letters, press the button marked with an arrow.
GENERAL OPERATION The back button The is integrated in the bottom left hand corner of the casing. It has various functions: • Depending on the menu context, if pressed briefly, you will be returned to the previous entry level. • The main menu is displayed by pressing and holding the button. Radio remote control >>> This unlocks the base plate, which can now be removed. >D Note: It is not absolutely essential for the function of the Navigation device to install the remote control.
>>> GENERAL OPERATION Removing the remote control >D You can remove the remote control again, to change the battery for example. > GB >F >I > PL > Position the base plate so that the word UP is pointing in the direction of travel. > Secure the base plate using the supplied screws or self-adhesive film. Note: If you wish to stick the base plate in place, you will first need to clean the adhesive surfaces. 32 > Press the remote control onto the base plate.
GENERAL OPERATION Connecting the remote control to the Navigation device Connecting for the first time > Switch on the Navigation device. 2 Replacing the battery If the Navigation device stops responding to commands from the remote control, the battery in the remote control is probably dead. ¤ 3 1 > Press the button 1 on the remote control. The connection to the Navigation device is established.
>>> GENERAL OPERATION >D Operating the Navigation device using the remote control You can control most functions and the main functions of the Navigation device using the remote control. It is provided with five buttons and a control ring. The main functions of the individual remote control buttons are: > GB >F >I > PL 6 1 5 2 4 3 Butto Basic function n Opens the map display. Opens 1 the options menu for the map display if the map is already active. Starts the telephone mode.
GENERAL OPERATION Content Manager Installing the Content Manager The Content Manager is a PC-based application containing a number of important functions to help you manage the content on your Navigation device. With the Content Manager you can: • back up the content saved on the Navigation device to your PC and restore it later to your Navigation device, • download current content from the Internet and install it on the Navigation device.
>>> GENERAL OPERATION Starting the Content Manager >D Execute the following actions to start the Content Manager: > GB >F >I > PL Switch on the Navigation device. Note: When you connect the Becker Navigation device to the PC for the first time, the PC installs all the necessary drivers and then displays the message "Your unit is now ready to use". After a short time, the Navigation device is displayed as a removable storage medium on the computer. 36 > Click on Start > All Programs on the computer.
GENERAL OPERATION Transferring pictures Faults Images*, music* and videos* can be stored on a separate Micro SD memory card (not included in the scope of delivery) or in the internal memory of the Navigation device in the "Media" folder. Files can be transferred via a card reader or a USB connection. Malfunctions in the operating system or in the unit are displayed accordingly. If the function you want cannot then be executed, you should restart the Navigation device using the On/Off switch.
>>> NAVIGATION MODE What is navigation? Navigation Mode >D The term "navigation" (lat. navigare = to travel by sea) is generally understood to mean the determination of a vehicle’s location, the determination of its direction and its distance from the desired destination and the required route to get there. Stars, prominent landmarks, compasses and satellites etc. are used as navigation tools. With the Navigation device, the location is determined by the GPS receiver.
NAVIGATION MODE Selecting Navigation >>> Note: The menu items Set current position and Select from last destinations (fast access mode) can also be used to select a destination. Navigation mode is called up from the main menu. New destinations can be entered in the menu "New destination". Destinations that have already been visited or saved can be selected in the menu My destinations.
>>> NAVIGATION MODE Last destinations list >D > GB >F >I Here you can set the new home address for example using an intelligent text entry field. > PL Smart Guess The two addresses that can be selected with the button, is a selection of the addresses last visited. Depending on the time of day and your current position, the two most likely destinations are displayed and can be selected directly.
NAVIGATION MODE Icons used The following icons are used in the destination list: Icon Meaning This destination is a standard destination with no special features. This destination is protected. If the destination memory is full, this destination will not automatically be deleted. This can be performed manually, if required. In the case of a protected entry, you can also determine the position using the fast access function.
>>> NAVIGATION MODE Option Meaning Protect entry The destination is protected from automatic deletion. This function is only available for unprotected destinations. Remove The protection is reprotection moved from the destination. This function is only available for protected destinations. Move up The destination is moved forwards by one position. If the destination is moved it is automatically protected. Move down The destination is moved back by one position.
NAVIGATION MODE A list of the available destinations will be displayed. Using the buttons or the scroll wheel, it is possible to scroll through the list. Note: If the list contains numerous entries, it may be a good idea to search for the desired destination by selecting Search entry and using the input menu. A maximum of 1000 destinations can be imported. Newly imported destinations are filed at the start of the list. > Select the desired destination.
>>> NAVIGATION MODE 10 entries, a list of contacts is displayed straight away. > In the input menu, select the first letters of the entry you are looking for. > Press the button when the name you want is displayed in the top line. If there are 5 or fewer entries available with the letter combination entered, a list containing these entries will automatically be displayed. >D > GB >F >I > PL Note: You may also first have a list displayed that corresponds to the letter combination entered.
NAVIGATION MODE Layout of the New destination menu Enter address The various steps from selecting an address to starting route guidance can be carried out using the Enter address button. • See "Entering the address" on page 45. Select Point of Interest Points of interest such as airports and ferryports, restaurants, hotels, petrol stations or public buildings can be selected and route guidance started using the Select Point of Interest button. • See "Points of interest" on page 52.
>>> NAVIGATION MODE Selecting a country You can select a country from those available using the button for the country of destination. A country is adopted automatically in the address input menu after selection. If a country of destination has already been entered it will remain until you select a different country. >D > GB >F >I > PL > Press the button containing the country of destination to access the country selection list. The selection list appears. > Press the button for the desired country.
NAVIGATION MODE Selecting a town The destination can be entered by either using the name or ZIP code. When you enter the letters of a place, the navigation device displays suggestions (See "Accepting proposals" on page 28). If you do not want to accept the proposal, just enter the other letters of the location you want. The Navigation device excludes all impossible letter combinations and ZIP codes and activates only letter fields or numerical fields that lead to an existing location or ZIP code.
>>> NAVIGATION MODE Selecting the street In the Street menu field the street and house number can be entered separately using a letter and number field. The Navigation device excludes all impossible letter combinations and activates only those letters that could give an existing street name. A house number can only be chosen once the street has been selected and if house numbers are included in the data.
NAVIGATION MODE Selecting a house number After entering the destination town and street, you can enter a house number so as to further limit the choice. Note: Instead of entering the house number, you can also enter a junction. However, it is not possible to enter both at the same time. > Press the No. button. The input menu for the house number will appear. > Enter the house number and then press the button.
>>> NAVIGATION MODE Note: The symbols above the progress bar refer to restrictions that you may have activated (e.g. unpaved roads, toll roads). >D > GB >F >I If the route guidance is already running and a waypoint has already been entered you will be asked whether the new destination should replace the old destination or the waypoint.
NAVIGATION MODE If your entry is unique, after a short time the menu for entering addresses will be displayed with your entry filled in. Entering address by speech (selected models) You can start the spoken address entry from the address entry menu by pressing the button. Notes: • Only one address can be entered using the voice entry function. Lists for more precise selection cannot be operated using speech. • The destination country cannot be entered using speech.
>>> NAVIGATION MODE If your entry was not unique or the Navigation device was not able to uniquely assign your entry, you will be shown appropriate lists. You can then select the address you want from these lists. Depending on your entry, lists with town names, lists with street names or combined lists with town and street names can be displayed. >D > GB >F >I > PL Note: Voice entry can be restarted at any time in the lists by pressing the button.
NAVIGATION MODE Note: You can also press the All categories button. An input menu will then open and you can enter the name of a point of interest directly and confirm it. You can choose between: • a point of interest in the vicinity, • a point of interest near to an address, • a point of interest near to a destination, • a point of interest along the route or • entering a point of interest directly. Point of interest in the vicinity > Press the POI nearby button.
>>> NAVIGATION MODE >D Point of interest near to an address > Press POI near location. > GB >F The available Points of interest categories for the city entered will be displayed. > Select the desired point of interest as described under "Point of interest in the vicinity" on page 53. >I > PL By pressing of the button next to the selected POI, you can display the additionally available information for the destination. Point of interest near to destination > Press the POI near destination button.
NAVIGATION MODE Entering a point of interest directly > Press the POI search by name button. > Enter the desired point of interest or part of the name. > Press the button. The Navigation device displays in a list all the points of interest corresponding to the name entered. > Select the desired destination in the list. You will now receive additional information about your chosen destination. >>> > Press the Start to begin route guidance to the point of interest straight away.
>>> NAVIGATION MODE >D Additional point of interest information Any additional information that is provided for a point of interest can also be displayed. > GB >F >I > PL To display the additional information, press the More button shown at the bottom of the point of interest information screen. You can scroll through the displayed text using the arrow buttons or the scroll wheel.
NAVIGATION MODE > Press the Select button. > Press the desired point lightly on the surface of the screen. A flashing red cross will be displayed at this point. Note: By pressing the GPS Position you can display your current position again. Where available, the address of your chosen point is displayed. > Press the Start button to begin route guidance to the destination straight away. You can also search for points of interest in the vicinity of your chosen point using the POI nearby button.
>>> NAVIGATION MODE Coordinate entry >D You can also enter your destination using geographic coordinates. > In the main menu, press the button New destination. > GB >F >I > PL > Press Enter geo-coordinates. 1 2 3 > Using 2 select the value you wish to change. > Using the two buttons indicated by 1 select the direction required for the geographic longitude and latitude (east/west or north/south). 58 > Then enter the desired values using the buttons to .
NAVIGATION MODE By pressing Add stage you can now add a stage to the route. After pressing Rename route you can give the route a new name. Pressing Delete route will allow you to delete the route from the stored routes. Route planning The route planning menu allows you to create and select individual routes. To do this, enter the individual destination points for the desired route. It is then possible to travel to these points consecutively without having to enter any further information.
>>> NAVIGATION MODE You can call up the route options using the Options button. >D > GB >F >I > Select the start point or your current position as the start point for route guidance. > PL Note: If a start point is selected, this is only used to view a route. The individual stages are calculated. A map of the stages will then be displayed. > Press the Start button to start guidance for this route.
NAVIGATION MODE Notice (depending on model): Here you can define a loading time. This, in turn, has an impact on the calculations of the arrival time for the subsequent destinations of the route. > Enter the loading time in hours and minutes using the buttons. If you do not want to set any loading time, press the No loading time button. >>> Editing a route > Select the route you wish to edit. > Press the button in front of the stage you wish to edit.
>>> NAVIGATION MODE Option >D Move down > GB >F Delete stage >I Replace stage > PL Meaning The stage is moved backwards by one position. The stage is deleted from the route. You can replace the selected stage with another intermediate destination. Optimising a route If you have entered several destinations for a route, you can use the Navigation device to optimise the order of the destinations for the journey distance. The route stored is retained even after optimization, however.
NAVIGATION MODE This will take you to the navigation settings menu. Configuration Various pages containing functions are available in the menu: The Map view button You can select whether the map is to be displayed in 3D or 2D mode, in a split screen with 3D or 2D display or in arrow mode. You can also select whether or not 3D buildings available in towns should be displayed in 3D mode. Further setting options are available to you in the extended settings.
>>> NAVIGATION MODE >D > GB >F >I > Press the button 3 for arrow mode. > PL To call up the extended settings, press the Advanced button. 64 The following setting options are available in the extended settings: • Auto zoom You can select how the map changes when approaching an action point or at different speed. • Select POI categories You can select which symbols are displayed for points of interest on the map.
NAVIGATION MODE Auto zoom > Press the Auto zoom button in the extended settings. Pressing the Auto zoom button switches the zoom function on ( ) or off ( ). When the zoom function is switched on, you can select whether the autozoom action should be weak, medium or strong. >>> Select POI categories You can select which POI symbols are to be displayed on the map. > Press the Select POI categories button in the extended settings. Selecting Show all POIs displays all points of interest on the map.
>>> NAVIGATION MODE Under these options, you can select displays for the travel without a selected route. Here you can only select between Speed, Speed limit, Time and Height. >D > GB >F >I Touch the first field to select one of the possible options. An options list appears on the right side over the window. > PL 3D city view With this option, you can select whether or not 3D buildings available in towns should be displayed in 3D mode or not.
NAVIGATION MODE The Route overview button The Guidance info button With the options in this setup menu you can select the Points of Interest to be displayed and whether TMC reports are displayed in the map view when pressing the Route overview button. > Activate the option All Destinations. In the Guidance info settings window you can select which additional information you would like displayed during route guidance. > Press the Guidance info button in the settings menu.
>>> NAVIGATION MODE Setting Meaning Signposts When this function is activated, you receive additional important information at traffic junctions about the sign you should follow. SituationSca When this function is n activated, you receive help from assistants in certain traffic situations, such as avoiding a traffic jam or selecting parking spaces at the destination.
NAVIGATION MODE The Route options button You can edit your driving profile in the Route options settings window. The settings made here have an effect on the route selection and on the calculation of the estimated journey times. > In the settings menu, press the Route options button. Selecting the vehicle profile (depending on model) This setting influences the calculation of the expected time of arrival and blocks e.g. motorways for the bicycle setting.
>>> NAVIGATION MODE >D The window for selecting the maximum speed is displayed. > GB >F >I > PL Select a speed and exit the speed menu with the back button . > Exit the vehicle selection menu, too, with the back button . The selected vehicle type is now displayed. The required profile is displayed once selected. Truck and mobile home functions (depending on model) You can select or set the vehicle profile.
NAVIGATION MODE You have different operation options in the car or truck profile menus displayed. You do not have any further setting options for all other profiles. For the car profile: Setting truck profiles Notes: This function is only available with models with optimized route navigation for trucks, busses and mobile homes. > Select one of the saved truck profiles or the general truck profile.
>>> NAVIGATION MODE >D 1 > GB >F >I > Use the 1 button to select whether there is a trailer ( ) or not ( ). > Select the total number of axles. > Confirm your settings by selecting . > PL Setting weight > In the profile settings, press the button for setting the weight. > Press the button next to the weight to be entered. An entry menu will appear. > Enter the desired weight. > Confirm the entry in the entry menu by pressing .
NAVIGATION MODE Feedback after route calculation When calculating the route, the best possible route is selected by taking the vehicle or loading specifications into consideration if possible. The route might vary considerably from the car route as regards distance, journey time or routing. If a destination cannot be reached without taking the predefined restrictions into consideration, this will be displayed after the route calculation.
>>> NAVIGATION MODE described in the chapter "Feedback after route calculation". You have the following options: 1 Press the button to close the message. 2 enlarge the display area if another restriction lies ahead of you. The message will close automatically once you have left the critical area. In addition, the message closes automatically when you approach a new road section with a restriction.
NAVIGATION MODE Time-dependent route guidance If this function is switched on ( ), information (statistical information) on the possible speed on certain segments at certain times of the day is also taken into account in the route calculation, provided this is available. This provides a more accurately calculated arrival time and may even result in a different route being selected. Avoiding particular types of road After pressing the button Avoid you can exclude various types of road, e.g.
>>> NAVIGATION MODE Setting >D Rerouting > GB >F >I > PL Meaning This button allows you to choose whether the route change should be made Never, Automatically or Manually. (See "Taking announcements into consideration when calculating routes" on page 86.) The setting Never is equivalent to switching off the TMC function. > Confirm your settings by pressing the button. An automatic search procedure presets the transmitter with the best reception.
NAVIGATION MODE Setting the Voice In the Voice settings window you can set the voice that will make the navigation announcements for the language that has been set. > In the Voice guidance settings window, press the Voice button. The Voice settings window appears. Setting the Volume With the Volume settings window, you can set the standard volume for voice announcements for each start of the Navigation device, or switch off voice announcements completely.
>>> NAVIGATION MODE • Driver alerts (depending on the >D > GB >F >I el) ) You can have signs displayed, for example for dangerous curves or steep gradients, provided this information is stored in the map data. You can let yourself be warned about loading and vehicle-specific restrictions (e.g. height, weight, restrictions for hazardous materials). • Speed info You can select whether speed limits are displayed in parallel to the navigation.
NAVIGATION MODE The following signs are available in the individual categories: • Curve warnings This category includes warning signs that relate to sharp curves. • Traffic regulations This category includes other traffic regulations, such as no passing zones. • General warnings This category includes all other warning signs, such as steep gradients, falling rocks. • Informatory road signs This category contains the available information signs. > Confirm your settings by pressing the button.
>>> NAVIGATION MODE Setting Speed info The Speed info settings window allows to select whether speed limits are displayed in parallel to the navigation. You can also receive an audible warning about exceeding the speed limit. >D > GB >F >I Note: This information can only be displayed if it is contained in the map material. > PL ¤ Setting Out of city The following settings are available.
NAVIGATION MODE The Blocked roads button In the Blocked roads settings window you can unblock previously permanently blocked roads (See "Blocking a section of the road permanently" on page 124) or modify the block (time and days of week of block). > In the settings menu, press the Blocked roads button. A window is displayed containing the roads that have previously been blocked.
>>> NAVIGATION MODE Note: Press the Block 24 h, button to set a block for an entire day. Press the Use setting for... button to also use the block on other days. >D > GB >F > Confirm your settings by pressing the back button . >I > PL The Vehicle data button This menu allows the calculation of an economic route by using the fuel consumption of the vehicle. > Press the Vehicle data button. > Press the Extra-urban button to enter the average fuel consumption of the vehicle outside cities.
NAVIGATION MODE The Format button The Time button In the Format settings window you can set the measurement units to be used for times and distances. > In the settings menu, press the Format button. You can select the time zone relevant for your location in the Time settings window. This setting is important for the correct calculation of the estimated time of arrival. > Press Time in the settings menu. The Format settings window appears. The Time settings window appears.
>>> NAVIGATION MODE The Reset button >D You can reset the navigation settings to their factory settings. The settings will then be reset. The fast access mode data, stored routes, blocked routes, voice and home address are retained. > GB >F >I > PL > Press the Reset button. > Press the Yes button. The navigation settings are reset to their factory settings.
NAVIGATION MODE Displaying TMC messages on the map Using TMC Current TMC messages are displayed on the map graphically. Sections of the route where there are traffic problems are highlighted blue. Arrows indicating the traffic direction which is affected by the traffic problem continue to be displayed. When the Navigation device has been attached to the carrier plate (power supply with the integrated TMC antenna connected), your Navigation device will receive up-to-date traffic announcements.
>>> NAVIGATION MODE The part of the route with the travel direction 4 If a TMC message lies on your route, the message is indicated by the sign . Traffic announcements received via Premium-TMC are indicated by the symbol. 3 >D > GB >F >I > PL 5 A red twisted arrow next to the traffic report warns for traffic jams that need to be avoided. If the arrow is grey and crossed in red colour , there is no sensible byroad available to avoid the traffic jam.
NAVIGATION MODE If, after displaying the traffic message, the navigation system detects that a sensible alternative route is possible, the following display appears. Note: This display may also appear if, for example, a previously obstructed route is now free again. The red route or route marked blue for an obstruction shows the previous route. The route marked yellow displays the alternative route calculated.
>>> NAVIGATION MODE >D > GB >F The map display will then appear and, if GPS reception is available, will show your current position. If route guidance is already active, the map will be displayed with route guidance. 1 Structure of the map display 4 5 6 7 >I > PL The structure depends on the settings made in "Map display options" on page 96 or in "The Map view button" on page 63 and whether route guidance is active or not.
NAVIGATION MODE Your current position is displayed on the map via the position icon. The Information box During route guidance you can have information displayed in the Info box. 1 2 If you press the Info box again, more or less fields are displayed. At least one field and a maximum of three fields can be displayed. The information displayed depends on the settings that are selected in the Navigation settings in the map view menu > Advanced > Info box data fields.
>>> NAVIGATION MODE Split screen with route guidance >D 14 > GB 1 7 13 3 >F 8 11 >I 2 15 4 12 6 > PL 10 1 2 3 4 5 6 7 9 5 Speed limit on the road currently being driven on (display not available for all roads), signs for the driver alerts will also be displayed Driver alerts (depending on the model) Zoom buttons Vehicle position Power level/telephone status (depending on the model) Button for calling up the options Traffic lane recommendation (only appears on some multi-lane roads; green
NAVIGATION MODE 10 Traffic lane recommendation (only appears on some multi-lane roads; green arrows = recommended lanes) Note: If you follow the lane recommendation, the next driving maneuver is possible without changing lanes. 11 Current street or street to which the Map display with Junction view You can display a detailed and realistic view of the lane situation at many motorway junctions. To do this, switch on the Junction view function as described under "The Guidance info button" on page 67.
>>> NAVIGATION MODE Note: The tunnel view provides a schematic view of the route layout of the tunnel. The whole tunnel layout, the first route section and the vehicle position are displayed. Since there is no GPS signal during the travel through the tunnel, the displayed position is only calculated. >D > GB >F >I > PL Using the map display Repeating the last announcement During route guidance, the system announces important information, e.g. the next driving manoeuvre.
NAVIGATION MODE An x now appears next to the speaker symbol . With pressing the button, you can make the volume control elements disappear. > Press again the speaker symbol in the preview area to mute the voice again. ¤ Warning! Always adjust the volume so that you can still hear any ambient noise while driving. The bar display disappears again automatically after a short while if no button is pressed. Map zooming The map can be zoomed into in steps by using the zoom buttons. > Press the button.
>>> NAVIGATION MODE Map orientation When a route is activated, the map view can be oriented in different ways. If you have selected a 2D view in the Navigation settings in the map view (see page 64), this pertains to the compass direction only. > Press the 2D map view on the display a little longer. >D > GB >F >I > PL You can orient the map for example in the direction of travel. If you have selected a 3D display for the map view, the vertical display angle can be adjusted, too.
NAVIGATION MODE number of TMC announcements and POIs are displayed. > Press one or more buttons to display TMC events or POIs. A list of POIs and, if applicable, TMC events is displayed with the expected arrival time and distance from the current vehicle position. > Press the desired Point of Interest or TMC event. Information such as the address and the telephone number of the POIs or the type of traffic obstruction are displayed.
>>> NAVIGATION MODE lot to the destination are governing for the selection. > Touch a parking possibility on the map to select it. You can then have the route leading there displayed and the route guidance started. You can have the device lead you to the destination in pedestrian mode at the arrival at the parking place. >D > GB >F >I > PL Map display options In the map display options, you can change the settings for route guidance, the map display and the route.
NAVIGATION MODE Displaying the whole route (Only available when route guidance is active.) You can have the whole route to the destination displayed on the map. Additionally, you can have a complete route description displayed. As a further option, you can display and, if needed, select the different routes that can be set in the Route options. > Call up the options menu for the map display.
>>> NAVIGATION MODE >D > Select Block for current route to block the section of the route for the current route guidance session only. > GB Note: If the route section is more than 10 kilometres long, you can choose, in another menu, whether to block the entire section or just part of it. >F >I > PL > Select Block permanently to block the section of the route for future route guidance sessions too. Changing of the blocking times is described on page 125.
NAVIGATION MODE Canceling route guidance Entering/deleting a stopover (Only available when route guidance is active.) You can cancel the active route guidance. > Call up the options menu for the map display. (Only available when route guidance is active.) With this function, you can enter a stopover, or you can delete an entered stopover. > Call up the options menu for the map display. > Press the Stop guidance button. This cancels route guidance to all destinations. > Press the Add stopover button.
>>> NAVIGATION MODE Blocking route temporarily >D Using the Block road ahead option, you can block a stretch of road ahead temporarily. This determines a certain stretch of road that should not be used. The Navigation device will now try to calculate a detour. > GB >F >I Notes: • The selected length of the block is only an approximation since the actual distance blocked depends on the availability of an exit. > PL > Call up the options menu for the map display.
NAVIGATION MODE Displaying current position (Where am I?) You can display your current position, make an emergency call (depending on model), select a hospital or filling station and save this position. Furthermore, you can display information regarding the current GPS reception and the current country. > Call up the options menu for the map display. > Press the Where Am button. The current position is displayed. If possible, an address is displayed.
>>> NAVIGATION MODE Entering the destination >D > GB >F >I You can see how many satellites are being received, and whether the satellite reception is good enough for navigation. The current time and the geographic position are also displayed. > PL (Only available when route guidance is not active.) You can enter a destination. > Call up the options menu for the map display. > Press the Enter destination button.
NAVIGATION MODE >>> Skipping a destination >D If a planned route with several destinations is active, you may delete the current destination of the route. Route guidance to the next destination is then started. This may be necessary if a destination was not driven to directly. The Navigation device otherwise tries to guide you to the current destination. > Call up the options menu for the map display. > GB >F >I > PL > Press the Next destination button.
TELEPHONE MODE If your navigation device has an integrated Bluetooth® interface, you can connect it to a mobile phone equipped with Bluetooth® wireless technology. Your Navigation device can then be used as a very comfortable hands-free unit. Telephone mode Note: • For some cell phones equipped with Bluetooth® wireless technology, it is possible that some of the functions described are not available. • The following descriptions assume that Bluetooth is activated on the cell phone.
>>> TELEPHONE MODE The Navigation device now attempts to reconnect the cell phone last connected. When the connection is established, the telephone menu is displayed after a short period. If no cell phone has been connected yet or if the device last connected is not available, the following display is generated. >D > GB >F >I > PL > Press the Yes button to find Bluetooth cell phones as described in "Searching for cell phones" on page 111.
TELEPHONE MODE Note: Press the button to delete the characters entered. Press the Pause button if you wish to pause the dialling process. > Press the Dial button. The Navigation device then attempts to establish a connection to the phone number entered. You can find out how to continue operation in "Telephone calls" on page 113. Phonebook In the phonebook, the system displays the phonebook entries loaded from the SIM card and from the memory of the cell phone.
>>> TELEPHONE MODE >D > In the input menu, select the first letters of the entry you are looking for. Note: • For example,if you entered the letters "M" and "I", the entries are displayed whose last names or first names start with "MI". That means, "Miller John" or "Bauer Michael". • You may enter the first letter of the last name and then enter the first letter of the first name separately using a space (button ).
TELEPHONE MODE Text messages (SMS) (only selected models) If this function is supported by the mobile phone, all the received text messages on the SIM card and in the mobile phone’s memory will be loaded onto the Navigation device. The text messages can be displayed on or read out by the unit and edited. > In the telephone menu press the SMS button. The selected text message is displayed. > Press the Read out button in order to have the message read out.
>>> TELEPHONE MODE Incoming text message You will receive notification of any text messages received, depending on the settings under "Text message notification (depending on the model)" on page 118. If you have activated the Show popup setting, the following menu will be displayed on receiving a new text message. >D > GB >F >I > PL The following options are then available: • Read out The text message will be read out. • Show text The text of the message will be displayed.
TELEPHONE MODE Icons used The following icons are used in the number list. Icon Meaning This entry is a standard entry without any special features. This entry is protected. If the number list is full, this entry is not automatically deleted. You have the option to do this manually. For a protected entry, you also have the option to set the position in the quick access.
>>> TELEPHONE MODE >D Lists loaded from cell phone > In the number list, call the respective list using the buttons Missed, Received and Dialled. > GB >F >I > PL With the buttons, you may scroll in the list in the relevant direction of the arrow. > To initiate a call, press the button with the entry you want.
TELEPHONE MODE Automatic connection After activation, your Navigation device attempts to establish a connection to the cell phone last connected. Selection Meaning Protect entry The device is protected against automatic deletion (only available for unprotected devices). Remove The protection of the deprotection vice is canceled (only available for unprotected devices). Move up / The device is moved one position forwards/backMove down wards. Delete The device is deleted from the device list.
>>> TELEPHONE MODE >D > GB >F >I > Then select the name of the cell phone to be connected. The Navigation device will then attempt to establish the connection. On the cell phone, the password prompt should then occur. This password is fixed by Navigation device. > PL Connecting from device lists From the device list, you may initiate a connection to a cell phone. If a cell phone is already connected, that connection is automatically disconnected and the new device is connected.
TELEPHONE MODE Disconnecting a connected telephone You may disconnect the connection to a cell phone currently connected via Bluetooth. Telephone calls In the telephone calls section, you can find a summary of the control options that are available for establishing a call, accepting a call, and ending a call. >>> Accepting a call >D For an incoming call, a ringing tone will sound. Also the following is displayed. > GB >F >I Establishing a call > Press the Disconnect button.
>>> TELEPHONE MODE If you have switched on the automatic call acceptance as described in "Automatic call acceptance" on page 117, the time to call acceptance is also displayed for the Accept button. >D > GB >F >I > PL Ending a call During a call You can end an active call. During a call, you have various control options. > In the call screen, press the End call button. The call is ended. The screen last active is displayed. Note: The call is also ended if the other party hangs up.
TELEPHONE MODE > To call the options menu of the call screen, press the Options button. • Volume By pressing the Volume, you can call the volume adjustment. See "Telephone volume" on page 117. • Microphone off/Microphone on For a private conversation in a vehicle, you can switch off the microphone of the Navigation device. The other party on the phone will not hear anything. Press the Microphone off button to switch off the microphone. Press the Microphone on button to switch the microphone back on.
>>> TELEPHONE MODE >D You will branch to the menu for the telephone settings. > GB Start In the menu, various pages with the functions are available: >F >I Switching Bluetooth on and off • Bottom icon: function off With the Bluetooth button, you can switch Bluetooth on or off. Visibility > In the settings menu, press the Bluetooth button. Depending on the previous setting, you can switch Bluetooth on or off.
TELEPHONE MODE Automatic call acceptance Telephone volume Updating the phonebook With this function, you can set whether or not or after which time an incoming call is accepted automatically. With this function, you can set the volume of the ringtone and the volume of the call. With this function, you can update or retransfer the stored phonebook entries in the Navigation device. >>> >D > GB >F > In the settings menu, press the Autoaccept call button. > In the settings menu, press the Volume button.
>>> TELEPHONE MODE Bluetooth name >D With this function, you can assign a name for your Navigation device. This assigned name will then be displayed by other Bluetooth devices. > GB >F >I > In the settings menu, press the Bluetooth name button. > PL > Enter the desired name. > Confirm the name entered by pressing the OK button. 118 Text message notification (depending on the model) With this function you can set how the Navigation device should respond when a new text message is received.
TOOLS Under Tools, the following functions are grouped together, depending on the model: • Marco Polo City Guides • Image viewer • Country information • Overview of functions • Blocking a section of the road • Trip computer The Tools menu is called up from the main menu. >>> Image viewer* Tools >D Note: The image viewer cannot be called up when route guidance is active. This displays the extras menu. > Select the desired function by pressing one of the buttons.
>>> TOOLS The image viewer menu >D Selecting an image In the image viewer menu, you can select images, start a slide show and call up the settings. > GB >F 3 >I A message is displayed stating that the image viewer must not be used when driving. Please observe this warning. > PL > Confirm the message by pressing the OK button. The image viewer menu appears.
TOOLS Press the buttons to the left and right of the image to move to the next or previous image. Press the centre of the image to hide the image menu. Enlarging the image > Show the image menu. > Press the Zoom button. >>> Displaying image information > Show the image menu. > Press the EXIF button. >D > GB >F >I > PL Press the right- or left-hand side of the screen to move to the next or previous image. Press the centre of the image to show the image menu again.
>>> TOOLS >D > GB >F >I > PL Slide show Traffic forecast (depending on model) In the slide show, all the pictures in the current folder level are automatically displayed sequentially. > Press Slide show in the image viewer menu. The image display changes to full screen display and initiates the slide show according to the settings made, with the first image in the current folder level. The slide show will end once all images have been displayed. Press the button to stop the show before the end.
TOOLS • With the and buttons you can change the section of the map. • With the button you can display the complete route on the screen if available. >>> Country information >D The country information enables you to display country-specific information for numerous countries (maximum permitted speed, alcohol limits, etc.). > GB >F >I The country-specific information is displayed (maximum permitted speed, alcohol limits, etc.). You can select another section of the map by dragging.
>>> TOOLS Symbol >D Meaning Speed limit in built-up areas > GB Speed limit outside built-up areas >F >I Speed limit on motorways > PL Alcohol limit Reflective jacket requirement Blocking a section of the road permanently With the Block option you can block individual route sections permanently. The Navigation device then calcu-lates a diversion to avoid a traffic obstruction. Furthermore, existing blockages can be removed (with the Delete blockage button) or be displayed on a map .
TOOLS > Using the buttons 1 set the first period when the road is to be blocked on this day. > Using the buttons 2 set the second period when the road is to be blocked on this day if necessary. The road is currently blocked for all days of the week, for the whole day . You can now set whether or not the road should be blocked for each day of the week. > Press the buttons with the days on which the road should not be blocked .
>>> TOOLS Travel time without breaks in the journey 7 Travel time with breaks in the journey 8 Compass 9 Calls up the stopwatch with lap recording Press the Stop button to stop the recording. The time continues if you press the Start button again after stopping the recording. Press the Reset button to delete all recordings and reset all times to zero. 6 >D > GB >F >I > PL Press the Reset button to reset the values to zero.
SETTINGS Selecting system settings Settings You can change various basic settings for all applications on the Navigation device. > In the main menu, press the button. The system settings menu You can select the various settings optionsfrom the system settings menu. >>> Operation >D Selection options Select the desired menu item by pressing the appropriate button. The functionality of the buttons varies depending on the selection and is described under "The individual menu items" on page128.
>>> SETTINGS The individual menu items >D Battery Your Navigation device may be operated using an external power supply unit or an integrated rechargeable battery. > GB >F >I Note: The current charging state is important when operating with a battery. If the battery is low on power, it may not be possible to continue navigation right to the destination. > PL The power level is shown in the charge display. In the example, the battery still has around two-thirds charge.
SETTINGS • Bottom icon: The function is switched off, the Navigation device does not switch off automatically. The following display is shown during automatic switch-off. You can cancel the automatic switch-off procedure by pressing the Cancel button. Day/night display You can set the Navigation device display to day, night or automatic. The automatic setting changes automatically between day and night display depending on the time, the current position and the time of year.
>>> SETTINGS >D Design by day With this option, the menu and map display during the day can be switched to the colours and contrast of night display. > GB >F Design by night Two schemes with different contrasts are available to select for the map display at night. Press the Design by night button. > Press the Design by day button. >I Select the option on the bottom to set a lighter night display for the map view. > PL > Select the Dark design option for a dark display during the day.
SETTINGS Setting the colour You can change the colour of the icons and other design elements. Language The texts on the touch screen can be displayed in a variety of languages. > Press the Colour schemes button. Opening language selection You can choose between the various languages using the following button: 1 2 > Press the Language button. The language selection appears. > Select one of the eight predefined colours. or > Select the required colour using the slider 2 at the bottom of the display.
>>> SETTINGS Renaming driver profile Sounds You can switch the Navigation device signal tone on and off. This also includes the clicking of the touch screen buttons. > Press the Tones button. Depending on the previous setting, the signal tones are switched on or off. >D > GB >F >I You restart the system by pressing on the Yes button. > PL • Top icon: Tones switched on • Bottom icon: Tones switched off Driver profiles (depending on model) You can select 4 different driver profiles.
SETTINGS Deleting driver profile You can delete the saved profile data by pressing the Delete profile button. The profile itself will still remain. If the profile was renamed previously, it will then be renamed to the original name again (Profile 1 – Profile 4). Service information The following button displays information regarding the Navigation device. > Press the Information button. The information display appears with the software version number.
>>> SETTINGS >D Calibration If the touch screen responds incorrectly when buttons are pressed, it needs to be calibrated. > GB >F Starting the calibration You can start the calibration using the following button: >I > PL > Press the Calibration button. The calibration procedure will be started. You will be guided through the procedure by means of text instructions.
TECHNICAL TERMINOLOGY GMT (Greenwich Mean Time) Central European Time standard Standard time at 0 degree longitude (the longitude intersecting Greenwich, Great Britain). This time is used worldwide for synchronization of data collection. Technical terminology Bluetooth Technology for wireless data transmission at short range up to 10 metres. GPS (Global Positioning System) GPS determines your actual geographical position by the use of satellites.
>>> TECHNICAL TERMINOLOGY Stylus A stylus is an input pointer which is used for the operation of touch-screens, mobile phones or PDAs. The stylus consists basically of a plastic pointer with a softer plastic core. The sleeve is hard and can be gripped and the softer core emerges at the tip and is designed to touch the screen as softly as possible (i.e. without the danger of scratching the screen). The stylus is more accurate than operation using the fingers, since only the thin tip touches the screen.
index INDEX Numerics 3D display . . . . . . . . . . . . . . . . . . . . . . . . . 63 A Adjusting the map view . . . . . . . . . . . . 63 Announce streets . . . . . . . . . . . . . . . . . . 76 Automatic call acceptance . . . . . . . . .117 Automatic connection . . . . . . . . 111, 116 B Block . . . . . . . . . . . . . . . . . . . . . . . . . . . . . 99 Blocked roads . . . . . . . . . . . . . . . . . . . . . 81 Blocking a section of the road . . . . . . . 99 Blocking a section of the road permanently . .
>>> INDEX I >D ID3 tag . . . . . . . . . . . . . . . . . . . . . . . . . . 135 Image viewer . . . . . . . . . . . . . . . . . . . . 119 Intended purpose . . . . . . . . . . . . . . . . . . .7 Intersection . . . . . . . . . . . . . . . . . . . . . . . 48 > GB >F >I J > PL JPG/JPEG . . . . . . . . . . . . . . . . . . . . . . . 135 L Lap recording . . . . . . . . . . . . . . . . . . . . 126 Last announcement . . . . . . . . . . . . . . . 92 Lists List of towns . . . . . . . . . . . . . . . . .
INDEX settings Navigation . . . . . . . . . . . . . . . . . . . . 62 System . . . . . . . . . . . . . . . . . . . . . .127 Telephone . . . . . . . . . . . . . . . . . . .115 Short route . . . . . . . . . . . . . . . . . . . . . . . . 74 Slide show . . . . . . . . . . . . . . . . . . . . . . .122 SMS . . . . . . . . . . . . . . . . . . . . . . . . . . . . .107 Speed limit . . . . . . . . . . . . . . . . . . . . . . . . 80 Stopover . . . . . . . . . . . . . . . . . . . . . . . . . . 99 Deleting . . . . . . .
>>> MODEL OVERVIEW AND TECHNICAL SPECIFICATIONS Model overview and technical specifications : standard - : not available : optional >D > GB >F Navigation system Ready 45 LMU Ready 45 EU19 Ready 45 SE Active 45 Transit 45 Becker BE S02 Becker BE S01 Becker BE S00 Becker BE S10 Becker BE S1x Weight 149 g 149 g 149 g 162 g 162 g Processor in MHz 533 533 533 533 533 Flash memory 4 GB 2 GB 2 GB 4 GB 4 GB SD-RAM 64 MB 64 MB 64 MB 128 MB 128 MB Li-ion battery 720 mAh 720 mAh 720 mAh 1200 mAh 1200 mAh TMC
NOTICE >>> Dear customer, In conformance with current EC guidelines, any person may operate this unit. This unit conforms to the current valid European or harmonized national regulations. This designation is your guarantee that the unit conforms to the applicable specifications concerning electromagnetic compatibility.
>>> NOTICE Disposal of the unit >D Customer information on the disposal of electrical and electronic devices (private households) According to the self-proclaimed corporate principles of United Navigation GmbH, your product has been developed and manufactured from high-quality, recyclable materials and components.
NOTICE >>> Disposal of the battery >D Duty to supply information according to battery legislation (BattV) > GB Batteries must not be disposed of in household waste. It is the duty of the user to return used batteries. Please only dispose of batteries via specialised dealers or at battery collection points. In this way, you make a positive contribution to environmental protection.
>>> NOTICE >D > GB >F >I 4 > PL 2 3 1 > Completely discharge the battery (leave the unit switched on with no power supply until it automatically switches off). > Unscrew and remove the housing screws 1 using a small TX5 screwdriver. > Lever off the rear of the housing 2 using a flat-blade screwdriver (placed at the slits on the sides of the housing). > Pull out the connector of the battery connecting cable 3 . > Remove the battery 4 .
3LGRCBÍ,?TGE?RGMLÍ%K@& &:J<ͱ )ͱEͱ ,LJ Á ͭ Á(KL˓E=>JG - Germany UUU KW@CAICP AMK