AUSTRALIA USA/CANADA BeefEater SL4000s Series Stainless Steel Barbecues Assembly And Operating Instructions Trolley-mount And Built-in Models Certified ISO 9001 : 2000 by For outdoor use only
Safety Warnings WARNING: We want you to enjoy your barbecuing experience - Failure to follow the instructions and observe the warnings provided in this operating manual could result in serious bodily injury or damage to property. NOTE TO INSTALLER: This manual must remain with the owner for future reference. • • • For Your Safety For Your Safety 1. Do not store or use gasoline or other flammable vapours or liquids in the vicinity of this or any other appliance. 2.
DO NOT DO • • • • • Spanner tighten all gas fittings as per instructions. • Check all gas hoses and line connections for damage, cuts or cracks each time the appliance is to be used. • Always Leak - test with a solution of soapy water. • Check main opening, throat and venturi to each burner and pilot flame tube regularly for insect nests (eg. wasp, ants or spiders). Nests are dangerous and must be cleaned out thoroughly. • Visually check burner flames to confirm lighting.
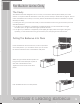
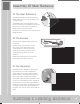
For Built-In Units Only The SL4000 comes in both trolley-mounted and built-in models. These two pages contain information relating to setting up built-in model only. About The Cylinder Enclosure If the gas for your barbecue is to be supplied by a portable gas cylinder, you will need to ensure that adequate provision is made to house the cylinder safely. The following must be adhered to: Keep out of heat: The cylinder and hose must be sheltered from the sun’s direct heat.
For Built-In Units Only The Cavity Your barbecue has been designed to sit into a cavity or cutout rather than be placed directly onto a flat surface. It is important that the dimensions of the cavity conform exactly to those listed on page 21. This will ensure the barbecue sits correctly in the cavity, and that the barbecue has sufficient ventilation to operate efficiently and safely.
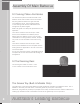
Assembly Of Main Barbecue Before You Start Note the tools you will need before you begin. Remove any protective plastic from stainless steel components. Allen Key (provided) Adjustable spanner/ wrench Phillips Head Screwdriver Check for damaged or missing parts, and consult your retailer if necessary. Attach The Side Shelves (Trolley-Mount Models Only) Attach the two top side shelves using the four screws provided with each side shelf kit.
Assembly Of Main Barbecue Fit The Heat Reflectors The reflectors fit between each burner. They reflect heat from the burners, upwards to the cooking surfaces. The tabbed ends of the heat reflectors face forward to the front of the barbecue frame. The tabs fit into the slots in the front end of the barbecue behind the control panel. The back of the reflectors rest on the rear of the barbecue frame. Fit The Burners Remove the ‘R’-shaped retaining clips from the burners.
Assembly Of Main Barbecue Fit Cooking Plates And Grates You should fit the plate to the left-hand side of the barbecue frame (with the drain hole to the extreme left). The grates are fitted to the right hand side of the barbecue frame. The temperature gauge on the roasting hood has been calibrated for this arrangement of plate and grate. NOTE: The grates must always be positioned over the Vaporizers.
Assembly Of Optional Rotisserie Assemble The Main Shaft Assemble the shaft in the order shown. The knurled nut, counterbalance and handle go on the threaded end. Slide the collar down towards the handle end. Slide the prongs onto the shaft so they face each other. Fit The Motor First attach the motor mounting bracket to the roasting hood. Then slide the motor onto the bracket. Fit The Shaft The pointed end goes into the motor The collar rests on the roasting hood.
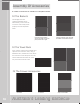
Assembly Of Accessories A number of accessories are available for Trolley-Mount models. Fit The Baskets The storage racks and condiment baskets can be fitted directly, without the use of screws. Ensure they locate properly into their respective holes. External storage baskets slot into the holes in the side panel, either left or right. Internal condiment racks fit inside the middle and left hand drawers. Fit The Towel Rack First, unscrew and remove the plastic end caps from the towel rack.
Installation LPG/Propane Cylinder If your barbecue is to be connected to a portable LPG cylinder, you should position it in the far right drawer. Place the prefitted mat down first, then position the cylinder on top. Secure the cylinder by wrapping the strap around the cylinder and clipping it to the bracket slots as shown in the illustration.
Installation Before You Begin NATURAL GAS TYPE IF IN DOUBT REFER TO LOCAL GAS AUTHORITY FOR CONFIRMATION OF GAS LPG PROPANE GAS TYPE IF IN DOUBT This appliance must have a minimum clearance from combustible materials of 450 mm (18”) on all sides of the barbecue. REFER TO LOCAL GAS AUTHORITY FOR CONFIRMATION OF GAS Check that the gas type is correct for your type of gas. You will find the gas type label on the side of your barbecue.
Installation Fixed Installation - Natural Gas (Natural Gas installation should be carried out by a qualified gas fitter) BeefEater Natural Gas barbecues are designed as low-pressure appliances (4.0” WC, 1.00KPa). Fit the natural gas regulator supplied directly to the barbecue inlet located on the right side of the appliance using either hard plumbing, or a flexible hose connected to a bayonet point, also known as a quick connect fitting.
Using Your Barbecue Before You Light The Barbecue Perform the following checks • • • • Make sure all gas connections are tight and leak tested. Ensure the cooking surfaces are clean and hygienic. Check the control knobs are in the off position. Check that the gas supply is turned on. • Ensure the hood of the barbecue and the lid of the side burner are up. If you do not, gases can build up inside the hood and create a dangerous situation. • Make sure long handles do not hang over the edge of the barbecue.
Using Your Barbecue Controlling The Burners The control knob can now be turned to the desired heat setting, Low, Medium or High. The control knob does not need to be pushed in while selecting the heat setting. To Turn Off The Burner Push in and hold the control knob while turning in a clockwise direction until the Off position is reached. After Use It is a good idea to leave the barbecue on for about 10 minutes after you have finished cooking.
Getting The Most From Your Barbecue Preheating Your Barbecue Like an oven, preheating your barbecue before cooking produces better results. Because your hood retains heat so efficiently, preheating your barbecue is quicker with the hood down. Turn the outside two burners to high. Close the hood, and allow to preheat for about 8 minutes. Then reduce the burner settings to achieve and maintain the required temperature, by following these guidelines.
Getting The Most From Your Barbecue Direct Cooking Method Commonly used for traditional barbecuing. Place food directly over the lit grill section. Excess flaring may occur and so care must be taken while cooking. Check inside the roasting hood regularly. We do not recommended this method for roasts unless you place a baking dish under the roast, to allow flammable fats and juices to be isolated away from the flame. The direct cooking method is recommended for steaks, chops, sausages, and hamburgers.
Cleaning Your Barbecue Stainless Steel Grills Many food acids, marinades, juices and sauces contain highly acidic elements that will slowly attack the surface of the stainless steel if not removed immediately after cooking. • After use, remove all solid material from the cooking surfaces using a brass bristle brush or plastic scourer. Brushes specifically designed for this purpose can be purchased from your BeefEater retailer. Wipe off remaining residue with a paper towel.
Cleaning Your Barbecue To Remove The Grease Tray For Cleaning The grease tray slides in and out on two runners at each side. The tray is locked to the runners at four points located at each corner of the tray. First release the front of the tray. To do this, pull the tray up and over the front tabs on each side. You may find it easier to use a flat blade screwdriver to help the tray to disengage. Next, release the rear of the tray, by pushing each of the rear tabs in a rearward direction.
Service And Maintenance This appliance should be checked and serviced by an authorised service person every 2 years to ensure the appliance remains in a safe operating condition. (These services are not covered by warranty). Spare parts are available from your retailer or the manufacturer.
Technical Specifications Gas Specifications Gas Injector size Input/burner Gas Pressure LPG/Propane 1.27 mm 19 MJ/hr 2.75 kPa / 11” WC Natural Gas 2.1 mm 19 MJ/hr 1 kPa / 4”WC Trolley-Mount Model Dimensions 1808/1964 585 87 X Gas connection point 1212/1372 920 165.50 1226 856/1013 503 All dimensions are in millimetres. Width dimensions are shown for both 5 burner model or 6 burner models.
SL4000 Spare Parts - Barbecue Trolley-Mounted Model 15 24 14 13 12 16 23 11 22 27 21 28 29 10 20 9 25 3 26 1 2 8 4 5 6 7 Built-In Model 32 30 33 31 22
SL4000 Spare Parts - Barbecue 5 Burner 6 Burner Ref # Description Code QTY Code QTY 1 SL4000 BBQ frame 31850 1 31860 1 2 SL4000s BBQ Manifold Tube 140907 1 150903 1 3a Gas Valve SU 45° Pilot LPG / Propane 040133 5 040133 6 3b Gas Valve SU 45° Pilot Natural Gas 040132 5 040132 6 4 Sig SL4000s fascia 140516 1 150509 1 5 Screws 8.
SL4000 Spare Parts - Roasting Hood 1 2 3 4 5 6 7 8 9 10 11 12 13 14 15 16 17 18 19 20 21 22 23 With Viewing Glass 4B 5B 29640 29650 Part Part Description Hood Body Top Hood Body Base Insulating Plate End Cap Handle Rod - Stainless Steel Mounting Screw M6 x 20 Fibre Washer Temperature Gauge & Nut (pack) Nut for Temperature gauge Bezel BeefEater Badge & Circlips Allen Key M6 x 30 Screw Pivot Screw N/A Pivot Washer - 25mm M6 Flat Washer M6 Glenlock Nut Rubber Stoppers Warming Rack Glass Glass Retainer Fram
SL4000 Spare Parts - Cart Ref # Description 5 burner Code 1 2 3 4 5 6 7 8 9 10 11 12 13 14 15 SL4000s Cart frame Side shelves Sig Side shelf handle SL4000s Gas bottle drawer SL4000s trolley drawer SL4000s trolley drawer handle Handle mount Sig SL4000s fat tray Fixed castor S/S Swivel castor S/S Trolley left hand slider Trolley right hand slider Internal condiment rack External storage basket Telescopic towel rail QTY n/a 180217 224801 180455 180456 180453 060622 190133 060700 060701 180451 180452 1802
Warranty BeefEater Barbecues Warranty Terms Barbecue Barbecue Frame Limited Lifetime Stainless Steel burners Limited Lifetime Valves 5 Years ‘Quartz Start’ Ignition System 2 Years Vaporizer Grids and Reflectors 2 Years All Other Parts 2 Years Cooktops / Cooking Surfaces Stainless Steel Grills Limited Lifetime Roasting Hoods Body Limited Lifetime All other parts 1 Year Side Burners Side Burner Frame Limited Lifetime Burner 5 Years Cast Alloy parts 5 Years All other parts 2 Years Tro
Warranty Beefeater Barbecues Warranty Conditions Should any part fail due to defective workmanship or faulty materials within the specified period from the date of purchase, BeefEater or its distributor will repair or, (at distributors option), replace the defective part free of charge. • LP / Propane Gas Cylinder The cylinder manufacturer is responsible for the materials, workmanship and performance of the gas cylinder.
Accessories Available Your retailer can advise on the range of BeefEater accessories available to help you take full advantage of the barbecue cooking opportunities available with your roasting hood. Apron and Mitt Set - handle baking dishes and other hot items safely and with confidence Poly Cover - protect your investment from the weather.