BUGG BB18224, BB18226, BB18228, BB18225GA Assembly and Operating Instructions FOR OUTDOOR USE ONLY AUSTRALIA / NEW ZEALAND
CONGRATULATIONS CONTENTS Dear customer, Important safety instructions........................................................3 Congratulations and thank you for choosing our barbecue. We are sure you will find it a pleasure to use. Before you use the barbecue, we recommend that you read through the relevant sections of this manual, which provide a description of your appliance and its functions. Product description.......................................................................
IMPORTANT SAFETY INSTRUCTIONS Please read the user manual carefully and store in a handy place for later reference. WARNING WARNING • Do not lean over barbecue when lighting. IMPORTANT TIPS & INFORMATION • Do not leave the barbecue unattended when alight. Important – check for any damages or marks • Do not delay lighting once the gas has been turned on.
PRODUCT DESCRIPTION 14 2 3 7 9 1 12 4 5 8 1 Barbecue body 2 Hood 3 Operating Knobs R + L 4 Stand * 5 Locking U Bolt 6 Cylinder Hook 7 Utility Hook 8 Cylinder Shield* 9 Shelves 10 Grill and Plate 10 10 11 11 Burner 12 Hood Handle 13 Body handle 13 14 Thermometer ** 15 Grease Tray * Stand is sold separately 15 4 PRODUCT DESCRIPTION ** May not be included with all models
DIMENSIONS 580 (23”) 1035 (41”) 190 (71/2”) 554 (22”) 702 ( 271/2”) 592 ( 231/4”) 1088 (43”) Barbecue manifold inlet thread: 3/8 SAE male flare fitting. Gas Pressure: LPG – 2.75 Kpa; 11”WC NG – 1.0 Kpa; 4” WC WARNING CAUTION Note: Do not modify this appliance. Any deviation from factory settings could result in a safety hazard. Gas Nozzle size: LPG – Ø 0.90mm (Au); Ø0.95mm (America) NG – Ø 1.
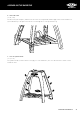
PRODUCT DESCRIPTION FOR STAND 2 5 1 9 4 11 9 8 1 10 8 3 4 7 6 6 6 INDEX DESCRIPTION QUANTITY 1 Leg 2 A Screw , 16mm (black) 20 2 Top Connecting Panel 1 A1 Screw , 25mm (stainless Steel) 4 3 Front Shelf Brackets 1R + 1L B Spring Washer 24 4 Wheel Bracket 1R + 1L C Screw, 8mm 6 5 Cylinder Hook 1 D Circlip 2 6 Silicone Feet 4 E Plastic Washer 6 7 Wire Shelf 1 F Alan Key 1 8 Wheel 2 9 Shaft 2 10 Hub Caps 2 11 Cylinder Shield 1 PRODUCT DESCRIP
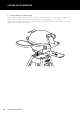
ASSEMBLING THE BARBECUE 1. Assemble Front leg: [ 4 x A, 4 x B ] Place the Leg (1) on a padded flat, level surface and assemble the two Front Shelf Brackets (3). Insert two Silicone Feet (6) to the bottom hole, and pull until rest against bottom of leg. 2. Assemble Back leg: [ 8 x A, 8 x B ] Place other Leg (1) on a padded flat, level surface and assemble the Wheel Brackets (4) and Cylinder Hook (5). Insert two Silicone Feet (6) to the bottom hole, and pull until rest against bottom of leg.
ASSEMBLING THE BARBECUE 3. Assemble Stand [ 8 x A, 8 x B ] Attach the Top Connecting Panel (2) with four screws to the Front Leg and four more screws to the Back leg: 4. Assemble the wheels [2 x D] Wheels (8) are placed on the inside of brackets. Insert the shaft (9) from the Wheel Bracket side inwards, and lock with a Circlip. The Circlip is to slide into the groove made in the shaft. Press the Hub-Cap (10) to place.
ASSEMBLING THE BARBECUE 5. Fit the Wire Shelf [ 4 x A1, 4 x B] The Wire Shelf (7) has two plates, and two hooks. The hooks are facing forward, and will engage into the Front Shelf Brackets (3) assembled in step 1. The plates have two holes each through which screws go into Back Leg: 6. Place the Cylinder Shield [ 6 x C, 6 x E ] The Cylinder Shield (11) is attached to the rear leg by six screws and washers, three each side.
ASSEMBLING THE BARBECUE 7. Position the Barbecue into Stand, and lock With the stand standing on a stable, flat surface, remove the Locking U Bolt from the rear of the Barbecue, and place the Barbecue onto the stand, ensuring each leg is fully engaged into the corresponding recess in the stand. Once the Barbecue is placed correctly over the stand, ensure the Grease-Tray is in its place under the Barbecue, and fully engage the Locking U Bolt back to its place.
GAS SPECIFICATIONS GAS TYPE UNIVERSAL LPG NATURAL GAS Gas bottle installation Maximum gas consumption 20 MJ/h 20 MJ/h • Connect the gas hose to the gas bottle. Injector office diameter 0.9 mm AU/NZ 1.83 mm • Place the gas bottle onto the cylinder hook at the rear of the barbecue. 0.95mm (North America)” Leak test procedure (Universal LPG) Number of injectors 2 2 • Ensure all gas valves are in the ‘OFF’ position. Regulator pressure 2.75 kPa 1.
GAS SPECIFICATIONS Natural gas installation See below illustration NOTE: Conversion of this unit to natural gas must be carried out by a qualified licensed pers on and a Certificate of Compliance must be issued to the owner on completion of the installation and conversion. 6. Remove each gas injector from the end of each jet holder, turning gently in a counter clockwise direction. Ensure the jet holder is firm and won’t turn while unscrewing the nozzle.
GAS SPECIFICATIONS Turn down adjustment Choosing a location • When converting to natural gas the turndown setting will need to be adjusted to give a satisfactory flame on low setting. • The vertical clearance above the cooking surface to any combustible materials must be at least 1000mm. • Remove knobs from valve shafts. • Using a flat bladed screwdriver, turndown adjustment screw should be fully inserted and then rotated ¾ turn counter clockwise. • Repeat for other valve.
INSTALLATION WARNINGS WARNING WARNING • This appliance shall only be used in an above ground, open air situation with natural ventilation without stagnant areas, where gas leakage and products of combustion are rapidly dispersed by wind or natural convection. This barbecue has been designed for outdoor use only. Refer to diagrams below. • Never install this barbecue inside any building, garage, shed or breezeway or inside a boat, caravan or recreational vehicle.
CONFIGURATION OPTIONS IMPORTANT TIPS & INFORMATION Plate and grill can be positioned either on the left or right side as shown. OPERATING INSTRUCTIONS WARNING WARNING The use of two hotplates is not recommended. This configuration does not allow adequate ventilation for the barbecue to operate safely. INCORRECT Control functions Before lighting the barbecue: • Check that all hoses and gas fittings are tight. • Open the roasting hood. • Check all control knobs are in the ‘OFF’ position.
OPERATING INSTRUCTIONS Preheating • This barbecue is fitted with high power burners. In most conditions it will only be necessary to preheat the barbecue for only a few minutes before cooking can commence. • As with most things, experience will familiarise you with the time required, to achieve the desire d preheating time and optimal cooking temperature. • Testing has shown that once preheated, the burners can be turned to the low position for satisfactory cooking.
CLEANING AND CARE Intensive cleaning cycle WARNING WARNING Please ensure that your barbecue is switched off and has cooled down before following the instructions below. Do not use a high pressure cleaner to clean this appliance. If cleaning the appliance without the stand attached ensure the base is stable before lifting the hood. Cast iron plates and grills The cooking plates and grills have a porcelain enamelled coating.
TROUBLESHOOTING ACCESSORIES PROBLEM POSSIBLE CAUSE SOLUTION STANDARD INCLUSIONS Barbecue won’t light No gas Check isolation valve is ON Cast iron hotplate Gas bottle empty – refill or change gas bottle Ignition system not working Check spark being generated when knob rotated Ignition electrode wet or dirty, gently clean and dry electrode, ensuring position unchanged Manually light the barbecue Excess smoke Too much heat being emitted from the cooking area Smell of gas Gas leak DO NOT ATTEMPT T
Warranty FOR SALES IN AUSTRALIA AND NEW ZEALAND APPLIANCE: BEEFEATER BUGG BARBECUE This document sets out the terms and conditions of the product warranties for Electrolux Appliances. It is an important document. Please keep it with your proof of purchase documents in a safe place for future reference should there be a manufacturing defect in your Appliance. This warranty is in addition to other rights you may have under the Australian Consumer Law. 1.
For more information on all Beefeater products, or for dimension and installation information, call into your retailer, phone or email our customer care team or visit our website: AUSTRALIA phone: 1300 307 939 fax: 1800 356 669 email: customercare@electrolux.com.au web: beefeaterbbq.com NEW ZEALAND phone: 0800 436 245 fax: 0800 225 088 email: customercare@electrolux.co.nz web: beefeaterbbq.com Beefeater. We are part of the Electrolux Family.