
Operation Manual


23
EN Cyclo-Eccopower
BEEM - Elements of Lifestyle
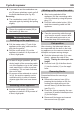
Empty the dust container
Please proceed as follows for emptying
the dust container (23):
Press the release button (15) and lift
the dust container (23) off the base
appliance (see Fig. B1).
Hold the dust container (23) over a
rubbish bin and press the emptying
button (14) on the handle (see Fig.
B2).
The bottom ap of the container
opens automatically for emptying (see
Fig. B3).
Close the bottom ap again until it
snaps into place.
Place the dust container (23) on the
base appliance (7) in such a way that
it snaps into place.
Check the correct t of the dust con-
tainer (23).
Cleaning and maintenance
Before starting with the work, please read
the safety instructions in chapter Safety.
Clean the appliance
Use a slightly moist cloth to wipe off
the outside of the appliance housing
and the accessory parts.
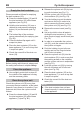
Clean the cyclone unit
Check the cyclone unit (22) every time
you empty the dust container, at the latest,
however, every three to six months. If you
nd some dirt, clean the cyclone unit as
follows:
Press the release button (15) and lift
the dust container (23) off the base
appliance (7) (see Fig. B1).
Release the cyclone unit (22) by turn-
ing anti-clockwise (see Fig. C1).
Pull the cyclone unit (22) out of the
dust container (23) (see Fig. C2).
Turn the holding ring anti-clockwise
and remove the ring in order to be
able to remove the screen insert of
the cyclone unit (22) (see Fig. C3).
Remove the screen insert (see Fig.
C4).
Use a dry cloth to clean all parts in-
cluding the dust container or, if and
when required, apply a soft brush (see
Fig. C5).
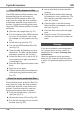
In order to re-assemble the cyclone
unit (22), push the screen insert on to
the cyclone unit again.
Push the holding ring on to the as-
sembly and turn the ring clockwise
until it locks into place.
Place the cyclone unit (22) into the
dust container (23) in such a way that
the marking arrows on the container
and the cyclone unit are in antiposition
(see Fig. D1).
Lock the cyclone unit (22) by turning
the unit clockwise until it locks into
place (see Fig. D2).
Place the dust container (23) on the
base appliance (7) in such a way that
it snaps into place.
Check the correct t of the dust con-
tainer (23).
NOTE
If the dust container has not been ►
closed correctly, it cannot be placed
in the appliance.