
Owner's Manual

Break-Barrel Spring Piston Air Rifle
How To Cock, Load, and
Close Your Air Rifle
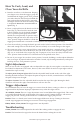
1. Point the air rifle in a safe direction. Keeping
your fingers away from the trigger, grasp the
stock behind the trigger guard. Next, position
your other hand on the barrel just behind the
front sight and break the barrel by smoothly
rotating it downwards until the cocking action
is completed. Do not use excessive force or
speed. (Fig. 1)
2. Insert a single pellet into the breech end of the
barrel (Fig. 2), closed end first until the skirt
is flush with the face of the breech. Caution:
This is a potential pinch point if the barrel
should close unexpectedly! To prevent injury
during loading do not move the safety to the
“Fire” position. Fingers should be outside the
trigger guard until barrel is returned to locked position and airgun is ready for firing.
3. Close the air rifle by pivoting the barrel upwards until it locks back into position. This should be
done with enough force to lock the barrel, but not violently as to avoid damage to the airgun.
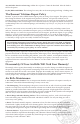
4. The automatic safety is now engaged (Note: some models only have a manual safety!). The safety
may be located on the side of the receiver, the side of the air rifle, on or inside the trigger guard
(Fig. 3A), or at the back of the airgun (Fig. 3B). To prepare to fire, move the safety forward to the
“Fire” position. Some models have a button that must be pushed in for “Fire.”
5. Be sure of your target. Be sure there are no persons, livestock, buildings, or other objects behind or
near your target. If projectile rebound or ricochet is noted, stop shooting immediately and replace
backstop. Always wear protective eyewear.
Sight Adjustment
Many of our air rifles are equipped with an adjustable rear sight. On some sights a screwdriver may
be needed for adjustment. Please note, however, that some models do not have open sights and are
intended for scope use only.
To adjust point of impact right or left: Turn the adjustable knob located on the side of the sight.
Rotating the knob clockwise will adjust the point of impact to the left; counterclockwise will adjust
the point of impact to the right.
To adjust elevation: Turn the adjustable knob located on the top of the sight. Moving the knob
clockwise will lower the sight; counterclockwise will raise the unit.
Trigger Adjustment
We recommend that you leave the trigger as it comes from the factory setting, or take it to a qualified
airgunsmith for adjustment. Improper adjustments may make the airgun unsafe.
“R” SERIES, GS1000: There is a large adjustment screw located behind the trigger blade. This screw
is accessible through the hole on the bottom of the trigger guard. Turning clockwise: will increase
trigger pull pressure. Turning counterclockwise: will decrease trigger pull pressure.
Kodiak: There is a slotted screw located in the trigger blade near the top. Turning in: decreases
second stage engagement. Turning out: increases second stage engagement.
HW30, HW50, GT650, GS700: The trigger unit is not adjustable.
Troubleshooting
GS950, GS1000: Extra effort required at the end of the cocking stroke to engage the sear.
Kodiak: The barrel must be tapped to release the detent before cocking the air rifle.
Fig. 3A
Fig. 3B
Fig. 2
Fig. 1