
Installation Instructions


ASSEMBLY PROCEDURE
If your air rifle is taken down into its two component
parts, follow these instructions for assembly and for
preparing your air rifle for use.
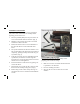
1. Take the provided (4mm) allen key and remove set
screw on the bottom of the breech block (Fig. 1)
2. Hold the receiver half of the air rifle in one hand
and the barrel half in the other.
3. Position the barrel so that set screw indentation at
the end of the barrel is on the underside of the
barrel.
4. Line up the indentation on the barrel with the screw
hole on the bottom of the breech block. Insert barrel
completely, pushing in firmly until it will not go in
any further. (Fig. 2)
5. Look thru screw hole to ensure indentation is lined
up with hole; turn barrel if needed to align. Re-
insert the set screw into the hole and turn clockwise
until the screw is hand tightened.
6. Ensure that the barrel will not move by pulling out-
ward on the barrel.
7. The first time you cock the air rifle, make sure that
the breech seal is firmly in the groove. (Fig 3)
8. Before using air rifle read all safety and usage in-
structions in the owner’s manual included with this
air rifle.
DISASSEMBLY PROCEDURE
Follow these instructions for disassembly and for
preparing your air rifle for storage.
1. Make sure air rifle is uncocked and unloaded and
is pointed in a safe direction.
2. Reverse assembly procedures.
3. Store air rifle in a safe location out of reach of
children.