Wireless Office Desktop Manual Article No.: 40620 http://www.typhoonline.
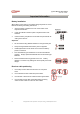
Typhoon Wireless Office Desktop Article No.: 40620 Important Information Battery Installation When battery power gets too low, please change keyboard or mouse batteries according to following instructions: 1. Open the battery compartment cover on the bottom of the keyboard and mouse. 2. Follow the indication inside to place in keyboard and mouse batteries. 3. Place the battery compartment cover back and proceed with ID setting of the devices.
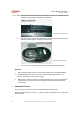
Typhoon Wireless Office Desktop Article No.: 40620 Introduction Congratulations on your purchase of this wireless RF keyboard and mouse! This keyboard and mouse will finally free you of the constraints of your desktop by providing a wireless connection between your keyboard/mouse and your PC.
Typhoon Wireless Office Desktop Article No.: 40620 System Requirements Microsoft Windows 95, Windows 98SE, Windows ME, Windows 2000 or Windows XP operating system Microsoft Internet Explorer 5.0 or later version (for the Internet keys) CD-ROM drive (for CD and Video operation) Standard sound card (for CD and Video operation) Available PS/2 & USB port. Please refer to table below for the other system requirements for the features.
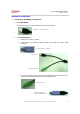
Typhoon Wireless Office Desktop Article No.: 40620 Hardware Installation Connecting and Battery Information For USB Model: Just directly plug the receiver’s USB connector into PC USB port. Front View of USB Connector For Combo Model: 1. Please turn off your PC system. 2. Firstly, connect the keyboard adaptor (USB to PS/2) with the receiver USB connector. Keyboard USB to PS/2 adaptor USB Connector Mouse PS/2 adaptor 3.
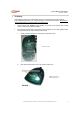
Typhoon Wireless Office Desktop Article No.: 40620 4. Take the keyboard and make sure the batteries on the back are installed correctly. (Follow the polarity signs in the battery compartment.) Bottom View of Keyboard 5. Take the mouse and make sure the batteries on the back are installed correctly. (Follow the polarity signs in the battery compartment.) Bottom View of Mouse 6. Turn on your PC, and PC system would auto-detective this RF keyboard kit. Remarks: 1.
Typhoon Wireless Office Desktop Article No.: 40620 ID Setting This wireless optical mouse contains 256 sets ID. The ID-recognition function helps to protect against interference from other RF products in the same environment. Remember to reset ID when other RF products affect your keyboard kit. The ID button (with Typhoon Logo) locates on the top of the receiver with a LED under to show the connecting condition. The mouse should be able to work after you first install it.
Typhoon Wireless Office Desktop Article No.: 40620 3. Then press the ID button on the bottom of the keyboard once. Keyboard ID button Note: The whole procedure should be complete within 25 seconds. Remarks: 1. Please choose only USB or PS/2 system to install your RF keyboard kit, do not mix USB and PS/2 port under the same system, or it may cause harm to your keyboard kit or PC system. If you choose USB system, only plug in the USB connector into your PC system.
Typhoon Wireless Office Desktop Article No.: 40620 Software Installation USB Device Driver The USB device driver is included in Windows system. When the first time you plug in the USB mouse, the system will automatically detect a new hardware connected and then bring up "Add New Hardware Wizard" dialogue box. Please follow the Wizard's USB driver installation steps. Once this installation step is completed the basic functions of the mouse will work under the operating system.
Typhoon Wireless Office Desktop Article No.: 40620 By Software: 1. When keyboard batteries are low, the battery low icon right-bottom corner on the Windows taskbar. will show on the 2. When mouse batteries are low, the battery low icon right-bottom corner on the Windows taskbar. will show on the Note: After changing new batteries, battery low icon 10 or will disappear.
Typhoon Wireless Office Desktop Article No.: 40620 Using the Keyboard Besides the usual keys, this keyboard also has extra-dedicated keys, which provide multimedia, Internet, and Office functions. These hot keys are reprogrammable, except Volume Down / Up and Mute. They can be configured as a string, a combination key, a web site, an existing file, or a function the driver pre-defines for you. To reconfigure these keys, click KeyMaestro icon on Windows system tray to select "Commands in the Menu.
Typhoon Wireless Office Desktop Article No.: 40620 Volume Control To raise or lower the volume Note: This key can’t be reprogrammable. Mute or resume sound output Mute Note: This key can’t be reprogrammable. Opens Microsoft Word. Word Note: Driver installation is necessary. Opens Microsoft Excel. Excel Note: Driver installation is necessary. PowerPoint Opens Microsoft PowerPoint. Note: Driver installation is necessary. ACPI Key: Your keyboard has the power management “Sleep” key.
Typhoon Wireless Office Desktop Article No.: 40620 F4: Send Sends the e-mail in Microsoft Outlook or Outlook Express. F5: Undo Reverses the last command or deletes the last entry you typed or action. F6: Redo Reverses the action of the Undo command. F7: Print Prints the file in the active window. F8: Save Saves the active file with current file name, location and file format. F9: My Comp Opens “My Computer”. F10: My Doc Opens “My Document”. F11: My Pic Opens “My Pictures”.
Typhoon Wireless Office Desktop Article No.: 40620 Mouse Buttons Besides normal mouse left and right key, this mouse also provides a scroll wheel, the 4th and 5th key for other features. Scroll Wheel: The 4th Key: th The 5 Key: Page up Page Down Scroll page up or down. Back Return to the last page you viewed. Forward View the next page you viewed before. Important Information 14 1. This optical mouse uses light to sense movement.
Typhoon Wireless Office Desktop Article No.: 40620 Commands in the Menu If you right-click on KeyMaestro icon commands. on taskbar, a menu will pop up with the following Configure Click on this command, a customization dialogue box will pop up with following functions. 1. Select a Hotkey This function contains the default function of a key. You can click on "Display Label" to re-define the key functions. When you click it, a Configure Button box will appear.
Typhoon Wireless Office Desktop Article No.: 40620 Configure to launch it. The default of this function is enabled. 4. Enable Auto Play This command is to show or hide the auto play function. When the function is enabled, Microsoft Media Player will show on the screen after you press the “Play” key of the multimedia keys. For Winamp user, you can use the multimedia keys to control Winamp function after you call out Winamp and disable Auto play function. The default of this function is enabled.
Typhoon Wireless Office Desktop Article No.: 40620 Troubleshooting If you are experiencing problems with your keyboard or mouse please check the following: 1. Make sure the receiver connector is inserted into the right port. 2. Check to see if the batteries in the keyboard and mouse are installed correctly. Make sure the polarity of the batteries corresponds with the polarity signs in the battery compartment. 3. Replace the batteries on time to make sure the batteries are not low in power.
Typhoon Wireless Office Desktop Article No.: 40620 “Microsoft Outlook”. You should change the setup for “Microsoft Outlook” (mail format) that will give the enhance function keys optimum compatibility. To change the setup, you should proceed as follows: Click “Microsoft Outlook”----“Tools” & “Options” and highlight the menu item “Use Microsoft Word to edit email messages”. Click “OK” to close the dialog box. The “Microsoft Outlook2000” setup screen is shown below for reference.
Typhoon Wireless Office Desktop Article No.: 40620 1. Open “Microsoft Word” application and click on “Tools”, “Customize”. 2. Click on “Commands” and “Keyboard”. 3. Select “All Commands” from “Categories” and “EmailSend” from “Commands”. Click and move cursor to “Press new shortcut key” blank area then Press the SEND key (the SEND key build on the Keyboard, that is; please make sure Keyboard office lock indicator is already enabled).
Typhoon Wireless Office Desktop Article No.: 40620 4. Click on “Close” and “Word” application to complete the setup process. Re-test the SEND key function under “Microsoft Outlook”;The SEND key function should now be working properly. Warning: Please don’t click the “Reset All” select item; or you will lose all shortcut key functions. Note: It is the best way of using the SEND key.
FCC GUIDELINES This equipment has been tested and found to comply with the limits for a Class B digital device, pursuant to Part 15 of the FCC Rules. These limits are designed to provide reasonable protection against harmful interference in a residential installation. This equipment generates, uses and can radiate radio frequency energy and, if not installed and used in accordance with the instructions may cause harmful interference to radio communications.