
User's Manual


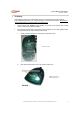

Typhoon Wireless Office Desktop
Article No.: 40620
All specifications and information are subject to changes without further notices
9
Software Installation
USB Device Driver
The USB device driver is included in Windows system.
When the first time you plug in the USB mouse, the system will automatically detect a new
hardware connected and then bring up "Add New Hardware Wizard" dialogue box. Please
follow the Wizard's USB driver installation steps. Once this installation step is completed the
basic functions of the mouse will work under the operating system.
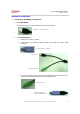
KeyMaestro Input Device Driver
1. Insert the CD labeled "KeyMaestro Input Device Driver" into your CD-ROM.
2. Run "SetupKey.exe" in the driver CD.
3. Follow the on-screen instruction to install the driver.
4. The default installation path is set to c:\Program Files\KMaestro. You have the option
to change the install path during setup.
5. The driver icon
will show on Windows system tray when the driver is loaded.
LED Indication
Num Lock: KeyMaestro driver icon will show as when pressing NumLock button.
Caps Lock: KeyMaestro driver icon will show as
when pressing CapsLock button.
Scroll Lock: KeyMaestro driver icon will show as
when pressing Scroll Lock button.
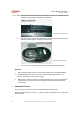
Battery Low Indication
By Hardware:
When the LED under receiver ID button flashes but there is no transmission between
receiver & keyboard or mouse, please check the situation under and change
keyboard or mouse batteries. Please prepare batteries and change them when
keyboard or mouse can’t transmit signals.
1. Mouse battery low:
When both LED indicators under receiver ID button flashes and mouse scroll
wheel flash, means mouse batteries are low.
2. Keyboard battery low:
When the LED under receiver ID button flashes but the LED under mouse
scroll wheel doesn’t flash, means keyboard batteries are low.
If the LED under receiver ID button still flashes after changing mouse
batteries, means keyboard batteries are low.