
User Manual


1/4
R
R
F
F
M
M
o
o
u
u
s
s
e
e
Q
Q
u
u
i
i
c
c
k
k
I
I
n
n
s
s
t
t
a
a
l
l
l
l
a
a
t
t
i
i
o
o
n
n
G
G
u
u
i
i
d
d
e
e
Congratulations on your purchasing this exciting mouse. Your new Mouse is easy to install and
offers you a host of useful features. The great features of this mouse are wheel for quick scrolling
and wireless function for easy movement. With the wireless function, you can pass around the
mouse during meetings without bothering from a cable or you can write e-mails and surf the
Internet from the comfort of your living room couch. All those human-oriented characteristics
make you feel more comfortable and efficient while surfing on the website or using applications.
After the KeyMaestro driver installed, you will have seven extra functions to select for buttons,
Quick Jump, Double Click, Window Zoom, Switch AP, Auto Panning, Back and Forward.
Moreover, the Quick Jump button is bonded with most often-used functions, Mouse Control
Panel, Control Panel, Horizontal Scroll Bar, Vertical Scroll Bar, Minimize All Windows, Size
Grip, Windows Explorer, Recall the Last Active Window and Exit. Please install the KeyMaestro
Input Device driver to find more great functions!
System Requirements
¾ Microsoft® Windows®NT 4.0, Windows®95, Windows®98, Windows®ME,
Windows®2000 or Windows®XP operating system
Note: For USB model, it is only suitable for Windows®98, Windows®ME, Windows®2000 or
Windows®XP operating system
Hardware Installation
Connect the Receiver to Your PC System
1. Turn off your PC system. Remember to turn off your PC
system before you connect or disconnect the receiver.
2. For PS/2 model, you can connect the receiver’s PS/2 plug
into the PS/2 port.
3. For the USB model, connect the receiver’s USB plug into
the USB port on your PC system.
4. Take the mouse and make sure the two
AA alkaline batteries
on the back are installed correctly. (Follow the polarity
signs in the battery compartment.)
5. Turn on your PC system.
ID Setting
This wireless optical mouse contains 256 sets ID. This extra ID-recognition function helps to
protect against interference from other RF mouse in the same environment. After completing the
hardware installation, you must set the ID of the receiver and mouse.
1. Press the ID button on the side of the receiver once.
2. Press the ID button on the bottom of the mouse once.
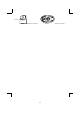
PS/2 Mouse Port
Mouse Battery Compartment
USB Mouse Port