
Use and Care Manual


paint your walls and trim
pinte las paredes y molduras
Walls Paredes
Cut In Recorte
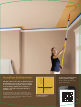
With an angled brush, paint a 3” to 4”
perimeter on your wall, feathering the
edge as you work. Paint around fixed
objects such as outlets.
Con una brocha angulada, pinte una franja de 3” a 4” en
el perímetro de la pared, emparejando las orillas mientras
usted trabaja. Pinte alrededor de objetos fijos, como
enchufes eléctricos.
Roll Rodillo
Place a loaded roller in the top corner of
the wall, joining the outline and feathered
edge. Working in a 3’ x 3’ area, roll a “W”
on the wall to distribute the paint. Roll
and fill in the remainder of the 3’ x 3’ area
completely. Reload your roller. Adjacent
and just below your first area, start a
second “W” allowing the top of the letter
to overlap into the painted area above.
Fill in your second “W” area, evenly
distributing the paint.
Coloque un rodillo saturado en la esquina superior de
la pared, uniendo el recorte con las orillas emparejadas.
Trabajando en un área de 3’ x 3’, pinte con el rodillo una
“W” en la pared para distribuir la pintura. Pinte con el
rodillo y sature el resto del área de 3’ x 3’por completo.
Sature nuevamente el rodillo. Contiguo y justo debajo de
la primera área inicie una segunda “W”, permitiendo que la
parte superior de la letra se empalme sobre el área pintada
arriba. Cubra el área de su segunda “W”, distribuyendo
uniformemente la pintura.
Wet Edge Orilla Húmeda
Joining sections of your painting project
while they are wet prevents unsightly
lines. Once you begin a section of wall,
stop only at natural breaks in the wall-
not in the center.
Uniendo secciones de su proyecto de pintura mientras
están húmedos evítarán líneas antiestéticas. Una vez
que inicie una sección de pared, sólo pare en los cortes
naturales en la pared y no en el centro.
12
80143_Behr_Int_HowTo.indd 13 3/14/12 6:20 PM