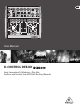
User Manual B-CONTROL DEEJAY Next-Generation DJ Machine—Play, Mix, Perform and Scratch Your MP3 Files like Vinyl Records
B-CONTROL DEEJAY BCD3000 User Manual Table of Contents Thank you........................................................................ 2 Important Safety Instructions....................................... 3 Legal Disclaimer.............................................................. 3 Limited warranty............................................................. 3 1. Introduction................................................................ 4 2. Installation........................................
B-CONTROL DEEJAY BCD3000 User Manual Important Safety Instructions Terminals marked with this symbol carry electrical current of sufficient magnitude to constitute risk of electric shock. Use only high-quality professional speaker cables with ¼" TS or twist-locking plugs pre-installed. All other installation or modification should be performed only by qualified personnel.
B-CONTROL DEEJAY BCD3000 User Manual 1. Introduction The BCD3000 features 2 first-class Phono preamps, one of which is switchable to the CD input. The sophisticated Headphone section includes a PFL function as well as the option to monitor the master output signal directly. Start/Stop, Cue, Loop and Pitch-Bend have dedicated controls to support your intuitive performance, plus 4 user-assignable controls and buttons are available in the Effects section.
B-CONTROL DEEJAY BCD3000 User Manual 2. Installation 2.1.2 Installing TRAKTOR 3 LE on Windows XP When using Windows XP, please continue with Chapter 2.1. Mac users continue with Chapter 2.2. Installation: 2.1 Installation on Windows XP First, install the driver on your computer. The driver is provided on the included “BCD3000” CD-ROM. 1. Insert the “TRAKTOR 3 LE” CD in the CD/DVD drive. 2. Open Windows Explorer (My Computer > right mouse button > Explorer). 3.
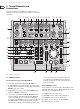
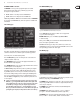
B-CONTROL DEEJAY BCD3000 User Manual 3. Control Elements and Connections The various control elements of your BCD3000 are described in this chapter. All controls and connections are explained in detail, and there are several useful tips on their use. (2) (1) (4) (9) (5) (10) (6) (13) (7) (11) (8) (12) (17) (19) (18) (15) (3) (16) (22) (21) (33) (32) (23) (24) (25) (34) (26) (27) (31) (30) (20) (28) (29) (14) Fig. 3.1: The BCD3000’s control elements 3.
B-CONTROL DEEJAY BCD3000 User Manual The OUTPUT section (13) The CUE A and CUE B buttons allow you to listen in on Deck A or B. Keep the respective button pressed to feed the signal of Deck A or Deck B to the Headphone output (14). (14) The PHONES output (¼" stereo connector) is used for connecting headphones. (15) The PHONES VOL control lets you adjust the volume level of the Headphone output (14).
B-CONTROL DEEJAY BCD3000 User Manual (43) The POWER switch turns your BCD3000 on and off. It should always be in the OFF position (out) when connecting the unit to or disconnecting the unit from the mains. ◊ Please note: The power switch does not completely separate your BCD3000 from AC power. If you plan on not using your BCD3000 for a prolonged period of time, please disconnect it from the mains by removing the power cable from the wall outlet. 4. The Software (43) (42) (41) (40) Fig. 3.
B-CONTROL DEEJAY BCD3000 User Manual GLOBAL MODE selection: The WDM/MME page: If STANDARD is selected, you can only adjust the input source for IN A (Mic or Phono A) and the driver latency on the ASIO page (see below). The outputs are assigned as follows: • CH 1-2: channels 1-2 are always routed to the MASTER OUT • CH 3-4: channels 3-4 are always routed to the PHONES OUT Additionally, the BCD3000’s MIDI characteristics differ from those in ADVANCED mode (see below).
B-CONTROL DEEJAY BCD3000 User Manual 5. Operation Program launch The control concept of the BCD3000 is designed to be extremely intuitive so that you master it quickly. All control elements have been arranged in such a way that you may already know from a DJ mixer or DJ CD player. The software’s user interface reflects the console of the BCD3000, allowing you to immediately control as many functions as possible with the B-CONTROL, without having to use the computer’s mouse.
B-CONTROL DEEJAY BCD3000 User Manual 5.2 Additional DJ functions CUE function The CUE function lets you place a cue point within a piece of music. A cue point marks the position in a tune that you can specify. This will primarily be a point in the track to which you want to return later, in order to play the track from that point, for example. • When PLAY is pressed while a track is playing, the playback is paused and the cue point is placed at the current position.
B-CONTROL DEEJAY BCD3000 User Manual The ANALOG INPUT A (36) is switchable between the microphone signal and PHONO A. This can be done the following ways: 5.4.2 Routing possibilities with the WDM/MME driver (Windows) • Via MIDI Program Change command (see Table 6.7) • In Windows XP, via the tab “ASIO” or “WDM/MME” in Control Panel The WDM/MME driver supports playback/recording of 2 audio signals. For 2-channel recording you can select input IN A or IN B in the WDM/MME window of the control panel.
B-CONTROL DEEJAY BCD3000 User Manual 6. MIDI Control Fader functions: All control functions of the BCD3000 are sent to your computer as MIDI data. The Musical Instruments Digital Interface is a generic, non-manufacturerspecific standard that enables communication between electronic musical instruments. Although the BCD3000 is not equipped with the “classic” 5-pin MIDI connectors, it still uses the MIDI protocol for data transmission via USB.
B-CONTROL DEEJAY BCD3000 User Manual 6.3 Receiving MIDI commands In TRAKTOR 3 LE, this means the following: The reception of MIDI data also allows for transmitting commands from third-party DJ software to your BCD3000. Although this function is not necessary to control the device from the software, you can still display the switching status of button LEDs, which enables you to work more intuitively.
B-CONTROL DEEJAY BCD3000 User Manual 8. Specifications Audio Inputs USB Interface Type Microphone Input Type XLR balanced Gain range -∞ - +50 dB Frequency response 10 Hz - 29 kHz (-3 dB) Impedance approx. 2 kΩ (balanced) Max. input level -25 dBu @ 35 dB Gain (mic level center position) Signal-to-noise ratio 110 dB (A-weighted) Distortion (THD + N) 0.01% (A-weighted) CMRR typ.
We Hear You