
Manual


8
TRUTH B2092A
making any changes, and then using the controls to finetune the
settings, creating the best results possible. Therefore, first set
the controls to the neutral position labeled TYPICAL, i.e. set PHASE
to 0° and ROOM COMPENSATION to 0 dB.
Start by placing the subwoofer roughly in the stereo center of
your loudspeaker system. If the frequency response is not well-
balanced, move the subwoofer to the left or to the right, so that
it excites different room modes. Also, experiment with different
distances to the wall and to the rooms corners. If you place the
subwoofer in a corner, the bass level will be increased, changing
the overall settings. When selecting a location for your
subwoofer, make sure that the openings in the back of your
B2092A are not covered.
The stereo/front loudspeakers should be placed symmetrically
with the same distance to the listening position. Correct placement
of near-field monitors is explained in detail in the TRUTH B2030A/
B2031A users manual and in the TRUTH B2030P/B2031P
handbook.
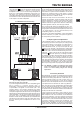
3.3.1 Adjusting room compensation
Fig. 3.3: Room compensation
After you have found an optimal physical location for your
B2092A speakers, use the switches in the back to finetune your
settings.
The ROOM COMPENSATION switch lets you lower the bass
range in 2-dB increments. If your B2092A is located near a wall
or in a room corner, the sound is reflected back from the boundary
and superimposed on the directly dispersed sound. This results
in a higher volume, which can be neutralized using the ROOM
COMPENSATION function.
3.3.2 Phase adjustment
Fig. 3.4: Effect of phase differences on the frequency
response
When installing the B2092A, a phasing deviation between the
subwoofer and main speaker signals may occur. This deviation
(phase difference) is easily audible in the sound. Improper
phasing causes a dip at the crossover point. Phasing differences
occur when the distance between the subwoofer and the
audience varies from the distance between the main speakers
and the audiencehence having a varying delay time. This can
not always be avoided. Using the PHASE function, your B2092A
can perform a phase adjustment electronically. Figure 3.5 shows
the possible results of phasing differences on the frequency-
response curve.
For optimal system calibration, we recommend using a Real Time
Analyzer, e.g. the BEHRINGER ULTRACURVE PRO DEQ2496
coupled to a ECM8000 measurement microphone. If no such
equipment is available, you can try making an adjustment using
an 80-Hz sinus tone:
Run the sinus tone simultaneously on the subwoofer and the
front loudspeakers. Set the PHASE switch to the position in
which the sound with the highest volume is being reproduced.
4. AUDIO CONNECTIONS
If you are working with the DEQ2496, place the measurement
microphone in your audience at the height of a human ear. Run
pink noise through the speakers. Keep an eye on the 80-Hz
range on the frequency display. If you notice a dip in this
frequency range, put the PHASE switch into a position that causes
a straight frequency response curve, as shown in
fig. 3.4 (the graphic on the left).
4. AUDIO CONNECTIONS
The audio connectors of your B2092A are electronically
balanced and ensure automatic hum and noise reduction.
Of course, you can also connect equipment featuring unbalanced
outputs. To this end, use either mono jacks or connect ring and
sleeve of the stereo jack (bridge pin 1 and pin 3 when using XLR
connectors).
+ Please ensure that only qualified personnel install
and operate the B2092A. During installation and
operation the user must have sufficient electrical
contact to earth. Electrostatic charges might affect
the operation of the unit.
Fig. 4.1: XLR connections
Fig. 4.2: 1/4" TS connector for the footswitch