User Manual V-AMP3 Next-Generation Virtual Guitar Amplifier with USB Audio Interface and energyXT2.5 Recording Software behringer.
V-AMP3 User Manual Table of Contents Thank you........................................................................ 2 Important Safety Instructions....................................... 3 Legal Disclaimer.............................................................. 3 Limited Warranty............................................................ 3 Basic Operation............................................................... 5 Audio Connections..........................................................
V-AMP3 User Manual Important Safety Instructions Terminals marked with this symbol carry electrical current of sufficient magnitude to constitute risk of electric shock. Use only high-quality commercially-available speaker cables with ¼" TS plugs pre-installed. All other installation or modification should be performed only by qualified personnel. 9. Do not defeat the safety purpose of the polarized or grounding-type plug. A polarized plug has two blades with one wider than the other.
V-AMP3 User Manual [2] Subsequently, the product must be returned in its original shipping carton, together with the return authorization number to the address indicated by MUSIC Group. [3] Shipments without freight prepaid will not be accepted. § 4 Warranty Exclusions [1] This limited warranty does not cover consumable parts including, but not limited to, fuses and batteries.
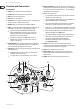
V-AMP3 User Manual Basic Operation 1. Plug the included power cable into the AC IN on the side of the unit. The V-AMP 3 will automatically turn on and resume the previously selected preset. Audio Connections ¼" TRS headphones connector strain relief clamp 2. Plug your guitar into the INPUT using a ¼" instrument cable. sleeve 3. Connect a monitoring system: ring • If using a pair of headphones, connect to the PHONES jack.
V-AMP3 User Manual Controls and Connectors [10] BANK UP and DOWN: In play mode, use these buttons to scroll through the banks of presets. Press both buttons simultaneously to enter EDIT mode. After an edit category has been selected (buttons A – E), use the BANK UP and DOWN buttons to edit parameters. Front panel [1] GAIN: Adjusts the distortion level of an amp simulation. [11] TAP: Performs seven functions: [2] TREBLE: Adjusts the upper frequencies of the guitar tone.
V-AMP3 User Manual Rear/Side panel [16] INPUT: Plug a guitar into this jack using a ¼" instrument cable. [19] AUX LEVEL: Adjusts the input level of the AUX IN jack. [17] PHONES: Plug a pair of headphones into this jack using a ¼" TRS cable. [20] LINE OUT: Plug balanced or unbalanced ¼" cables into these jacks to send the stereo signal for recording or performance applications. ≠ [18] AUX IN: Plug an external sound source into this jack using a ¼" TS or TRS cable. behringer.
V-AMP3 User Manual ≠ To exit configuration mode, press the TUNER/EXIT button. ≠ [22] MIDI OUT/THRU: Sends MIDI information from the V-AMP 3 or directly from the MIDI IN jack. Operating Mode Function LINE OUT L Studio 1 (S1) Stereo operation with selected effects and speaker simulations. Studio 2 (S2) Left (dry signal, only compressor plus auto-wah). Live 1 (L1) Stereo operation + additional 3-band EQ (adjustable in CONFIGURATION mode).
V-AMP3 User Manual Live mode 1, 2 and 3 Calling up presets When performing live with the V-AMP 3, the most common way to get the sound to the crowd is to run the unit into an amplifier on stage, route your signal directly into a mixing board, or both. When the unit is powered on, it automatically loads the last used preset.
V-AMP3 User Manual a 1 for distortion. • CABINETS – Enter EDIT mode and press the C button to select one of the speaker CABINETS. Press the BANK UP and DOWN buttons to select one of the 15 available speaker cabs. • REVERB – Enter EDIT mode and press the D button to edit REVERB settings. Press the BANK UP and DOWN buttons to select one of the 9 reverb types. You may use the REVERB knob to adjust the amount of reverb while in EDIT mode.
V-AMP3 User Manual V-AMP 3 Preset Chart Bank A Preset B Preset C Preset D Preset E Preset 1 2 3 4 acoustic ambienc crunch rhythm tight rhythm break da blues 1 6 11 16 clean reverb windmill rhythm tight hi octane crunch a blues 2 7 12 17 blackface dry EL34power crunch 80s metallic blisteringblue 3 8 13 18 4 9 14 19 ACOUSTIC AMBIENC 21 CLEAN REVERB 22 BLACKFACE DRY 23 6 7 8 9 10 11 12 CRUNCH RHYTHM TIGHT RHYTHM BREAK da BLUES acoustic ambienc crunch rhythm tight rhythm break da
V-AMP3 User Manual BRIT BLUES: Modeled on the JTM 45, the first Marshall amp ever designed. Extreme gain settings produce a highly compressed and really “dirty” sounding distortion. Combined with a 2 x 12" speaker simulation, it produces impressive Bluesbreaker sounds. V-CRUNCH: This amp is ideal for modern blues or jazz. Its sound is subtle but crunchy and dynamic. CUSTOM BLUES: This simulation is based on a 1965 Marshall JTM 45 Bluesbreaker, but has more flexibility of sound control.
V-AMP3 User Manual Effects Processor Cabinets — 1 2 3 4 5 6 7 8 9 10 11 12 13 14 15 A great complement to the selection of amps and speaker cabinets is the built-in multi-effects processor. You may select from 16 high-quality effects such as chorus, flanger, delay, auto wah, and many others. These effects can be used to thicken up your guitar tone in a subtle way, or create extreme and experimental sounds that push your creative limits.
V-AMP3 User Manual Wah Wah By using a MIDI pedal, such as the BEHRINGER FCB1010, you can access an additional Wah Wah effect. You may adjust the sweepable filter characteristic by entering EDIT mode, selecting the DRIVE menu and turning the EFFECTS knob while holding the TAP button. Effects descriptions The following is a brief description of the various effects available on the V-AMP 3: REVERB: Reverb is still the most important effect for mixing and live performance.
V-AMP3 User Manual MIDI MIDI IMPLEMENTATION CHART Function Transmitted Received 16 Y Y Amp Vol (0-127) 17 Y Y Presence (0-127) 18 Y Y Reverb Mix (0-127) *2 19 Y (skipped on request) Y Amp Type (0-32) with default cabinet *3 20 Y (skipped on request) Y Fx Type (0-15) with defaults *1 21 Y Y Fx off/on (0/127) 22 Y Y Reverb Send off/on (0/127) 23 Y Y Cabinet Type (0-15) *5 24 Y Y Reverb Type (0-8) *4 25 Y Y Noise Gate Level (0-15) 26 Y Y Drive off/on (0/127)
V-AMP3 User Manual Application HPM1000 X1222USB EP2000 X1204USB Balanced or unbalanced cables VP1520 MIDI cable FCB1010 MIDI Controller Studio Recording Live 1 Configuration Live performance without a guitar amplifier UCA222 ¼" to RCA cable HPM1000 AUX Input EP2000 FS112V (optional) X1222USB Jamming with a PC using UCA222 VP1520 GMX112 MIDI cable B3031A HPM1000 FCB1010 MIDI Controller Live 3 Configuration Live performance with a guitar amplifier Direct Monitoring = On Latency-free h
V-AMP3 User Manual Online Registration Please register your new BEHRINGER equipment right after your purchase by visiting http://behringer.com and read the terms and conditions of our warranty carefully. Should your BEHRINGER product malfunction, it is our intention to have it repaired as quickly as possible. To arrange for warranty service, please contact the BEHRINGER retailer from whom the equipment was purchased.
V-AMP3 User Manual FEDERAL COMMUNICATIONS COMMISSION COMPLIANCE INFORMATION V-AMP3 Responsible party name: MUSIC Group Services USA, Inc. Address: 18912 North Creek Parkway, Suite 200 Bothell, WA 98011, USA Phone/Fax No.: Phone: +1 425 672 0816 Fax: +1 425 673 7647 V-AMP3 complies with the FCC rules as mentioned in the following paragraph: This equipment has been tested and found to comply with the limits for a Class B digital device, pursuant to part 15 of the FCC Rules.
behringer.