
User's Manual


ECHO MACHINE EM600
Ultimate Echo Modeling Eects Pedal
Thank you for showing your condence in us by purchasing the BEHRINGER ECHO MACHINE EM600.
This ultimate stereo Echo Modeler delivers the whole range of analog, tape and digital delay eects.
Create any sound from vintage tape-based echo over warm analog BBD delay sound to clean
high-delity digital delay.
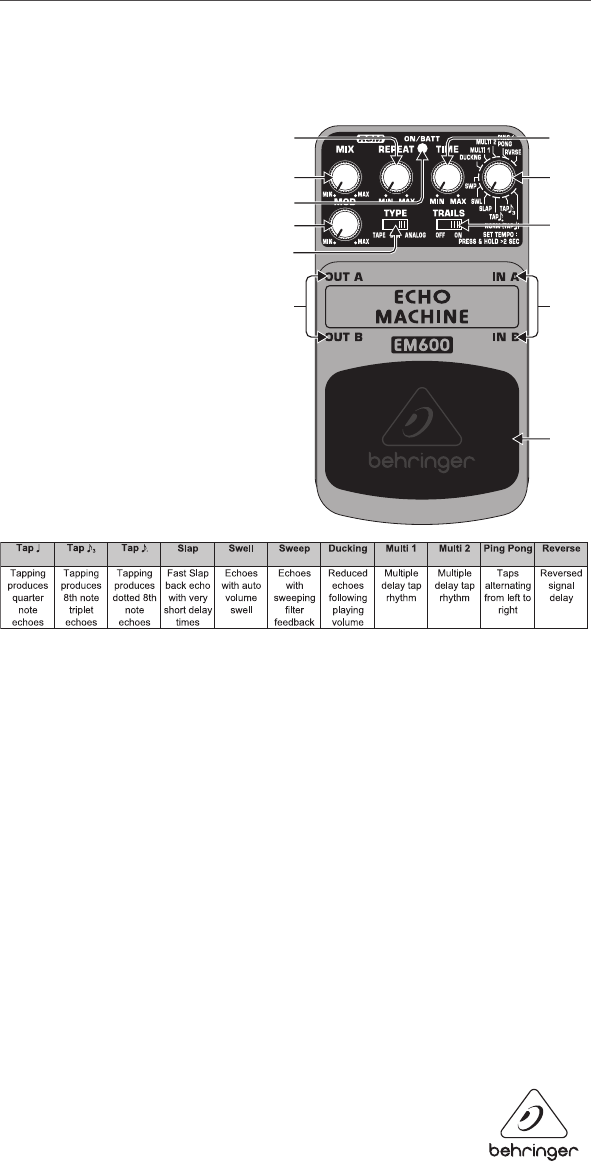
1. Controls
(1) The MIX knob is used for setting the
level of the delays.
(2) The REPEAT knob determines the
number of delays.
(3) The TIME control adjusts the
delay time. The length of time
depends on the selected program.
The delay time indicates how fast the
signal repetitions will follow after the
original signal. Low settings allow
to use the unit as a chorus or anger.
Alternatively, you can tap the tempo
with the footswitch. Turning the
control overrides tap tempo settings.
(4) With the MODE knob, you can select
one of several delay modes:
(1)
(9)
(4)
(11)
(6)
(8) (7)
(5)
(10)
(2) (3)
(5) The ON/BATT LED illuminates when the eect is activated. It also serves as a battery level indicator.
(6) Use the footswitch to activate/deactivate the eect. If you depress the pedal for more than
two seconds, you are able to enter a tempo by tapping the pedal several times in time with
the music. Depressing the pedal again for more than two seconds quits the tempo input mode.
(7) The ¼" TS connectors (IN A/IN B) connect to your instrument. Use IN A for mono applications and
both IN A and IN B if you have a stereo signal source, such as another eects unit.
(8) The two ¼" TS connectors OUT A and OUT B send the signals to your amp. Use both connectors if
you want to achieve a full stereo delay eect. For mono use simply plug in OUT A.
(9) With the MOD knob, you can add a nice modulation eect to your delays (TYPE switch position:
ANALOG = Vibrato; DIGITAL = Chorus; TAPE = Wow and utter).
(10) The TYPE switch allows you to choose from dierent classic delay characteristics,
ranging from TAPE (delays with subtle high-frequency damping), DIGI (high-quality delays)
to ANALOG (dark and slightly distorted delays).
(11) With the TRAILS switch, you can prevent delays from being cropped when bypassing the eect.
Use the DC IN connection at the front of the unit to plug in a 9 V power supply (not included).
The BATTERY COMPARTMENT is located underneath the pedal cover. To install or replace the 9 V battery
(not included), press the hinges with a ballpoint pen and remove the pedal cover. Be careful not to
scratch the unit.