Version 1.4 March 2003 ENGLISH FCB1010 MIDI FOOT CONTROLLER Downloaded from www.Manualslib.
MIDI FOOT CONTROLLER FCB1010 IMPORTANT SAFETY INSTRUCTIONS DETAILED SAFETY INSTRUCTIONS: 1) Read these instructions. 2) Keep these instructions. 3) Heed all warnings. 4) Follow all instructions. CAUTION: WARNING: To reduce the risk of electric shock, do not remove the top cover (or the rear section). No user serviceable parts inside; refer servicing to qualified personnel. To reduce the risk of fire or electric shock, do not expose this appliance to rain and moisture.
MIDI FOOT CONTROLLER FCB1010 MIDI FOOT CONTROLLER Ultra-Flexible MIDI FOOT CONTROLLER with Two Expression Pedals and MIDI Merge Function FCB1010 s 10 banks of presets, each with 10 fully user-editable presets customized for BEHRINGER amplifiers, V-AMP 2 and BASS V-AMP s Two expression pedals with freely assignable MIDI channel, controller number and range s Simultaneous transmission of five MIDI program change commands and two MIDI controllers per preset s MIDI NOTE commands for trigger and tap-tempo
MIDI FOOT CONTROLLER FCB1010 FOREWORD Dear Customer, welcome to the team of BEHRINGER users, and thank you very much for expressing your confidence in us by purchasing the FCB1010. Writing this foreword for you gives me great pleasure, because it represents the culmination of many months of hard work delivered by our engineering team to achieve a very ambitious goal: to present you with an outstanding device that gives you maximum flexibility and performance; both live on stage and in the studio.
MIDI FOOT CONTROLLER FCB1010 1.1.3 Warranty 1. INTRODUCTION Congratulations! With the BEHRINGER MIDI FOOT CONTROLLER FCB1010 you purchased an ultra-flexible controller unit for a wide range of applications, whether you are a guitarist, keyboard player or studio engineer: 10 BANKS with 10 PRESETS each and two fully user-programmable expression pedals will give you enough flexibility to manage your MIDI equipment.
MIDI FOOT CONTROLLER FCB1010 1.3.2 Rear panel 2. PROGRAMMING THE FCB1010 In this chapter you will learn to program your FCB1010 and adapt it to your specific MIDI set-up. But dont worry, you wont have to learn a programming language before you could give your FCB1010 a single MIDI command. The unit will perform all functions for you, one after the other. Simply make and confirm your choices. If particular functions prompt you to enter a parameter, this will be covered specifically. 2.
MIDI FOOT CONTROLLER FCB1010 to confirm activating DIRECT SELECT to be able to directly select presets. To do this, keep DOWN/ESCAPE pressed for 2.5 sec. to exit GLOBAL CONFIGURATION. The display now shows 00. Now you can directly select the presets, as described in ch. 2.1.2. 2.2.2 MIDI channel setting To get from DIRECT SELECT to MIDI FUNCTION, press UP. The MIDI FUNCTION LED flashes correspondingly.
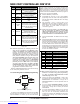
MIDI FOOT CONTROLLER FCB1010 6ZLWFK )XQFWLRQ 1 SWITCH 1 2 SWITCH 2 5 6 7 8 9 COPY PRESET SYSEX SEND $FWLRQ Determines if UP key toggles SWITCH 1 relay while DIRECT SELECT is enabled. Determines if DOWN key toggles SWITCH 2 relay while DIRECT SELECT is enabled. Enables copying presets (see ch. 2.4.1). Sends the entire memory as a sysex dump. SYSEX RCV When this switch is pressed, the FCB1010 waits for the reception of system-exclusive data.
MIDI FOOT CONTROLLER FCB1010 s If you have selected EXP A or EXP B, you can now enter the controller number the EXPRESSION PEDAL of your choice is aimed to send values for. Confirm your selection with UP/ENTER and enter the lower value (pedal up). Confirm with UP/ENTER. Afterwards, enter the upper value (pedal pressed down completely) and confirm once again with UP/ENTER.
MIDI FOOT CONTROLLER FCB1010 s s Confirm with UP/ENTER. The NUMBER LED lights up. s Enter the control nunmber (0 bis 127) via the footswitches or the expression pedal A. s Confirm your selection with UP/ENTER. The VALUE 1 LED lights up. s Enter the value to be transmitted when the pedal is completely open by using the foot keys or the expression pedal A. s Confirm your selection with UP/ENTER. The VALUE 2 LED lights up.
MIDI FOOT CONTROLLER FCB1010 2.5 Controller toggle function s The VALUE to be entered now corresponds to the upper limit of the parameter range determined by the controlled device. That might sound a bit confusing, but its quite easy: the manual that came with the device usually contains an effects table listing the parameter range to be input via MIDI in order to control the delay time.
MIDI FOOT CONTROLLER FCB1010 Fig. 2.5: Sending a SysEx-Dump Fig. 2.6: Receiving a SysEx dump 2.8 Restoring factory presets 2.7.2 Receiving SysEx dumps To send back FCB1010 data stored on a sequencer/computer before, please follow the instructions below: s Connect the MIDI OUT connector of your sequencer or computer to the MIDI IN connector of the FCB1010 (see fig. 2.6). s Keep the DOWN switch pressed during power-up to enter the GLOBAL CONFIGURATION menu.
MIDI FOOT CONTROLLER FCB1010 s Keep the switches 1 and 3 pressed while powering up the unit. This puts your FCB1010 into self-test mode, and all LEDs are being tested. s Please wait until all switch LEDs light up. Then press all the switches, including the UP/ENTER and DOWN/ESCAPE keys, so that all LEDs are turned off. s Wait for a moment while the relay test is completed (four quiet cliking sounds are heard). The display shows F1 if no MIDI connection is present.
MIDI FOOT CONTROLLER FCB1010 4. MIDIA STANDARD, A REVOLUTION In the early 80s several leading manufacturers of electronic musical instruments developed a common standard, which was soon to revolutionize the entire MI industryboth from a technical and musical point of view. The MIDI standard (short for: Musical Instruments Digital Interface) was invented to allow musical instruments of different makes to communicate with each other.
MIDI FOOT CONTROLLER FCB1010 4.2.4 Running status Since the MIDI standard uses a serial transmission format, i.e. transmits data successively, it was soon found that the transmission rate is too low if the system is exploited to its full capacity. To make up for an audibly delayed transmission of MIDI data, the so-called running status was introduced, which suppresses the status byte in two or more identical MIDI messages that follow each other. For example, if the data bytes of a controller (e.g.
MIDI FOOT CONTROLLER FCB1010 7. WARRANTY § 1 WARRANTY CARD/ONLINE REGISTRATION To be protected by the extended warranty, the buyer must complete and return the enclosed warranty card within 14 days of the date of purchase to BEHRINGER Spezielle Studiotechnik GmbH, in accordance with the conditions stipulated in § 3. Failure to return the card in due time (date as per postmark) will void any extended warranty claims.