
User Manual


23 MODEL D User Manual
5.3.1 Procedure
1. Make sure that the preliminary procedures shown in section 5.1 have been
followed, and the MODEL D front panel controls and switches are set as
directed.
Osc1 Range and Scale Calibration
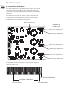
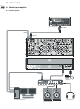
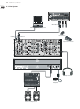
2. On the PCB, locate the OSC1 RANGE and OSC1 SCALE trimpots. (See PCB
drawing on the previous page.)
3. As set up in the preliminary procedure, make sure the A-440 switch is ON.
The A-440 test tone should be playing in your system.
4. On your external keyboard, press and hold the A5 key. Listen carefully, and
adjust the OSC1 RANGE trimpot on the PCB for zero beats.
5. On your external keyboard, press and hold the A2 key. Listen carefully, and
adjust the OSC1 SCALE trimpot on the PCB for zero beats.
6. Repeat steps 4 and 5 above until there are zero beats for either note. This
may need to be repeated several times to get this right.
7. Turn OFF the A-440 switch.
8. Make sure the OSC1 switch is left ON for the next calibration.
OSC 2 Scale and Range Calibration
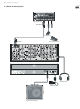
9. On the PCB, locate the OSC2 RANGE and OSC2 SCALE pots.
10. As set up in the previous procedure, the A-440 test tone should be o, and
the OSC1 switch should be set on.
11. On your external keyboard, press and hold the A5 key. Listen carefully to the
combination of OSC1 and OSC2, and adjust the OSC 2 RANGE trimpot on the
PCB for zero beats between them.
12. On your external keyboard, press and hold the A2 key. Listen carefully to the
combination of OSC1 and OSC2, and adjust the OSC2 SCALE trimpot on the
PCB for zero beats between them.
13. Repeat steps 11 and 12 above until there are zero beats for either note. This
may need to be repeated several times to get this right.
14. Turn OFF the OSC2 switch.
15. Make sure the OSC1 switch is left on, for the next calibration.
OSC 3 Scale and Range Calibration
16. On the PCB, locate the OSC3 RANGE and OSC3 SCALE pots.
17. As set up in the previous procedure, the A-440 test tone should be o, and
the OSC1 switch should be set on.
18. On your external keyboard, press and hold the A5 key. Listen carefully to the
combination of OSC1 and OSC3, and adjust the OSC3 RANGE trimpot on the
PCB for zero beats between them.
19. On your external keyboard, press and hold the A2 key. Listen carefully to the
combination of OSC1 and OSC3, and adjust the OSC3 SCALE trimpot on the
PCB for zero beats between them.
20. Repeat steps 18 and 19 above until there are zero beats for either note. This
may need to be repeated several times to get this right.
21. Turn OFF the OSC2 switch.
22. This completes the Oscillator Range and Scale Calibration.
23. If you want to do the other calibrations for the octave range, follow the
procedures shown on the next pages.
24. If you do not want to do any other calibrations, turn o the MODEL D,
check the internal cables are securely connected, and secure its front panel
assembly back onto the chassis using the 8 screws.