Version 1.
RACKTUNER BTR2000 IMPORTANT SAFETY INSTRUCTIONS CAUTION: To reduce the risk of electric shock, do not remove the top cover (or the rear section). No user serviceable parts inside; refer servicing to qualified personnel. WARNING: To reduce the risk of fire or electric shock, do not expose this appliance to rain and moisture. The apparatus shall not be exposed to dripping or splashing and no objects filled with liquids, such as vases, shall be placed on the apparatus.
RACKTUNER BTR2000 TABLE OF CONTENTS 1. INTRODUCTION ......................................................................................................... 4 1.1 Before you get started .................................................................................................................. 4 1.1.1 Shipment ............................................................................................................................ 4 1.1.2 Initial operation ..........................................
RACKTUNER BTR2000 1. INTRODUCTION Thank you for the confidence you have placed in us with your purchase of the BTR2000. You have acquired an extraordinary combination of a tuner and a metronome with integrated rack lighting that also makes it perfect for on-stage use. This advanced equipment sets new standards with its extensive list of features. It is an auto-chromatic tuner, which means it can automatically recognize any pitch when tuning your instrument.
RACKTUNER BTR2000 Should your BEHRINGER dealer not be located in your vicinity, you may directly contact one of our subsidiaries. Corresponding contact information is included in the original equipment packaging (Global Contact Information/European Contact Information). Should your country not be listed, please contact the distributor nearest you. A list of distributors can be found in the support area of our website (www.behringer.com/support).
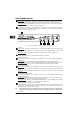
RACKTUNER BTR2000 TRANSPOSE/REF [TAP] button. Tuner mode: A short tap on this button lets you use the wheel for transposition (chapter 4.3). Keeping the button pressed longer lets you calibrate the standard A pitch (chapter 4.2.1). Metronome mode: The BTR2000 can recognize and save a tempo that is entered by pressing the [TAP] button at least 4 times in rhythm (chapter 5.2). The wheel is used to change the parameters of the various functions.
DEUTSCH RACKTUNER BTR2000 7
RACKTUNER BTR2000 + To enable reference tones and the metronome, click to be output from the MAIN connector, INPUT 2 must be selected and there must be nothing plugged into the SOUND connector! Using the built-in microphone If you want to use the built-in microphone, you must select INPUT 2 and the MUTE button must be pressed. 4. TUNER The BTR2000 tuner lets you control several parameters: s There are 11 different tuner modes. s The standard A pitch can be calibrated individually.
RACKTUNER BTR2000 To be able to work with the built-in microphone, there must be no cable plugged into the INPUT2 connector in the back of the BTR2000 and the MUTE button must be depressed. 1. Select INPUT 2 with the INPUT switch on the front of the BTR2000. The 2/MIC LED lights up. 2. Mute this channel by pressing MUTE/LIGHT; the MUTE LED above the MUTE/LIGHT button lights up. The built-in microphone is now activated and ready for use. 3. Position your instrument as close as possible to the BTR2000.
RACKTUNER BTR2000 Bass (BAS) This mode is especially well suited for a 6-string bass. (B - E - A - D - G - C) Baritone (brt) This setup helps you tune a guitar to a baritone tuning, in which each string is tuned 5 half-tones (a fourth) lower than a normal guitar. (B - E - A - D - F sharp - B) Banjo (bjo) The very widely used banjo tuning is made possible with this mode. (G - D - G - B - D) Ukulele (ule) The BTR2000 recognizes the notes of the open strings of a ukulele.
4.3.1 Manual calibration RACKTUNER BTR2000 1. Depress the TRANSPOSE/REF button for at least two seconds. The ¹440 LED flashes. The display shows the frequency currently set for the standard A, e.g. 440. 2. You can adjust the pitch of the standard A by up to 12 Hz higher or lower by turning the wheel. 3.
RACKTUNER BTR2000 1. Briefly press the TRANSPOSE/REF button. The TRANSP light flashes and the display shows the transposition currently set (0, if no transposition is set). 2. Turn the wheel to transpose up to 7 half-tones higher or lower. The display indicates the number of half-tones by which a non-transposed instrument is too high (1, 2, ..., 7) or too low (-1, -2, ..., -7), when compared with the BTR2000 transposition. 3. You can exit this menu by pressing the TRANSPOSE/REF button again. 4.
5. METRONOME RACKTUNER BTR2000 The integrated metronome in the BTR2000 has a range of 30 beats per minute (BPM) to 240 BPM. There are essentially 2 ways to use the metronome: s You can pre-set a tempo (e.g. 60 BPM). s The BTR2000 can pick up a tempo set by you. 1. Press and hold the SOUND/METRONOME button for 2 seconds. 2. The metronome function is selected when the METR light above the button is lit. 3. Briefly press INPUT SELECT; the click and the optical display of the metronome start up.
RACKTUNER BTR2000 Acoustic indicator The selected tempo is also output at the SOUND or MAIN connector. + If your instrument is plugged into INPUT 1, the metronome click is output only through the SOUND connector. If it is plugged into INPUT 2, and the SOUND output is not in use, the metronome click is output together with the instrument signal from the MAIN connector.
RACKTUNER BTR2000 7. APPLICATION EXAMPLES The following sample configurations should give you an idea how the BTR2000 can be integrated in a more or less complex environment. DEUTSCH If you have only one amplifier available, the setup shown in figure 7.1 is recommended.
RACKTUNER BTR2000 8. INSTALLATION 8.1 Rack installation The BTR2000 requires one height unit (1 HU) for installation in a 19" rack. Be certain to leave an additional 10 cm free in the back for the connectors. For installation in a rack, M6 machine screws and nuts should be used. Ensure a sufficient air supply and to not place your BTR2000 on an end, for example, to prevent the unit from overheating. 8.
RACKTUNER BTR2000 9. SPECIFICATIONS AUDIO CONNECTORS 1/4" TS connector on the front and back 1 MΩ, relay hard bypass INPUT 2 Input impedance 1/4" TS connector 1 MΩ, buffered SOUND Output impedance 1/4" TS connector 4.
RACKTUNER BTR2000 SHORT INSTRUCTIONS 18