UMA25S U-CONTROL User Manual A50-50233-00001
U-CONTROL UMA25S Important safety instructions 10) Place the power cord so that it is protected from being walked on and sharp edges. Be sure that the power cord is protected particularly at plugs, convenience receptacles and the point where it exits from the apparatus. 11) The apparatus shall be connected to a MAINS socket outlet with a protective earthing connection. 12) Where the MAINS plug or an appliance coupler is used as the disconnect device, the disconnect device shall remain readily operable.
U-CONTROL U-CONTROL UMA25S Ultra-Slim 25-Key USB MIDI Controller Keyboard with internal Audio Interface, more than 100 Software Plug-Ins and Ableton Live Lite 4 BEHRINGER Edition UMA25S V Stage performer and producer keyboard featuring 25 velocity-sensitive, full-size plus half-action keys V Built-in USB audio interface to connect your instruments and mixer to your computer for recording and playback V Kristal Audio Engine sequencer, Audacity audio editor and over 100 virtual instruments plus more tha
U-CONTROL UMA25S Foreword Table of contents Dear Customer, Welcome to the team of BEHRINGER users, and thank you very much for expressing your confidence in us by purchasing this device. Writing this foreword for you gives me great pleasure, because it represents the culmination of many months of hard work delivered by our engineering team to achieve a very ambitious goal: to present an outstanding keyboard which, thanks to its flexibility, can be used as audio interface as well as MIDI controller.
U-CONTROL UMA25S 1. Introduction Thank you for showing your confidence in us by purchasing the UMA25S. The UMA25S is an extremely flexible master keyboard with a control section that can be used for a wide array of applications.
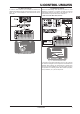
U-CONTROL UMA25S IMPORTANT INSTALLATION INFORMATION: 1.3 Hardware configuration The sound quality may diminish within the range of powerful broadcasting stations and high-frequency sources. Increase the distance between the transmitter and the device and use shielded cables for all connections. To connect the UMA25S to your computer, use the provided USB cable. Connect the supplied headset as shown in Fig. 1.3. Optionally, hook up further units to the UMA25S as can be seen from the diagram. 1.1.
U-CONTROL UMA25S 1.3.1 Stand-alone mode 1.3.2 USB mode (default) In case the USB connection is not available or detected, the UMA25S automatically switches to the stand-alone mode. In this mode, you can use the UMA25S to control external units via the MIDI output. This is the default setting when the device is turned on. If the UMA25S is connected to a computer via USB, the keyboard automatically switches to this mode. In the USB mode, you can choose between 2 options: MIDI THRU or MIDI OUT. 1.
U-CONTROL UMA25S 2. USB mode with MIDI OUT: 2. Software installation 2.1 Driver installation With Windows XP and Mac OS X operating systems, the UMA25S is detected as soon as you connect a USB cable to your computer. After detection, you can kick off right away. Thanks to the implementation of Core Audio in Mac OS X, it is possible to process your audio with extremely low latency. 2.1.1 Windows XP MIDI driver Optionally, you can install the BEHRINGER MIDI driver found on the supplied CD.
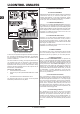
U-CONTROL UMA25S 3. Controls and connections Fig. 3.1: Top view of the UMA25S The keyboard of the UMA25S has 25 velocity-sensitive, full-size keys with half action. The OCT push buttons allow you to shift the keyboard range up to 4 octaves up or down. These push buttons are also used for transposition (see Chapter 5.2.2). Press the MMC push button to use the default MMC (MIDI Machine Control) functions of the control elements E1 to E8. The MMC functions are printed on these control elements.
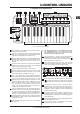
U-CONTROL UMA25S The LEVEL control adjusts the input volume of the microphone signal. Make sure the input signal does not clip (distortion). 4. UMA25S as audio interface The LINE OUT connector lets you connect RCA audio cables. The LINE IN connector lets you connect RCA audio cables. Fig. 3.3: Rear panel connectors MIDI OUT allows the UMA25S to connect to a computer.
U-CONTROL UMA25S 5. UMA25S as USB/MIDI controller At the highest control level of the U-CONTROL, you play and control the MIDI data (Play Mode). The UMA25S has an array of control elements with which you can control your MIDI equipment via the MIDI output or with which you are able to control your computer applications via USB (using the MIDI standard). Most Digital Audio Workstations (DAWs) are capable of receiving control data according to MIDI specifications.
U-CONTROL UMA25S Below are a couple of suggestions on how you can use your UMA25S: V Playing external sound generators (for example, MIDI sound modules, rack synthesizers and virtual instruments) V Editing sound parameters of (virtual) synthesizers, sound samplers and GM/GS/XG sound generators V Controlling parameters on effects equipment and software plug-ins, such as effects processors, compressors and digital equalizers 5.2.
U-CONTROL UMA25S Transpose function: Use the OCTAVE push buttons to transpose upward or downward in semitone steps. V Press the OCT > to transpose upward in semitone steps. V Press OCT < to transpose downward in semitone steps. V Press OCT < and OCT > simultaneously to return to the default key. The status of the Transpose function is indicated by the glowing (1 semitone) and flashing (2 and more semitones) of the respective push button’s LED.
U-CONTROL UMA25S E9 Example of the Learn function: In order to control the main volume level of a virtual instrument with the E19 slider, follow the steps below: 1. Press and hold the EDIT/EXIT push button. 2. Move the E19 slider. 3. Release the EDIT/EXIT push button. 4. Press the LEARN key. 5. Now move the volume control of the software instrument with your computer’s mouse. 6. When “Gd!” appears on the display, press the ENTER key. 7. To save these settings, store them in a preset. 5.
U-CONTROL UMA25S 5.5 MIDI Messages Examples of Program Changes: 5.5.1 Program Change and MIDI Bank Select Program Change messages are used to activate the memory banks of the connected devices. 128 program numbers are available to activate presets. For devices with more than 128 presets, there is the Bank Select function which allows you to select a memory bank before sending a Program Change.
U-CONTROL UMA25S 5.5.2 Control Changes 5.5.3 NRPN The Control Change messages (CC) belong to the most “powerful” MIDI messages. They allow you to control plenty of parameters and functions. You can assign CC messages to each control element on the UMA25S. Since it is possible to use push buttons, sliders and rotary knobs, the controller values can be controlled either statically or dynamically in real time. A list of the assigned standard controller numbers are found in Table A.
U-CONTROL UMA25S 5.5.5 Pitch Bend 5.5.9 Using keys as control elements The Pitch Bend wheel E17 on the UMA25S is used to change the pitch of a note. It has its own type of message in the MIDI specification. Not only the switch elements but also the keys on the keyboard can trigger CC messages and Note messages. The advantage is that you don’t have to do without the familiar feel of keys and velocity sensitivity.
U-CONTROL UMA25S 5.6 More functions in Edit Mode 3. All of the functions mentioned in this chapter are available in Edit Mode. Press the EDIT/EXIT push button to switch to Edit Mode. Press the SWAP key until the display shows the name of the control element (E1 or E9) you want. 4. Press the ENTER key to confirm. As a result, the MIDI channels of the eight control elements are switched around. 5.6.1 Show Element function Use the Show Element function to view the settings of a control element: 1.
U-CONTROL UMA25S 4b. + + Alternatively, press the EDIT/EXIT push button to cancel any changes you made and to exit Edit Mode The EDIT LED goes out. To select the channel in CH ASSIGN Mode, it is possible to use the +/- push buttons below the display instead of the keyboard with its labeled numbers. Please note that the channel assignment in GLOBAL EDIT Mode differs from the above described GLOBAL SEND CHANNEL method! For more information, read Chapter 5.7. 5.6.
U-CONTROL UMA25S MMC Frame Rate Select: The E13 rotary knob lets you adjust the frame rate: 24, 25, 30 (in each case “non-drop frame”) or 30d (“drop frame”). This is an important setting for the MMC messages, which contain defined song positions (for example, Locate). Factory Reset (restoring default presets): Restoring default presets has already been described in Chapter 5.1.3. 1. In Global Mode, turn the E14 rotary knob until “FAC” (which stands for Factory Reset) appears on the display. 2.
U-CONTROL UMA25S 7. Appendix GS/XG-Parameter Filter Cutoff Filter Resonance Vibrato Rate Vibrato Depth Vibrato Delay EG Attack EG Decay EG Release Modulation Portamento Time Volume Pan Reverb Send Chorus Send Delay/Variation Send Type NRPN NRPN NRPN NRPN NRPN NRPN NRPN NRPN CC 1 CC 5 CC 7 CC 10 CC 91 CC 93 CC 94 Display CUT RES RAT DEP DLY ATC DCY REL MOD POR VOL PAN REV CRS VAR Table 7.
U-CONTROL UMA25S E1~E8 Element Buttons Name E1 (Loop) E2 (Loc 0) E3 (Rew) E4 (Fwd) E5 (Stop) E6 (Pause) E7 (Play) E8 (Rec) CC 21 (undefined) CC 22 (undefined) CC 23 (undefined) CC 24 (undefined) CC 25 (undefined) CC 26 (undefined) CC 27 (undefined) CC 28 (undefined) E9~E16 Element Rotary Knobs Name E9 E10 E11 E12 E13 E14 E15 E16 Cutoff Frequency Resonance Attack Time Decay Time ReleaseTime Reverb Depth Chorus Depth Panorama E17~E21 Element Wheels, Slider, Pedals Name MIDI MIDI Parameter data type S
U-CONTROL UMA25S 8. Warranty § 1 Other warranty rights and national law 1. This warranty does not exclude or limit the buyer’s statutory rights provided by national law, in particular, any such rights against the seller that arise from a legally effective purchase contract. 2. The warranty regulations mentioned herein are applicable unless they constitute an infringement of national warranty law.