
User`s manual

18
ULTRALINK UL2000B
Low Gain: The LED blinks once with medium tempo.
High Gain: The LED blinks twice with medium tempo.
3.3.5 Auto Mute
1. Make sure the transmitter is not muted (MUTE switch is set to OFF).
2. Turn the selection switch to 7 or 8 and confirm your selection by briefly pressing the POWER
button.
3. The LED indicates the Auto Mute status with the corresponding number of medium-tempo
blinks::
Auto Mute turned off: The LED blinks once with middle tempo.
Auto Mute turned on: The LED blinks twice with middle tempo.
3.5 ULB2000 level setting
To optimally set the level on your ULB2000, the High Gain or Low Gain setting has to be
set to the level of the signal being transmitted (ch. 3.2.5).
Adjust the gain control in the microphone channel of your mixing console so that the peak LED
lights up only occasionally or never at all. The EQ controls in the microphone channel should be set
to mid-travel position to start with. To get the sound you want, try changing the mic position relative
to the sound source or even move the microphone around in the recording room of your studio.
Adjusting the angle at which walls face the sound source can also be helpful. Only when the desired
basic sound has been achieved should you start to use equalizers and signal processors, if any at all
(remember: less is often more!)
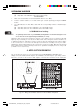
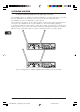
4. APPLICATION EXAMPLE
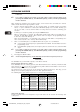
Fig. 4.1 shows how easy it is to use the products from the BEHRINGER ULTRALINK Series.
Simply connect the balanced XLR output on the ULR2000 to the XLR input on your mixing console.
Of course, you can use the receiver’s TRS output to connect to the next device in the signal path.
Fig. 4.1: Wiring the ULR2000 receiver and the ULB2000 microphone
4. APPLICATION EXAMPLE
DATA-MANFULL_UL2000B_ENG_Rev_A.pmd 04.09.2006, 09:3618