V-AMP PRO Version 1.0 DATA-MANFULL_V-AMP PRO_ENG_Rev_A.PMD 1 16.09.
V-AMP PRO SAFETY INSTRUCTIONS DETAILED SAFETY INSTRUCTIONS: All the safety and operation instructions should be read before the appliance is operated. Retain Instructions: The safety and operating instructions should be retained for future reference. Heed Warnings: All warnings on the appliance and in the operating instructions should be adhered to. CAUTION: To reduce the risk of electric shock, do not remove the top cover (or the rear section).
V-AMP PRO FOREWORD Dear Customer, Welcome to the team of BEHRINGER users and thank you very much for expressing your confidence in BEHRINGER products by purchasing the V-AMP PRO.
V-AMP PRO 1. INTRODUCTION 2. CONTROL ELEMENTS Congratulations! With the V-AMP PRO you have acquired the professional 19" rack version of the V-AMP 2. Our ultimate aim in developing it was to create the authentic sound of classic guitar amplifiers by means of physical modeling and to combine this with the latest DSP effects. 2.
+ V-AMP PRO CONFIGURATION: If you press the D and E keys simultaneously, you can select the V-AMP PROs general operating mode allowing adjustments to different studio and live situations (see chapter 3). Press TUNER/EXIT to quit configuration. The TUNER button is for switching on the tuner. In addition, this button can be used to quit EDIT mode (Exit). Use the two arrow keys to select a different bank (BANK DOWN and BANK UP). You can skip banks by holding each of the keys down.
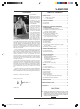
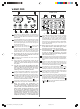
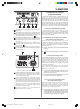
V-AMP PRO 2.2 Rear panel Fig. 2.4: V-AMP PRO front panel (section 3) Fig. 2.5: V-AMP PRO rear panel (section 1) This control is for selecting an effect or a combination of effects. This encoder-type rotary control is also surrounded by a ring of 16 LEDs. Each LED corresonds to one specific effects preset. Using the REVERB control, you can add the reverb content of your choice to your overall sound. By turning it to the left until all the LEDs are off, you deactivate the reverb.
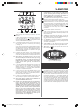
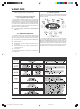
V-AMP PRO 3. EXAMPLES OF OUTPUT CONFIGURATIONS To adapt the V-AMP PRO best to different studio and live situations, you can select between five operating modes (CONFIGURATION). Regardless of the settings on the unit itself, these modes determine in which way the V-AMP PROs output signal is taken. Basically, there are 3 studio and 2 live operating modes (with additional EQ). This also allows for using the left and right output signals differently at the same time.
V-AMP PRO + When headphones are connected, the V-AMP PRO selects operating mode S1 automatically. 3.5 Live set-up with P.A. system and your own guitar amp on stage 4.1 Calling up presets When the unit is switched on, it automatically loads the preset used last. In the following example, the last preset selected was preset D in bank 25: This application is intended to give you your own guitar signal on stage so that you can have complete control of intentionally produced feedback, for example.
V-AMP PRO 4.2 Editing presets 5. AMP/SPEAKER SIMULATION Editing presets is fast and simple with the V-AMP PRO. One option is to call up a preset you like and then start editing it. Select an amp model by means of the AMPS encoder. The LED on the preset button flashes (e.g. D) and signals that you have made a change to the preset. Now change the settings of the VOLUME, BASS, MID, TREBLE and GAIN controls as you like.
V-AMP PRO CLASSIC CLEAN: Back in the 80s, the Roland JC-120 was the preferred sound of Buzzy Feiten (guitarist with the Dave Weckl Band). The unique quality of this transistor amps sound is the way its brilliance cuts through any mix. It is ideal for the New Wave sound of the 80s that is making a come-back today. By the way, the JC-120 was also popular among Fender Rhodes pianists. BLACK TWIN: This simulation was modeled on a Fender Blackface Twin from 1965.
V-AMP PRO PREAMP BYPASS: In this setting, no amp simulation is selected. This makes it possible, for example, to play through an external guitar preamp and only use the effects or the speaker simulation on the V-AMP PRO. To activate the PREAMP BYPASS, press TAP and TUNER. 6.1 Effect descriptions The following section contains short descriptions of the effects that can be produced using the multi-effects processor in your V-AMP PRO.
V-AMP PRO Special effects COMPRESSOR: A compressor limits the dynamic range of the audio material, thus producing audible and creative sound effects. Pronounced use of the compressor (using the EFFECTS control) allows you to compress the overall dynamic range of the material. AUTO-WAH: The legendary wah-wah effect owes its fame mainly to Jimi Hendrix. Describing it is certainly more difficult than simply listening to Hendrix using it on Voodoo Chile.
V-AMP PRO The digital outputs are on a cinch jack (S/PDIF) or XLR connector. The BNC jack is used to feed in external word clock signals. 8.4 MIDI connections The MIDI standard (Musical Instruments Digital Interface) was developed in the early 80s to enable different makes of electronic instruments to communicate with each other. Over the years the range of MIDI applications has constantly expanded, and today it is standard practice to network entire recording studios using the MIDI standard.
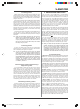
V-AMP PRO 9. SPECIFICATIONS AUDIO INPUTS Guitar input Input impedance Max. input level Pre DSP return/line in Input impedance Max. input level Post DSP insert return L/R Input impedance Max. input level AUDIO OUTPUTS Pre DSP send/line out Output impedance Max. output level Analog line outputs L/R Output impedance Max. output level Analog DI out Output impedance Nom. level (S1 - S3) Nom. level (L1 and L2) Post DSP insert send L/R Output impedance Max. output level Headphones connector Max.
V-AMP PRO 10.
V-AMP PRO 11. WARRANTY § 1 WARRANTY CARD/ONLINE REGISTRATION To be protected by the extended warranty, the buyer must complete and return the enclosed warranty card within 14 days of the date of purchase to BEHRINGER Spezielle Studiotechnik GmbH, in accordance with the conditions stipulated in § 3. Failure to return the card in due time (date as per postmark) will void any extended warranty claims.