
User Manual


20 X32 RACK DIGITAL MIXER User Manual
5.4 How do I add one of the 8 internal eects
to the sound?
There are two types of eects that are commonly used:
• “Eects Loop” (side chain) style eects, where multiple channels all send
varying amounts of their signal to a common eect, such as a reverb,
delay,or chorus.
• “Insert” style eects that are inserted in to the signal path of a single
channel of audio. Examples would be a graphic EQ, lter, exciter,
ortubeemulator.
To apply an “Eects Loop” style eect:
• Press the “Eects” menu button. The main screen will show the FX
home screen where dierent eects processors are assigned to the 8
processing slots.
• Adjust rotary encoder #6 to highlight the rst eects processor; it will be
surrounded by an orange outline.
• Adjust rotary encoder #1 and rotary encoder #2, selecting your desired bus as
the source for both the left and right inputs of the rst eect processor.
• Adjust rotary encoder #5 to select a specic eect processor,
suchas “Ambience”.
• Rotate the Channel Select knob until 1 L appears in the channel number
display and press the knob. Use the Channel Level knob to bring the return
up to 0 dB. Turn the Channel Select knob to the right one click so that 1r
appears in the display, the press the knob. Bring the return level up to 0 dB.
• Back on the Eects page, press the PAGE SELECT right button to switch the
screen to the editor for the Ambience processor. The screen will switch to an
editor page for the rst processor. Adjust the rotary encoders to tailor the
eect to your liking.
• Press the Home button again and tab over to the ‘sends’ page. Raise
the virtual faders for the channels to which you want to add the eect.
The higher you raise the fader, the more of that channel's signal will be sent
to the processor.
To apply an “insert” style eect:
• Press the “Eects” menu button.
• As the eects on the left side are also able to handle complex send eects
like reverb, the slots on the right side shall be used for insert eects like
limiter, graphic EQ, etc. You can also use insert eects on the left side,
butthis will limit your use of reverbs and other processor-intensive eects.
• Adjust rotary encoder #6 to highlight one of the eects processors on the
right side; it will be surrounded by an orange outline.
• Adjust rotary encoder #1 and rotary encoder #2, selecting “Insert” as the
source for both the left and right inputs of the eect processor.
• Adjust rotary encoder #5 to select a specic eect processor, such as
“precision limiter”.
• Select the specic input or output channel you wish to use the inserted
eect on.
• Press the HOME button, then the PAGE SELECT right button to navigate to the
selected channel’s “Cong” screen.
• Adjust rotary control #6 to select the specic processor you have applied the
eect to, in this case “Ins FX 5L”. Press the encoder to connect the selected
insert eect.
• The Precision Limiter is now applied as an insert on the selected channel.
Sending more than one channel through the same insert eect is, of course,
prohibited. There will be a warning when you try to insert an eect slot that
has already been used as an insert on any other channel. Both sides of a dual
type eect can be used as inserts on dierent channels or buses.
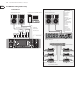
5.5 How do I use an outboard
eectsprocessor?
In some situations, you may wish to use a loop-style eect provided by an
external eect processor, as opposed to using one of the eight built-in processors.
To do so:
• Press the ROUTE button, page right to the “Aux Out” screen, and adjust the
rst and fourth encoders to tie a rear panel ¼" aux out, such as Aux Out 1,
toan available mix bus, such as Mix Bus 2.
• Patch rear panel Aux Output 1 to the input of your external eects processor.
• Patch the output of the external eects processor to rear panel Aux Input 1.
• Rotate the Channel Select knob until A1 appears in the display, the press the
knob. On the Home screen, ‘home’ tab, verify that the Main LR is highlighted.
• Move the Aux 1 channel level to 0 dB.
• Adjust the settings on the external eects processor to taste.
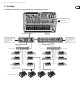
5.6 How do I set up live stage monitoring?
Setting up a live stage monitor mix using conventional monitors:
1. Press the ROUTE button and page right to the Analog Out page.
2. Adjust the rst encoder to select a rear panel analog output (e.g. Output 1),
then adjust the fourth encoder to select a mix bus (e.g. Mix Bus 1). Whenthe
source and destination have been selected, press the 4th encoder to
complete the assignment.
3. Adjust the 5th encoder to set up the monitor send as pre-fader, or pre/post
EQ. This will prevent the monitor mix from changing when the front-of-
house mix is adjusted.
4. Connect a cable from rear panel analog Out 1 to the input of:
a) A powered stage monitor
b) An external amplier feeding a passive stage monitor
c) A transmitter for a set of wireless in-ear monitors
5. Rotate the Channel Select knob to select Bus 1, then press the knob.
Adjust the Channel Level knob to 0 dB. You can change the output on this
bus later.
6. To adjust the mix sent to the monitor, select an input channel with the
Channel Select knob, nagivate to the Home screen’s ‘sends’ tab, then raise
the faders for each bus that the channel should be sent to.