Behringer X-TOUCH Universal Control Surface MIDI Documentation © Music Tribe Global Brands Ltd. All rights reserved. All information in this document is subject to change without any further notice. musictribe.com 1 behringer.
X-TOUCH Remote Control of X AIR Mixers With the release of X-TOUCH firmware version 1.15, the X-TOUCH is able to remotely control the X AIR series mixers: XR12, XR16, X18, and XR18. The connection between the X-TOUCH and the mixer can be made via Ethernet connection or MIDI in and out connections. This document shows how to make the connections, and how to use the X-TOUCH in Xctl mode, Xctl + MC mode, and Xctl + HUI mode.
Direct MIDI Connection Between X AIR Mixer and X-TOUCH Control Surface Steps: 4a Preparation Make sure your X AIR Mixer is switched on b Connect any X AIR remote control application with your Mixer as usual c Open the Setup/Audio-MIDI page, make sure that all MIDI Tx and Rx flags are off d Connect mixer MIDI In to X-TOUCH MIDI Out, and connect mixer MIDI out to the X-TOUCH MIDI In, using 2 standard MIDI cables 5a Hold down the CH01 Select button for more than 2 seconds while switching the X-TOUCH p
Connecting X AIR Mixer and X-TOUCH Control Surface in LAN/WLAN Network Infrastructure Steps: 3a Local area Network Setup Connect any X AIR remote control application with your Mixer as usual, and open the Setup/network pages for reviewing/adjusting the LAN/WLAN settings b On LAN/WLAN setup pages you may choose either DHCP for automatically receiving an IP address from the network router, or manually select a Static IP Address and Subnet Mask that is valid in your network. DHCP is recommended.
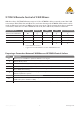
MODE: XCTL This section shows the operation of the X-TOUCH controls in XCTL mode X-TOUCH firmware: 1.15 X AIR min firmware: 1.
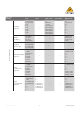
Other Functions display: action: FUNCTION F5 - F6 — — FUNCTION F7 X Toggle AUTOMIX Group X on/off FUNCTION F8 Y Toggle AUTOMIX Group Y on/off MODIFY SHIFT FX1 Sends on Faders FX 1 MODIFY OPTION FX2 Sends on Faders FX 2 MODIFY CONTROL FX3 Sends on Faders FX 3 MODIFY # ALT FX4 Sends on Faders FX 4 AUTOMATION READ BU1 Sends on Faders BUS 1 AUTOMATION WRITE BU2 Sends on Faders BUS 2 AUTOMATION TRIM BU3 Sends on Faders BUS 3 AUTOMATION TOUCH BU4 Sends on Fader
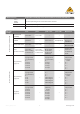
Channel Section SOLO MUTE SELECT functions pertaining to the selected block of 8 channels Faders fader levels pertaining to the selected block of 8 channels Meters channel input meters pertaining to the selected block of 8 channels all channels on selected bank Encoder Assign turn: push: Global View (default) panorama pan-center TRACK gain/trim PAN/SURROUND panorama pan-center FLIP (Sends-on-Fader) panorama when sending to stereo bus pan-center when sending to stereo bus EQ (Channel) pa
Encoder Assign turn: for selected channel EQ (Bus) page 2/2 1: select chan. 2: page select 3: Q1 4: Q2 5: Q3 6: Q4 7: Q5 8: Q6 push: push + turn: — 1: — 2: Bus-EQ mode 3: Band Type1 4: Band Type2 5: Band Type3 6: Band Type4 7: Band Type5 8: Band Type6 push + REC: — SEND (to Buses) Send Level 1-6 / Pan 4, 6, 8 for stereo buses — — — PLUG-IN (send to FX) 5: Send to FX1 6: Send to FX2 7: Send to FX3 8: Send to FX4 — — — INST (Noise Gate) page 1/3 1: select chan.
FUNCTION turn: REC button: 1: page select 2: — FUNCTION F1 - F4 = edit FX1-FX4 3: param1 When Delay effect types are selected, the REC button below the Delay Time parameter can be used for tapping the tempo 4: param2 5: param3 6: param4 7: param5 8: param6 TRANSPORT FUNCTIONS for XR12/XR16 USB RECORDER STOP ** amber LED Stops all playback or recording Starts playback of selected track PLAY while stopped green LED PAUSE PLAY while playing green flashing FFWD while playing amber LED Fas
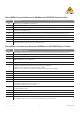
MODE: XCTL + MCU and XCTL + HUI This section shows the operation of the X-TOUCH controls in XCTL + MCU mode and XCTL + HUI mode X-TOUCH firmware: 1.15 X AIR min firmware: 1.
Other Functions display: action: FUNCTION F5 - F6 — — FUNCTION F7 X Toggle AUTOMIX Group X on/off FUNCTION F8 Y Toggle AUTOMIX Group Y on/off MODIFY SHIFT FX1 Sends on Faders FX 1 MODIFY OPTION FX2 Sends on Faders FX 2 MODIFY CONTROL FX3 Sends on Faders FX 3 MODIFY # ALT FX4 Sends on Faders FX 4 AUTOMATION READ BU1 Sends on Faders BUS 1 AUTOMATION WRITE BU2 Sends on Faders BUS 2 AUTOMATION TRIM BU3 Sends on Faders BUS 3 AUTOMATION TOUCH BU4 Sends on Fader
Channel Section SOLO MUTE SELECT functions pertaining to the selected block of 8 channels Faders fader levels pertaining to the selected block of 8 channels Meters channel input meters pertaining to the selected block of 8 channels all channels on selected bank Encoder Assign turn: push: Global View (default) panorama pan-center TRACK gain/trim PAN/SURROUND panorama pan-center FLIP (Sends-on Fader) panorama when sending to stereo bus pan-center when sending to stereo bus EQ (Channel) pa
Encoder Assign turn: for selected channel EQ (Bus) page 2/2 1: select chan. 2: page select 3: Q1 4: Q2 5: Q3 6: Q4 7: Q5 8: Q6 push: push + turn: — 1: — 2: Bus-EQ mode 3: Band Type1 4: Band Type2 5: Band Type3 6: Band Type4 7: Band Type5 8: Band Type6 push + REC: — SEND (to Buses) Send Level 1-6 / Pan 4, 6, 8 for stereo buses — — — PLUG-IN (send to FX) 5: Send to FX1 6: Send to FX2 7: Send to FX3 8: Send to FX4 — — — INST (Noise Gate) page 1/3 1: select chan.
FUNCTION turn: REC button: 1: page select 2: — FUNCTION F1 - F4 = edit FX1-FX4 3: param1 When Delay effect types are selected, the REC button below the Delay Time parameter can be used for tapping the tempo 4: param2 5: param3 6: param4 7: param5 8: param6 TRANSPORT FUNCTIONS CONTROL DAW PERMANENTLY STOP amber LED Stops all playback or recording Starts playback at current song position pointer (SPP) PLAY while stopped green LED PAUSE PLAY while playing green flashing FFWD while playing a
music-group.com 15 behringer.