User Manual Wireless Video & Audio Encoder/Extender Model: HEV-10W
FCC Caution: Any Changes or modifications not expressly approved by the party responsible for compliance could void the user's authority to operate the equipment. This device complies with part 15 of the FCC Rules. Operation is subject to the following two conditions: (1) This device may not cause harmful interference, and (2) this device must accept any interference received, including interference that may cause undesired operation.
Table of Contents 1. Features ....................................................................................................... 1 2. Technical Specifications .............................................................................. 2 3. Package Contents........................................................................................ 3 4. Hardware Description .................................................................................. 3 4.1 Indicator Light ............................
1. Features The HEV-10W is a compact, yet professional H.265/H.264 streaming encoder that supports a maximum of 2160p60 input and can stream it at HD 1080p with ultra-low encoding latency. Supports both wired connection and wireless connection mode. It features a local HDMI loop out that a monitor can be looped out through the encoder so that it can still display the video on the monitor in real-time while encoding it.
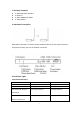
Loop Output HDMI 2.0 4096×2160P@60/30Hz, 3840×2160P@60/30Hz, Supported Video Input 1920×1080P@60/50/30Hz, 1920×1080i@60/50/30Hz, Resolution 1280×720P@60/50/30Hz 4096×2160P@60/30Hz, 3840×2160P@60/30Hz, Supported Video Loop 1920×1080P@60/50/30Hz, 1920×1080i@60/50/30Hz, Out Resolution 1280×720P@60/50/30Hz Video Codec H.264/AVC & H.
3. Package Contents 1× HEV-10W Video Encoder 1× Antenna 1× Micro USB Power Cable 1× User Manual 4. Hardware Description HEV-10W comes with an antenna. Please install the antenna on the antenna interface and tighten it before your use the wireless connection. 4.
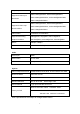
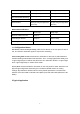
RTSP Streaming Green light keeps on Green light keeps on Attempt to RTMP Streaming Green light keeps on Green light flashes slowly Successful RTMP Streaming Green light keeps on Green light flashes quickly WiFi Off Off Green light keeps on Reset/ Reboot Red light and green light flash Red light and green light flash alternately alternately Network Port Indicators Green Light Orange Light Ethernet Cable Connected Keeps on / Controlling the Web UI Keeps on Flashes slowly Streaming Ke
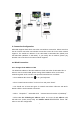
6. Connection Configuration HEV-10W supports both wired connection and wireless connection. Please note that the IP of wired connection and wireless connection cannot be in the same network segment. The default IP address of the HEV-10W is 192.168.1.251 (Wired) and 192.168.2.252 (Wireless in AP Mode). If you modify the IP address, please pay attention not to set them in the same network segment. 6.1 Wired Connection 6.1.
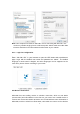
Note: Your computer’s IP must be 192.168.1.xxx for connecting with Encoder. “xxx” can be any number ranging from 0 to 255 except 251. Please make sure HEV-10W Encoder should be in the same Network environment as your LAN IP. 6.1.2 Login for Configuration Enter “192.168.1.251” in your browser to open the HEV-10W's Web administrator page. Login with the default user name and password as “admin”.
router and perform video transmission. Please find the specific instructions below. Step 1: Open your wireless networking utility on your laptop or mobile devices to search SSID called “HEV-10W” and access to it by the password “12345678”. This step is only required in AP WiFi mode. Step 2: Then open a web browser and enter the IP address for HEV-10W wireless network connection. In AP mode, the default IP address is “192.168.2.252”.
Step 5: Set IP Mode. You can enable either DHCP or Static. Note that this is the IP address in Client mode, when the encoder works in Client mode, please enter this address to login to the Web UI. It is recommended to enable DHCP, the router will automatically assign an IP Address for your HEV-10W; Or you can select Static IP, please note that the static address and the router connected to the encoder should be in the same network segment.
7.Encoding Configuration 7.1 Audio configuration Step: Click “Audio” → configure your settings → click “Apply”. Encoding Type: To set audio coding/ live stream type as AAC or G.711u format. Bit rate can only be adjusted in AAC format, while G711u format only supports default parameter 64000bps which cannot be modified. Note: HEV-10W only supports AAC audio encoding type for live stream.
Input Status: Display the resolution, sampling rate, and other information of the current HDMI input video in real-time. Encoding Type: Select either H.265 or H.264 compression formats. Frame Rates: Adjusts the number of frames between full picture updates. Key Frame Interval (GOP): It is used to modify the keyframe interval. Generally, we recommend setting the Key Frame Interval (GOP) to twice the Frame Rate (FPS) value. Bit Rate: Allows you to select or enter different bit rates from 128kbps to 16Mbps.
Text: Enabled or disable to show text on your video stream. Content: Enter your desired title text here [0-80]. Location X: Adjust Left and Right location of the text [0-1920]. Location Y: Adjust Up and Down location of the text [0-1080]. Font Size: Size of text [8-72]. Font Color: Color of the text. Alpha: Opacity of the text [0-128].
Picture: Enabled/ Disabled to show the logo on your screen. Location X: Adjust Left and Right position of the picture [0-1920]. Location Y: Adjust Up and Down position of the picture [0-1080]. Alpha: Opacity of the picture. Transparent Color: In this section, users can select the corresponding color, once you set a color to be the transparent one, any region of the image in that color will be transparent.
→WiFi Mode: Select “Access Point” mode. Network Name (SSID): The SSID name of Network Name of the encoder in AP mode can be customized and modified. The default network name is HEV-10W. Password: The default password is 12345678 in AP mode. You can also change this password. Wireless Band: Select either 2.4G or 5G. Channel: Select the WiFi signal channel. →WiFi Mode: Select “Client” mode. Network Name (SSID): This field allows you to enter or select an existing router’s SSID for HEV-10W to connect to.
Client mode. →WiFi Mode: Select “Off”. Click Apply and the the encoder will be disconnected from the network. If you want to connect to wireless networks again, please hold down the button about 3s to enter the AP mode to turn on the WiFi connection. After it switches to the AP mode, you can press the button for 3s again to switch to Client Mode.
7.3.3 Considerations of Simultaneous Use of Wired and Wireless HEV-10W supports both wired connection and wireless connection mode. Need to pay attention to the following. If your HEV-10W is connected to a router via wired and wireless at the same time, you can access the encoder via wired IP and wireless IP at the same time. Note that the wired IP and wireless IP cannot be set exactly the same.
Steps: Enter the full RTMP URL and stream name/key in HEV-10W Encoder RTMP lnterface, and click "Start" to live. When you need to stop your live steaming, click "Stop” in this page. And you can click” Save” to save your settings. Server URL: To fill in the RTMP stream address of live stream platform. Each live stream platform has different and unique RTMP push stream address. Stream Key: To fill the stream name/key of live stream platform.
7.5.1 RTSP Unicast The factory default of the HEV-10W is RTSP unicast mode. Decoding software or equipment in the local area network can directly play the HEV-10W video stream through URL1 or URL2. The URL1 and URL2 ports can be customized. If you need to change, just enter the URL Port value (range 1-65535) and click Apply. After the changes is completed, the URL address will be automatically changed accordingly. Generally recommended Use the default 8554 and 554 ports.
In the pop-up window, select "Network", fill in the URL and click "Play" to play the video stream. URL fill in URL1 or URL2 in HEV-10W is OK. 7.5.2 RTSP Multicast RTSP unicast mode outputs up to 8 video streams, and multiple video streams will share the HEV-10W encoding capability. The multicast mode supports a maximum of 200 video stream outputs and can maintain each video stream for transmission at a maximum bit rate of 16M (The highest bit rate of wireless streaming is 8M).
After the setting is successful, multiple devices can use URL1 or URL2 to play the video stream. Note that when multiple devices are playing at the same time, it is best to uniformly select the URL1 or URL2 address for playback, and it is best not to mix the two at the same time. 7.5.3 UDP Unicast In the webpage, select "Transport Stream", which allows HEV-10W to perform unicast or multicast transmission using the UDP protocol.
After the setting, the HEV-10W video can only be played on the computer or decoding device with IP address “192.168.1.65”, other devices cannot play it. Take VLC player as an example, enter the URL: udp: //@192.168.1.65: 8541, where 192.168.1.65 is the "Destination IP" filled in the HEV-10W web page, and 8541 is the "Port" filled in the web page. 7.5.
After a successful setting, multiple devices can use the URL: udp: //@239.255.17.19: 8541 to play the HEV-10W video stream, of which 239.255.17.19 is the "Destination IP" filled in the HEV-10W webpage, 8541 "Port" filled in the HEV-10W website. 7.6 System 7.6.1 Device Information This interface allows you to set your device name, upgrade the latest firmware, factory reset, and change password. Device Name: You can change the device name of your encoder.
Note: It is important to remember your password after you changed it. If you changed a new one but you forget it, you can hold the Set button about 15s to restore value to factory settings so you can log in to WEB UI by the default one “admin”. 8 Live Stream Application 8.1 YouTube Live You may follow the steps below to stream your content to YouTube Live. Step1. Login to YouTube Live and click at the image icon in the top right corner. As shown in Picture 1. Picture 1 Step 2.
Picture 2 Step 3. Select “Live Streaming” and then click at “Stream now”. As shown in Picture 3. Picture 3 Step 4. Copy the Server URL and Stream name/ key of the ENCODER SETUP page. As shown in Picture 4.
Step 5. Paste the full Server URL and Stream name/ key on the Encoder RTMP Interface and then click at the Start button. As shown in Picture 5. * Note that YouTube does not require authentication, so you will no need to enable the Authentication function. If the video live stream platform requires authentication (e.g. Dacast), please enable Authentication function and fill in the authentication information provided by the platform. Picture 5 8.2 Facebook Live Step 1.
Step 3. Click at “Connect” on the pop-up web page. As shown in Picture 3. Picture 3 Step 4. Click “post” in the pop-up web page → click “Share in a Group” in the “Choose where to post your live broadcast” dialog box → click “Share on your Timeline”, you will get “Server URL” and “stream name/key”. As shown in Picture 4. Picture 4 Step 5. Paste the full RTMP URL and Stream name/ key on the RTMP interface of the encoder, and click at the Start button to live in the HEV-10W webpage.
shown in Picture 6. Picture 6 9. Important Notes A. Whatever you choose Static IP or DHCP mode, please make sure that the HEV-10W, router, and your devices are in the same network segment. B. After setting a new static IP address, it will take effect immediately without restarting. From static IP to "DHCP" IP mode, you will need to restart the HEV-10W and enter the router to view the IP address assigned by the router to the HEV-10W. The DHCP server will allocate an IP address to the encoder automatically.