PM-246 Pro Printer Setup Guide www.phomemo.com www.phomemo.com Copyright © 2019 Phomemo Powered by QUYIN TECHNOLOGY CO.
Support Your Phomemo PM-246 Pro is covered by a one-year warranty. In the unlikely event that you experience any issues with your printer, please contact Phomemo priority customer service to promptly receive troubleshooting tips for a replacement.
Content Driver Installation.................................................................................. 6 1.Driver Installation on Mac..................................................................................6 1.1 Setting Security & Privacy on Mac.................................................................................. 6 1.2 Installing Driver on Mac.................................................................................................. 8 1.3 Prepare before use on Mac.......
How-Tos..................................................................................................... 29 1.Label Adjustments............................................................................................ 29 1.1Adjusting Label Margins.............................................................................. 29 1.2 Cropping a full size 8.5" x 11" page to a 4" x 6" label................................31 1.3 Cropping multiple pages in the same document at once..........................
1.14 Paypal............................................................................................................62 1.15 Chitchats....................................................................................................... 64 1.16 Stamps.com.................................................................................................. 64 1.17 Fedex Ship Manager..................................................................................... 69 1.18 QuickBooks Enterprise..............
Driver Installation Download the driver from www.phomemo.com or USB Driver You can check the video to know: How to setup PM-246 Pro https://phomemo.com/pages/pm-246-pro-setup-guide 1.Driver Installation on Mac (1) Before installation, please ensure the printer is connected and turned on! (2) Double click the "pkg" installer to begin.
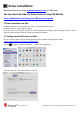
(3) Input your "Password" of your Mac. Then click "Modify Settings". Note: If you do not need to set a password, please skip this step. (4) Click "Open", then you can continue to install the driver. ATTENTION: Before installation please ensure the printer is connected and turned on. www.phomemo.com Copyright © 2019 Phomemo Powered by QUYIN TECHNOLOGY CO.
1.2 Installing Driver on Mac You can check this video to know: Installing Label Printer Driver and Prepare before use PM246 Pro on Mac "https://www.youtube.com/watch?v=tLXLzQKh37s&list=PL3_AhQ0D1H_DYR7nDrUaCGONgJdC4cW-6&index=2" (1) Follow the installation steps until you receive "Installation was successful" message. (2) Click " " and go to "System Preferences" -> select "Printer & Scanners" (3) Click "+" to add a printer www.phomemo.com Copyright © 2019 Phomemo Powered by QUYIN TECHNOLOGY CO.
(4) Select "Thermal Label Printer"-> Click "Select Software" under "Use" ->Select "LabelPrinter Label Printer" and click "OK" ->Click "Add" www.phomemo.com Copyright © 2019 Phomemo Powered by QUYIN TECHNOLOGY CO.
1.3 Prepare before use on Mac (1) Open desired file (e.g. a PDF). Click"File"and choose "Print". Select "Show Details" (2) Choose a paper size from "Paper Size". If the size you need is not listed, then click "Manage Custom Sizes", input width and height, then click "OK". (3) Select "Printer Features" in "Preview", you can set up printer properties, such as "Media Tracking", "Darkness" and "Print speed". www.phomemo.com Copyright © 2019 Phomemo Powered by QUYIN TECHNOLOGY CO.
(4) Select paper type in "Media Tracking". Choose from "Continuous", "Gap" or "Black Line". (5) You can change the printing speed and the Darkness of your printing (Larger number means higher Darkness) (6) After setup, click "Print" www.phomemo.com Copyright © 2019 Phomemo Powered by QUYIN TECHNOLOGY CO.
2.Driver Installation on Win You can check this video to know: Installing Label Printer Driver and Prepare before use PM246 Pro on Win 10 "https://www.youtube.com/watch?v=vFI3TK0a6HQ&list=PL3_AhQ0D1H_DYR7nDrUaCGONgJdC4cW-6&index=3" (1) Double click the installer to begin. ATTENTION:Before installation, please ensure printer is connected and turned on! ①Follow the installation steps until finish. ② Click "Get USB Port" to check which USB Port the label printer connect.
②Right click on "Label Printer" -> "Printer Properties"-> Click on "Print Test Page" (3)Set as default printer: ①Right click on "Label Printer" -> "Set as default printer" (4)Select the paper type ①Right click on "Label Printer" -> choose "Printer Preferences" ②Go to the "Page Setup". You can choose the size you need in "Name" www.phomemo.com Copyright © 2019 Phomemo Powered by QUYIN TECHNOLOGY CO.
③If there is no label size you need, you can click "New" to create a label size. ④Change Paper name and input width and height, click "OK" (5)You can change the printing speed and the Darkness of your printing (Larger number means higher Darkness) www.phomemo.com Copyright © 2019 Phomemo Powered by QUYIN TECHNOLOGY CO.
(6) Choose file (PDF file) to print. ①Click "Print" ②Select Printer "Label Printer" ③Before click Print, check the preview and print size. www.phomemo.com Copyright © 2019 Phomemo Powered by QUYIN TECHNOLOGY CO.
Troubleshooting 1. Print Quality Issues 1.1 Poor printing quality Reason①: Cover is not completely closed Firmly press the Cover to confirm that it has been completely closed. Reason②: Poor quality of label paper The darkness of the label depends on the label manufacturer. High quality labels produce darker prints. Reason③: Margins and paper size Please make sure the label size is correct before printing.
-> Right click on "Label Printer" -> choose "Printer Preferences" -> Go to "Page Setup". You can change the Darkness of your printing (Larger number means higher Darkness) Note: Setting the density too high may cause some unwanted dark lines and/or the label getting too hot and sticking to the printhead. Reason⑤: Dust or adhesive on the Printhead You can check this video to know: How to clear the Printhead "https://www.youtube.
1.2 White spots on label Reason: Dust or adhesive on the Printhead: You can check this video to know: How to clear the Printhead "https://www.youtube.com/watch?v=ckuZ7r2-4CI&list=PL3_AhQ0D1H_DYR7nDrUaCGONgJdC4cW-6&index=6" Turn off printer. Open the Cover and use the alcohol pads to wipe the Printhead and Platen Roller clean. (Any 70% Alcohol pad would work.) Allow 2-3 minutes for components to dry, then close the Cover and turn Label Printer back on.
2.2 Skipping labels or continuously feeding Reason①: Changing your label type and size are the main causes for printer skipping labels or continuously feeding First step: Disconnect the USB from your printer. Check the video "Automatic label identification". https://www.youtube.com/watch?v=gEOJiPgxF6Q&list=PL3_AhQ0D1H_DYR7nDrUaCGONgJdC4cW-6&index=8 Let the printer re-learn your label. Then change your label type, size on your computer, then re-connect the USB to the printer.
-> You can choose the size you need in "Name". -> If there is no label size you need, you can click "New" to create a label size. -> Change Paper name and input width and height, click "OK" Note: The application you are using (i.e. Adobe Reader) could be over-riding your driver label setting and sending the print in a larger/smaller size to printer. Look for "Page Setup" or "Paper Size" in the print prompt and ensure it is set to the size you want.
2.3 I get horizontal label instead of vertical label You can setup printer to rotate it for you automatically.
2.4 Barcode is not printing clearly ①The source file wasn't created in the ideal quality: Print the sample label to test if your printer is working well. You can download the sample label from USB Driver: OR website https://s3.amazonaws.com/cdn.freshdesk.com/data/helpdesk/attachments/production/69000091194/original/Labels-Sample.
For Win: -> Go to "Control panel" -> "Devices and Printers" (Right click on "This PC", choose "Properties", then click on "Control panel"-> "Devices and Printers") -> Right click on "Label Printer" -> choose "Printer Preferences" -> Go to "Page Setup" -> You can change the printing speed and the Darkness of your printing (Larger number means higher Darkness) www.phomemo.com Copyright © 2019 Phomemo Powered by QUYIN TECHNOLOGY CO.
2.5 Paper jams or label prints only half and stops Reason: High print density High print density causes the label to get too hot and get stuck to the Printhead. Different labels require different heating temperatures. Set your print speed to "4 in/sec" and density to "2" and try print again. If the label is too light, increase the density by 1.
-> Right click on "Label Printer" -> choose "Printer Preferences" -> Go to "Page Setup" -> You can change the printing speed and the Darkness of your printing (Larger number means higher Darkness) www.phomemo.com Copyright © 2019 Phomemo Powered by QUYIN TECHNOLOGY CO.
2.6 Same label keeps printing Reason: When printer doesn't accept a label was printed correctly, it will attempt to re-print it: Turn power switch off . This clears any pending print jobs. Check the video "Automatic label identification". https://www.youtube.com/watch?v=gEOJiPgxF6Q&list=PL3_AhQ0D1H_DYR7nDrUaCGONgJdC4cW-6&index=8 Let your printer re-learn your label. 3. Other Issues 3.1 Printer doesn’t turn on Ensure power connection A.
-> You can change the printing speed and the Darkness of your printing (Larger number means higher Darkness) For Win: -> Go to "Control panel" -> "Devices and Printers" (Right click on "This PC", choose "Properties", then click on "Control panel"-> "Devices and Printers") -> Right click on "Label Printer" -> choose "Printer Preferences" -> Go to "Page Setup" www.phomemo.com Copyright © 2019 Phomemo Powered by QUYIN TECHNOLOGY CO.
-> You can change the printing speed and the Darkness of your printing (Larger number means higher Darkness) 3.4 Why are the label sizes in millimeters? Reason: Windows is designed to use the metric system. To convert inches to millimeters on Google. 3.5 There is a Spark Please ensure you turn the printer off using the power switch on the back of the printer before connecting or disconnecting the power cable. Connecting the power cable while switch is in ON position can produce a spark.
How-Tos 1.Label Adjustments 1.1Adjusting Label Margins Sometimes your shipping platform or the settings on your application results in prints that are off center or cut-off. You can adjust these margins and define new paper sizes by the following method. For Mac: -> Open desired file (e.g. a PDF). Click"File"and choose "Print". Select "Show Details" . -> Click "Manage Custom Sizes". Adjust the margins as desired on "Non-Printable Area".
-> Go to "Control panel" -> "Devices and Printers" (Right click on "This PC", choose "Properties", then click on "Control panel"-> "Devices and Printers") -> Right click on "Label Printer" -> choose "Printer Preferences" -> Go to "Page Setup", you can adjust the margins as desired on "Position Adjustment". You may need to do some trial and error to find the perfect combination. You may enter both negative and positive values. -> Click on "OK" to send these settings to the printer for your next print.
1.2 Cropping a full size 8.5" x 11" page to a 4" x 6" label Some shipping platforms only provide you with a full page (8.5" x 11") document. Frequently, they use half of the page for the shipping label and the other half for receipt or packing slip. While there are many ways to split this page into a 4" x 6" label size, here is our favorite method: 1."Take a Snapshot" 2."Crop pages" -> Remove White Margins: Please see this article for Cropping multiple pages (4-1-3.
⑥If the size you need not is not listed, then click "Manage Custom Sizes" -> input width, height and rename the size, then click "OK" ⑦Click "Printer..." -> "Show Details" -> Select "Printer Features" in "Preview" ⑧You can set up printer properties, such as "Media Tracking", "Darkness" and "Print speed". (Larger number means higher Darkness) ⑨Preview, check the print size and Orientation. If preview looks good, click "Print" www.phomemo.com Copyright © 2019 Phomemo Powered by QUYIN TECHNOLOGY CO.
For Win: ②Open the file in Adobe Reader ③Go to "Edit" -> "Take a Snapshot" ④Drag the box over your label, ⑤Select Printer -> Click then right click and select "Print" "Properties" -> Go to "Page Setup"-> Select label size from "Name" If the size you need not is not listed, then then click "New" to create a label size, then click "Ok" ⑥You can change the printing speed and the Darkness of your printing (Larger number means higher Darkness) www.phomemo.
⑦Check the created size and click "OK" ⑧Preview, check the print size and Orientation. If preview looks good, click "Print" Note: If you are shipping more than a few labels, you would benefit from using a commercial solution that create 4 x 6 labels in one-click. See this article: How do I generate labels?(1-4.Printing Label - Printing Label - How do I generate shipping labels) Official guide from Adobe:Print portion of a PDF page using Acrobat or Reader (https://helpx.adobe.
1.3 Cropping multiple pages in the same document at once Some shipping platforms only provide you with a full page (8.5" x 11") document. Frequently, they use half of the page for the shipping label and the other half for receipt or packing slip. While there are many ways to split this page into a 4" x 6" label size, here is our favorite method: 1."Take a Snapshot" Please see this article for Cropping a 8.5 x 11 pages to a 4 x 6 label (4-1-2.Label Adjustments - Cropping a full size 8.
⑥Select Printer -> Click "Page Setup..." -> Select Printer from "Format For: " -> Select label size from "Paper Size: " ⑦If the size you need not is not listed, then click "Manage Custom Sizes" -> input width, height and rename the size, then click "OK" Click "Printer..." -> "Show Details" -> Select "Printer Features" in "Preview" www.phomemo.com Copyright © 2019 Phomemo Powered by QUYIN TECHNOLOGY CO.
⑧You can set up printer properties, such as "Media Tracking", "Darkness" and "Print speed". (Larger number means higher Darkness) ⑨Preview, check the print size and Orientation. If preview looks good, click "Print" For Win: ②Open the file in Adobe Acrobat Pro ③Go to "Edit" -> "Edit Text & Images" -> "Crop Pages" -> Double click white margins ④Set "Units" www.phomemo.com Copyright © 2019 Phomemo Powered by QUYIN TECHNOLOGY CO.
⑤Tick "Remove White Margins" and remember "the Cropped page size" ⑥Choose "All", and click "OK" ⑦Click "Print" and select Printer ⑧Click "Properties" -> Go to "Page Setup"-> Select the label size from "Name" www.phomemo.com Copyright © 2019 Phomemo Powered by QUYIN TECHNOLOGY CO.
⑨If the size you need not is not listed, then click "New" to create "the Cropped page size" ⑩You can change the printing speed and the Darkness of your printing (Larger number means higher Darkness) ⑪Check the created size and "OK" www.phomemo.com Copyright © 2019 Phomemo Powered by QUYIN TECHNOLOGY CO.
⑫Preview, check the print size and Orientation. If preview looks good, click "Print" Note: If you are shipping more than a few labels, you would benefit from using a commercial solution that create 4 x 6 labels in one-click. See this article: How do I generate labels?(1-4.Printing Label - Printing Label - How do I generate shipping labels) Official guide from Adobe:Print portion of a PDF page using Acrobat or Reader (https://helpx.adobe.com/acrobat/kb/print-portion-page-acrobat-reader.
1.4 Create New Custom Size Labels When you load in a new direct thermal label, there are two actions that need to take place: 1) Run the automatic label identification on the printer. 2) Set proper label settings on your computer. 1)Run the automatic label identification. ①Disconnect the USB cable from your printer, then turn the printer off. Press and hold the Feed Button until you hear one beep, then release. ②Printer will determine the gap size and other properties of your label.
-> Go to "Page Setup" -> Select the paper type in "Name" If there is no label size you need, you can click "New" to create a label size. Change Paper name and input width and height, click "OK" Third step: The application you are using (e.g. Adobe Reader) could be over-riding your driver label setting and sending the print in a larger / smaller size to the printer. Look for "Page Setup" or "Paper Size" in the print prompt and ensure it is set to the size you want. www.phomemo.
2.Tips and Tricks 2.1 Sharing Phomemo over the network (Windows) You can share Phomemo with other computers in your network using Windows' Printer Sharing feature. Windows Go to "Control panel" -> "Devices and Printers" (Right click on "This PC", choose "Properties", then click on "Control panel"-> "Devices and Printers") Right click on "Label Printer" -> choose "Printer properties" Go to "Sharing" -> tick "Share this printer" -> click "OK". When done, click or tap OK .
2.2 Printing FBA Product ASIN labels There are two ways to print your ASIN tags, including Amazon provides way. Method 1: Amazon Scan & Label In your Amazon Seller Central account, please click on Inventory -> Manage FBA Shipments. At the top of the page, click on Scan & Label Click on Printer Settings, enter your label dimensions, and click on Save Tip: If your label size is smaller than minimums required by Amazon, just scale both Width and Height together.
Enter your UPC / Merchant SKU and press enter On the right hand side, you will see Print Label and Download label. Choose one and print the file to Phomemo PM-246 Pro. Please ensure paper size is correctly selected and that the preview looks correct. Method 2: Adobe PDF 1.If you do not yet have Adobe Reader or Adobe Acrobat installed, please download and install it from https://get.adobe.com/reader/ 2.During FBA shipment process, choose the label size that correspondence closest to your label.
3.Open the downloaded file in Adobe Acrobat (ATTENTION: NOT Adobe Reader ). 4.Go to Edit -> Take a Snapshot 5. Click and drag over one of your labels. 6.Click File -> Print. Ensure preview looks good and click Print. When done, click or tap OK . The printer is now shared with the other computers on your network, regardless of the operating systems that they are using. www.phomemo.com Copyright © 2019 Phomemo Powered by QUYIN TECHNOLOGY CO.
2.2 Mac: Select default label size for Phomemo There are a few ways to set a default label size for your Phomemo printer. Normally, you can use "Last Used Settings" shown below as a preset to print. This will remember the setting that was previously used. If this doesn't work for any reason, please follow these steps to set the default size for OS In the Print Prompt Window, under Paper Size, click on "Manage Custom Sizes" Click on "+" to add a new size. www.phomemo.
Create a new size with 4" x 6" dimensions. You may double-click on the left to rename this page or something similar. Please go to System Preferences -> Printers & Scanners -> Select Label Printer and set the default size. www.phomemo.com Copyright © 2019 Phomemo Powered by QUYIN TECHNOLOGY CO.
Platform Setup 1.1 Printing FBA Product ASIN labels There are two ways to print your ASIN tags, including Amazon provides way. Method 1: Amazon Scan & Label In your Amazon Seller Central account, please click on Inventory > Manage FBA Shipments. At the top of the page, click on Scan & Label Click on Printer Settings, enter your label dimensions, and click on Save www.phomemo.com Copyright © 2019 Phomemo Powered by QUYIN TECHNOLOGY CO.
Tip: If your label size is smaller than minimums required by Amazon, just scale both Width and Height together. For example if your label is 20mm x 20mm, you can enter 40mm x 40mm Enter your UPC / Merchant SKU and press enter On the right hand side, you will see Print Label and Download label. Choose one and print the file to Phomemo PM-246 Pro. Please ensure paper size is correctly selected and that the preview looks correct. www.phomemo.com Copyright © 2019 Phomemo Powered by QUYIN TECHNOLOGY CO.
Method 2: Adobe PDF 1.If you do not yet have Adobe Reader or Adobe Acrobat installed, please download and install it from https://get.adobe.com/reader/ 2.During FBA shipment process, choose the label size that correspondence closest to your label. We are not concerned about the number of labels but rather the size (i.e. 63.5mm x 38.1mm or 1" x 2-5/8"). Then click on "Print Labels for this Page" 3.Open the downloaded file in Adobe Acrobat (ATTENTION: NOT Adobe Reader ). 4.Go to Edit -> Take a Snapshot 5.
1.2 Amazon.com There are few different types of labels that Amazon provides for sellers. Please see information about each below: Amazon Customer Orders - These are orders to fulfill customer orders. You may simply leave the layout as "default" and this will produce a label in 4x6 size in the proper format for Phomemo and other thermal printers. Amazon ASIN product labels - These are the labels to place on products before sending to Amazon.
1.3 UPS.com UPS provides a free software for all UPS customers called WorldShip. This application is optimized for printing labels in 4 x 6 format in high-speed and with efficiency. UPS.com website, on the other hand, has more limitations. Please see this article for setting up WorldShip with Phomemo (Plantform Setup: 1.4 UPS WorldShip). If you don't like using WorldShip, we then recommend one of the commercial solutions discussed in this article How do I generate shipping labels: https://phomemo-pm246s.
1.4 UPS WorldShip Follow these simple steps to setup your UPS WorldShip with Phomemo. If you have not already done so, please download UPS WorldShip (https://www.ups.com/forms/order/worldship_download?loc=en_US) and install it on your computer. After your have gone through your initial Setup, please open UPS WorldShip and follow the steps below: www.phomemo.com Copyright © 2019 Phomemo Powered by QUYIN TECHNOLOGY CO.
www.phomemo.com Copyright © 2019 Phomemo Powered by QUYIN TECHNOLOGY CO.
1.5 Shopify Follow these simple steps to setup your Shopify to Print to Phomemo. Click on Settings on the left hand side menu. Choose Shipping under Settings. Set your Shipping Label Printing to "4 x 6 label printers (DYMO or similar). Click on "Print test label" to print a sample label to your Phomemo. Alternatively, you may update your label settings when you are purchasing postage for your order. Please refer to the screenshot below. www.phomemo.
1.6 Etsy To update your Etsy settings so it generated 4x6 shipping labels: 1) Sign in to Etsy.com. 2) Click Shop Manager. 3) Click Orders & Shipping. 4) Click View shipping labels. 5) Click Options. 6) Select Format my labels for 4x6 Label printers. Please note that after you change the label format to 4 x 6, only new labels will be generated correctly. Kindly void any previously generated labels and create new ones. Article content source: https://help.etsy.
1.8 ShippingEasy Shipping Easy has provided a quick-how to guide on their website. Please refer to this link: https://support.shippingeasy.com/hc/en-us/articles/203086779-How-to-Save-my-shipping-labels-settings 1.9 BigCommerce Phomemo is compatible with all platforms that offer shipping labels in 4x6 format. This includes BigCommerce. For setting up BigCommerce, please see the official help link: https://support.bigcommerce.com/articles/Public/Shipping-Labels 1.
1.11 Poshmark By default Poshmark produces labels in in 8.5 x 11 size which won't fit correctly on 4x6 labels. Please kindly update your label size setting on Posh Mark to 4x6. To select your shipping label size, go to: Account Tab -> My Seller tools -> Shipping Label Settings Reference: https://support.poshmark.com/articlesDescriptionPage?id=ka01I000000aaxtQAA 1.12 Shippo To print your label in 4x6 in format, which is compatible with thermal label printers, navigate to the Labels tab ( https://goshippo.
1.13 eBay On the new eBay Interface, please select 4" x 6" PDF as your label format. www.phomemo.com Copyright © 2019 Phomemo Powered by QUYIN TECHNOLOGY CO.
On the "Classic" Interface: 1. During the label creation process, please click [Printer and label receipt preferences] 2. On the following pop up, you may pick any of the 4 x 6 label sized printers. For example, you may pick the "Zebra TLP3842 4x6" 3. Click "Save" and continue to purchase your label. www.phomemo.com Copyright © 2019 Phomemo Powered by QUYIN TECHNOLOGY CO.
1.14 Paypal You just need to change your printer settings to a 4 x 6. Note: For PayPal Multi-Order Shipping, please scroll to the bottom of this article for directions. Business PayPal Accounts To access this setting on PayPal, please - Log in to PayPal and click the Gear Icon in the far top right corner. - Choose Account Settings - On the left-hand side, please choose Shipping - Under Shipping Preferences, click Update - Pick Label Printer and one of the 4 x 6 printers, such as the "Zebra TLP 3844-Z 4.
Personal PayPal Accounts 1. Login to PayPal www.PayPal.com 2. Visit https://www.paypal.com/shiplabel/createbulk 3. Click on Shipping Preferences 4. Select the Label Printer and any of the 4.0"x6.0" sizes PayPal Multi-Order Shipping After you are logged into your Multi-Order shipping platform, click on Edit > Settings Choose the "Print Settings" settings from the left menu, click on the "Label Printer" and choose any of the 4 x 6 labels. To Save, click OK. www.phomemo.
1.15 Chitchats Phomemo is compatible with all platforms that offer shipping labels in 4x6 format. This includes Chitchats. For setting up Chitchats, please see the official help link: https://support.chitchats.com/support/solutions/articles/47000426810-how-do-i-print-postage 1.16 Stamps.com Note: We recommend that you switch to Stamps.com's newest acquisition ShipStation for reliable, fast, and easy printing. 1.16.1 Web Version We recommend that you use the web version of Stamps.com.
1.16.2 Stamps.com Pro Software Stamps.com software requires a few steps to successfully print to a thermal printer. This software was originally produced in late 90s and the set up steps reflect that era. Essentially, we will install Phomemo as a EPL printer. 1. Download the Zebra Printer Driver (ftp://ftp.fedex.com/pub/us/software/ZebraFedEx_driver_4500_self_extracting15.exe) 2.
(2) "Device Manager" -> "Universal Serial Bus controllers" -> Double click on "USB Printing Support" to check which USB port is connected 5.We will now go back to the installation window and pick the same port and click "Finish" 6. Go to "Control Panel" -> "Devices and printers" -> Right click on "Zebra 2844" -> choose "Printer properties" www.phomemo.com Copyright © 2019 Phomemo Powered by QUYIN TECHNOLOGY CO.
7. Go to "Stocks" to choose the label size 8. Go to "General", click on "Print Test Page" to check the Zebra 2844 driver is installed successfully and connect the right printer 9. Next, open the Stamps.com software and select "Tools" -> "Configure Printer" www.phomemo.com Copyright © 2019 Phomemo Powered by QUYIN TECHNOLOGY CO.
10. Choose "Yes" and click "Next," and then "Finish" 11. In the Packages tab, if not already selected, please select "Zebra / Eltron Type - Standard 4x6 label - roll" Click on Print Sample or Print Postage 12. For your printer, please pick Zebra 2844 and click "Print" www.phomemo.com Copyright © 2019 Phomemo Powered by QUYIN TECHNOLOGY CO.
1.17 Fedex Ship Manager The easiest way to print your shipping labels from Fedex is to use a commercial platform, such as XPSShip (free) or ShipStation (paid but great). They are approved Fedex partners and use your negotiated rates to provide you with a 4 x 6 shipping label which you can then easily print to Phomemo. You will also be able to compare rates from other carriers and pick the best option. We recommend this because Fedex Ship Manager is a bit cumbersome to set up.
4. (1)To know which USB Port is connected, please go to "This PC" and right click on, choose "Manage" (2) "Device Manager" -> "Universal Serial Bus controllers" -> Double click on "USB Printing Support" to check which USB port is connected 5.We will now go back to the installation window and pick the same port and click "Finish" www.phomemo.com Copyright © 2019 Phomemo Powered by QUYIN TECHNOLOGY CO.
6. Go to "Control Panel" -> "Devices and printers" -> Right click on "Zebra 2844" -> choose "Printer properties" 7. Go to "Stocks" to choose the label size 8. Go to "General", click on "Print Test Page" to check the Zebra 2844 driver is installed successfully and connect the right printer www.phomemo.com Copyright © 2019 Phomemo Powered by QUYIN TECHNOLOGY CO.
5. Next, go to Fedex Ship Manager, click on the "Utilities" -> "Printer Setup" 6. Select Zebra 2844 under the "Label Printer" and click OK 7. We now need to change the default label size to 4 x 6. Click on "Customize" -> "Shipping Profiles" 8. Select the appropriate domestic or international shipping profile and click "View/Edit". You may want to update all of them to the correct size. www.phomemo.com Copyright © 2019 Phomemo Powered by QUYIN TECHNOLOGY CO.
13. If you are using Fedex Provided Labels, their sizes and part numbers are as follows. 153078-077 - Indicates a Format 77 label. (4" x 5" Thermal Label with FedEx Logo) 154254-354 - Indicates a Format 354 label. (4" x 6 3/4" Thermal Label with Doc Tab) 156295-434 - Indicates a Format 354 label. (4" x 6" Thermal Label without Doc Tab) 156297-435 - Indicates a Format 435 label. (4" x 6 " Thermal Label without Doc Tab) a.
1.18 QuickBooks Enterprise Quickbooks is not currently on our official supported platform list: What platforms does Phomemo work with? Note: QuickBooks software requires a few more steps than other platforms to work. Essentially, we will install Phomemo as a EPL printer. Quickbooks Enterprice Software: 1. Download the Zebra Printer Driver (ftp://ftp.fedex.com/pub/us/software/ZebraFedEx_driver_4500_self_extracting15.exe) 2.
4. (1)To know which USB Port is connected, please go to "This PC" and right click on, choose "Manage" (2) "Device Manager" -> "Universal Serial Bus controllers" -> Double click on "USB Printing Support" to check which USB port is connected 5.We will now go back to the installation window and pick the same port and click "Finish" www.phomemo.com Copyright © 2019 Phomemo Powered by QUYIN TECHNOLOGY CO.
6.Go to "Control Panel" -> "Devices and printers" -> Right click on "Zebra 2844" -> choose "Printer properties" 7. Go to "Stocks" to choose the label size 8. Go to "General", click on "Print Test Page" to check the Zebra 2844 driver is installed successfully and connect the right printer www.phomemo.com Copyright © 2019 Phomemo Powered by QUYIN TECHNOLOGY CO.
1.19 Endicia Dazzle (Win) Note: We need to install Phomemo as a EPL printer to work with Dazzle. 1.Download the Zebra Printer Driver (ftp://ftp.fedex.com/pub/us/software/ZebraFedEx_driver_4500_self_extracting15.exe) 2.After opening the downloaded file, please click on "Install Zebra Printer" You can check the video to know: How to install Zebra 2844 Driver with PM246 Pro on Win: "https://www.youtube.
(2) "Device Manager" -> "Universal Serial Bus controllers" -> Double click on "USB Printing Support" to check which USB port is connected 5.We will now go back to the installation window and pick the same port and click "Finish" 6. Go to "Control Panel" -> "Devices and printers" -> Right click on "Zebra 2844" -> choose "Printer properties" www.phomemo.com Copyright © 2019 Phomemo Powered by QUYIN TECHNOLOGY CO.
7. Go to "Stocks" to choose the label size 8. Go to "General", click on "Print Test Page" to check the Zebra 2844 driver is installed successfully and connect the right printer 9. Next, open Dazzle and click on the "Printer Setup" 10. Choose "Zebra 2844" and Click OK www.phomemo.com Copyright © 2019 Phomemo Powered by QUYIN TECHNOLOGY CO.
1.20 How to use Phomemo printing with Endicia Dazzle 1. Ensure you are in the Design Tab. 2. Click on "File" -> "Printer" 3. Set your Printer and Label Values as shown. Click on "Test Print." If it all looks good, click "OK." www.phomemo.com Copyright © 2019 Phomemo Powered by QUYIN TECHNOLOGY CO.
Note: Due to a software bug in Dazzle, "Quick Label" does not produce 4 x 6 labels. Please create your own labels from the "Design" tab. Per Endicia Support: The Design tab would be the correct route. You would need to change layouts on the Design tab as you change from a domestic address to an international one, or an APO . The main reason for the Quick Label tab was to shield users from the need to change label layouts. Dazzle changes the layout based on the address and mail class.
1.21 Pirate Ship Phomemo is compatible with all platforms that offer shipping labels in 4x6 format. This includes Pirate Ship. For setting up Pirate Ship, please see the official help link: https://support.pirateship.com/en/articles/2610080-windows-how-to-print-with-a-4x6-label-printer www.phomemo.com Copyright © 2019 Phomemo Powered by QUYIN TECHNOLOGY CO.