INTEGRATED DIGITAL HD READY COLOUR TELEVISIONS 26WLZ530HID Operating Instructions
TABLE OF CONTENTS 1 2 3 4 5 6 7 8 9 1-Important Information........................................................................... 1 1.1-Cleaning the screen and cabinet.........................................................................1 1.2-Disposing of your TV at the end of service life.....................................................1 1.3-Superior features of your integrated digital television...........................................1 1.4-Receiving digital broadcasting channels.....
1 Important Information LCD panels are produced with state-of-the-art technology. However, there may be missing or lit spots on the screen under certain circumstances. That does not mean that the product is faulty. 1.1-Cleaning the screen and cabinet... After powering off, wipe the screen and the cabinet clean with a soft and dry cloth. We recommend that you do not use patented polishes or solvents on the screen or cabinet since they may cause damage. 1.2-Disposing of your TV at the end of service life...
1.5-Changing the plug The supplied mains cable already has a mains plug fitted, however should you need to replace it at any time please refer to the appropriate wiring information below for your particular cable.
2 Features of your new television We would like this product, which has been manufactured in modern facilities in accordance with total quality principles, to offer you the best performance. Therefore, we would like you to read this entire manual carefully before you use your product and keep it for future reference. 2.1-Special Features • • • • • • • • • • • • • • • • • • • • • • • • • • • • • • HD-Ready feature. HDCP feature. 2-HDMI connection input. High image and sound performance. CI slot input.
3 Important Safety Instructions This symbol is used to warn the user about the “dangerous voltage” contained inside the housing of the product that may create a risk of electrical shock. This symbol is used to remind the user important usage and service instructions supplied with the TV. • 1) Please READ the operating instructions before using your TV for the first time. 2) Please observe the instructions contained in the Operating Instructions. 3) Please consider all warnings.
10) Never operate your TV close to water. Operating your TV, for example, near a bathtub, washbasin, kitchen washbasin, washing basin, wet basement and swimming pool can cause fire or electric shock. • • Note: Do not use defective sockets. Make sure that the plug is firmly inserted into the socket. If the plug remains loose, then it can cause fire due to arcing. Refer to an electrician to have your socket replaced.
18) Wipe the TV cabinet clean with a soft and dry cloth. Wipe dust from the screen gently with a soft cloth. Stubborn stains can be cleaned with a cloth slightly moistened with soap and lukewarm water. Never use solvents such as thinner or gasoline for cleaning. Unplug the AC power cable from the socket when cleaning the TV. Otherwise, there is the risk of electric shock. 21) Do not dispose of your TV with regular household waste. Observe local laws and regulations for disposal.
4 Start Remove your television carefully from its box. You can keep the packaging of your television to use in future. your television for a long time, unplug its power cable from the socket. 4.3-Performing initial start and settings Contents of the box Power cable Remote control 2 batteries Note: Scart, HDMI, VGA and PHONO cables are not supplied with the device. To set up your television, read the sections on the TV controls and making the channel settings. 4.4-Batteries 4.
5 Your new television 5.1-TV Control Panel or or Program Down/Up button or Volume Level Down/Up button or or or Stand by indicator or or Menu button/Source selection button or or Bright light: TV is in Stand-by Dimmed light: TV is On No light: Power Cable is not connected. or Power/Standby button 5.
5.
6 Performing the initial power-on settings 6.1-TV controls 6.1.4-Temporary sound mute (MUTE) 6.1.1-Temporary on/off (STAND-BY) To temporarily mute the sound of your television, press the MUTE button on your remote control. The MUTE symbol will appear on the screen. When you press the same button a second time, the sound will be restored. If you press the VOL+ button while in the Mute mode, the sound level is increased and the Mute function is aborted.
6.2-Turning on your television for the first time and tuning Installation Guide menu will be displayed on the screen when you turn on your television for the first time.
ADDITIONAL INFORMATION Please note that Encrypted channels may not be stored after scanning in the Digital TV channels. If this is the case then you will need to rescan the channels again but this time change the LIST SCRAMBLED CHANNELS from AUTO to ON: 1 2 3 4 5 6 Press the MENU button on your remote control. Select CHANNEL SETUP by pressing the Right/Left movement button and confirm your selection with OK button.
6.4.2-Manual tuning of analogue channels and storing in the memory 6.4.2.1-If you already know the channel number Analogue Manual Tuning System Channel I C 4 Fine tuning Select Analogue Manual Tuning by pressing the Up/Down movement buttons in the CHANNEL SETUP menu and confirm by pressing the OK button. Analogue Manual Tuning menu will be displayed. +00 Search Programme no 1 Skip No Frequency 62.
6.6-Program table No Information With the program table, you may list the television channels, delete channels, create favorites list, lock any channel you wish or change the names of the analogue channels according to your personal choice. Select the Program Table tab by pressing the Down movement button in CHANNEL SETUP menu and confirm with the OK button. Program Table menu will be displayed.
created. To do this, press the FAV button on your remote control. Favourite List menu will be displayed. Favourite List ALL CHANNELS FAV1 FAV2 FAV3 FAV4 Select one of the ALL CHANNELS, FAV1, FAV2, FAV3, FAV4 lists by pressing the Up/ Down movement buttons and press OK button to confirm. 6.6.3- Relocating a stored channel Select the channel you want to relocate from the Program Table menu with Up/Down buttons and press the “GREEN” button on your remote control.
6.6.8-Channel List Note: Signal Information menu will be active only for Digital broadcasts. If you press OK button when no menu is open, Channel List menu will be displayed on the screen. 6.8-CA Module (Conditional Access) In this menu, you can check the CA Module settings. If a CI module is inserted for a channel that has a scrambled broadcast, then a submenu for that module is opened and the information for that module is updated. CHANNEL LİST Channel 1 Channel 2 6.
7 The settings on your new television 7.1.3-Sound Type 7.1-Performing the Sound settings The program you watch may be broadcast in stereo or in two different languages. Using the Right/Left movement buttons in this menu, you can select Mono/Stereo or Dual-1/ Dual-2. You may perform Volume settings by using the V+ or V- buttons on your television or the VOL+/VOL- buttons on your remote control. You can perform other Sound settings by entering the Sound menu.
7.1.6-Headphone By connecting headphones to your television you can listen to the program sounds independently from your television. To turn up and down the headphone volume level, select Headphone tab from the Sound menu and adjust the volume level by using the Right/Left movement buttons. Note 1: The settings you have made in the Sound menu will be stored in the memory without requiring any other operations.
7.2.5.1-DNR (Noise reduction) You may reduce interference and noise formed in the picture by using this feature. Select DNR tab with the Up/Down movement buttons to activate this feature and select one of the Off, Low, Normal, High or Auto options with Right/Left movement buttons. Note: Noise reduction function is only effective in weak broadcasts. 7.2.5.2-MPEG NR You can remove the artifacts that appear in the picture as square shaped blocks by using this feature.
Note: Since the use of certain functions in order to change the picture sizes for collective projection or commercial purposes (modifying the height and width etc.) will be deemed an infringement of the picture’s copyright, legal proceedings can be carried out as required under relevant laws. 7.2.6.3-14:9 This is a movie format. 7.2.6.8-Overscan: Off When this mode is selected, high defined picture from the HDMI is not cropped and it is displayed in its original size.
7.3.2-Off Time 7.4-Options menu settings Select the Off Time tab by pressing the Up/ Down movement button in TIMER menu and confirm your selection with the Right movement button or OK button. In this menu, you can set the off time for your television with weekly or daily periods. Press the MENU button on your remote control. Select OPTIONS by pressing the Up/Down movement buttons and press the OK button.
7.4.3- Country 7.5-Parental Control You can not access the Country option from the Options menu. The country selected during the initial use will automatically displayed in the menu. 7.4.4- Game Mode In the Options menu, you can set the Game Mode tab to On/Off by pressing the Right/ Left buttons. When the Game Mode is set to On, display settings will return to the default values. Game Mode becomes active only for PC, HDMI and YPBPR sources.
7.6.2-Freeze (Freeze picture) to block from the Block Programme menu with Up/Down buttons and confirm with the GREEN button on your remote control. A lock symbol will appear next to the channel name. When a blocked channel is selected, the password screen will be displayed and the channel will not appear until the correct password is entered. If you do not enter the password, CH BLOCKED will be displayed on the screen. There will also be a lock symbol next to the blocked channel in the Program Table.
8 Teletext Being one of the most prominent services of broadcasting today, Teletext renders the TV more fruitful. Teletext means in short the transmission of various updated information along with the TV broadcast signal in the form of text and graphics. To be able to receive a quality teletext broadcast, a good antenna system and a broadcast signal that is not weak, with no reflections and interference from other channels are required.
8.7-Temporary TV Picture (UPDATE) 8.10-Fastext This button allows you to switch to the television picture while the page you want is being searched in the teletext broadcast eliminating the need to wait during the search. You may switch to the television picture by pressing the UPDATE button while Teletext is searching for your desired page. Once the page you want is found, the number of that page appears on the screen. The coloured buttons on the remote control are for the fastext feature.
9 External Equipment Connections Your TV is equipped with 9 inputs including antenna input, which allows for the external device connection. These inputs are: 1-Aerial input 2-SCART input 3-AV input 4-S-Video input 5-PC input 6-HDMI1 input 7-HDMI2 input 8-YPbPr Component input 9-CI slot input You can connect your external device supporting the suitable inputs to your TV via these inputs.
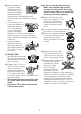
9.3-Connecting external equipment via AV connection Side view of the TV CAMERA DECODER DVD AV : To watch the picture of the broadcast device connected using the RCA (Phono) input, select AV option from the Source menu and press OK button. Your TV will switch to the selected source. SATELLITE RECEIVER GAME CONSOLE 9.
9.6-Connecting an external device via HDMI connection Rear or side view of the TV DVD SATELLITE RECEIVER HDMI: When a connection is made via HDMI socket, select the HDMI input through which you have made the connection from the Source menu and press the OK button. Your TV will switch to the selected source. GAME CONSOLE Connect to the HDMI input at the back of your TV by using the connector located on your PC or your digital video-transmission device with a suitable cable (not supplied with the TV).
9.7.2-Switching to the PC mode For your LCD-TV to switch to the monitor (PC) mode, press the SOURCE button on your remote control. SOURCE menu will be displayed. Select PC by pressing the Up/Down movement buttons and press the OK button. 9.7.3-PC Access Setting Enter into the SETUP menu from the Main Menu by pressing the MENU button in the PC mode.
10 Help and tips Failure Possible cause Solution The television does not function Is the power cord connected to the mains supply? Check the power cord. Is the Power On/Off button on? Check if the On/Off button is on. Is the antenna cable connected? Check the antenna cable. If you are using a satellite antenna, is it well adjusted? Have the antenna adjusted. Antenna may be affected by two connected external devices. Try disconnecting one of the devices. It may need fine tuning.
11 Technical Specifications Chart SCREEN SIZE Panel type 26” 26”, 16:9 Active matrix TFT Sound output 2x7 W Power consumption 110 W Stand by power value <1 W SCART input Standard Audio/Video Phono input Standard S-Video socket Standard HDMI input 1/2 Standard YPBPR input Standard VGA input Standard PC Audio input Standard CI Slot Input Standard Dimensions (WxDxH) 490x665x178 Weight (Kg) 9,5 General technical specifications Power supply AC: 230V 50 Hz Program memory: 100 RF Ae
12 MAIN UK TRANSMITTER STATIONS UHF CHANNELS Regional Main stations North West STATIONS CT D BBCI BBC2 ITV CH4 CH5 Map Caldbeck 30 Winter Hill Douglas (IOM) 55 34 68 66 28 59 48 32 65 56 56 48 56 12 15 45 Belmont 22 North 62 28 25 44 51 47 32 41 56 37 17 16 Bilsdale West Moor Chalton 33 39 26 45 29 49 23 42 35 14 54 56/58 13 Ridge Hill Sutton Coldfield The Wreckin 22 28 25 32 35 26 33 23 29 25 23 22 20 Waltham 58 64 61 54 35 21 Beacon Hill Caradon H
13 Guarantee - Television Your new television is guaranteed against the cost of breakdown repairs for twelve months from the date of the original purchase. What is covered? • All repairs necessary as a result of faulty materials,defective components or manufacturing detect. • The cost of all functional replacement parts,excluding remote control batteries • The labour costs of a Beko approved repairer to carry out the repair • You may be offered a replacement instead of repair under guarantee.
HOW TO OBTAIN SERVICE Congratulations on your choice of a Beko colour television.Your new television has been designed and manufactured to the highest quality stadards to give you many years of use. To get the best out of it,please take a few moments to read the instruction book. Your television is supplied with a full 12 months guarantee,covering parts and labour.
V8K.