Automatic washing machine WMB61431S WMB61431B WMB61431W
Please read this user manual first! Dear Customer, We hope that you get the best results from the product which has been manufactured in state-of-the-art plants and passed through a strict quality control procedure. Therefore, please read the entire user manual carefully before using the product and keep it as a reference for future use. In case of transferring the product to someone else, give the manual as well. The user manual will help you use your machine in a fast and safe way.
TABLE OF CONTENTS 1 Your washing machine 4 Overview . . . . . . . . . . . . . . . . . . . . . . . 4 Technical specifications . . . . . . . . . . . . 5 2 Important safety instructions 6 General safety . . . . . . . . . . . . . . . . . . . 6 Intended use . . . . . . . . . . . . . . . . . . . . 6 Children's safety . . . . . . . . . . . . . . . . . . 7 3 Installation 8 Appropriate installation location . . . . . . 8 Removing packaging reinforcement . . . 8 Removing the transportation locks .
1 Your washing machine Overview 8 1 2 3 7 6 4 5 1- Power cable 2- Top panel 3- Control panel 4- Filter cap 5- Adjustable feet 6- Loading door 7- Detergent drawer 8- Drain hose 4 EN
Technical specifications Models WMB61431S WMB61431B WMB61431W Maximum dry laundry capacity (kg) 6 6 6 Height (cm) 84 84 84 Width (cm) 60 60 60 Depth (cm) 45 45 45 Net weight (±4 kg.) 65 65 65 Electrical input (V/Hz) 230 V / 50Hz Total current (A) 10 Total power (W) 10 10 2200 Spin speed (rpm max.) 1400 1400 1400 Stand-by mode power (W) 1.00 1.00 1.00 Off-mode power (W) 0.25 0.25 0.
2 Important safety instructions This section contains safety instructions that will help protect from risk of personal injury or property damage. Failure to follow these instructions shall void any warranty.
Children's safety • • • Electrical products are dangerous for the children. Keep children away from the product when it is in use. Do not let them to tamper with the product. Use child lock to prevent children from intervening with the product. Do not forget to close the loading door when leaving the room where the product is located. Store all detergents and additives in a safe place away from the reach of the children.
3 Installation Refer to the nearest Authorised Service Agent for installation of the product. To make the product ready for use, review the information in the user manual and make sure that the electricity, tap water supply and water drainage systems are appropriate before calling the Authorized Service Agent. If they are not, call a qualified technician and plumber to have any necessary arrangements carried out.
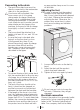
will get damaged or the product will switch to protection mode and will not operate. Do not use old or used water inlet hoses on the new product. It may cause stains on your laundry. 1. Connect the special hoses supplied with the product to the water inlets on the product. Red hose (left) (max. 90 ºC) is for hot water inlet, blue hose (right) (max. 25 ºC) is for cold water inlet. A 3. Attach the plastic covers supplied in the User Manual bag into the holes on the rear panel.
Connecting to the drain • A • • • • • The end of the drain hose must be directly connected to the wastewater drain or to the washbasin. Your house will be flooded if the hose comes out of its housing during water discharge. Moreover, there is risk of scalding due to high washing temperatures! To prevent such situations and to ensure smooth water intake and discharge of the machine, fix the end of the discharge hose tightly so that it cannot come out.
for any damages that will arise when the product is used without grounding in accordance with the local regulations. • Connection must comply with national regulations. • Power cable plug must be within easy reach after installation. • The voltage and allowed fuse or breaker protection are specified in the “Technical specifications” section. If the current value of the fuse or breaker in the house is less than 13 Amps, have a qualified electrician install a 13 Amp fuse.
First use Before starting to use the product, make sure that all preparations are made in accordance with the instructions in sections "Important safety instructions" and "Installation". To prepare the product for washing laundry, perform first operation in Drum Cleaning programme. If your machine is not featured with Drum Cleaning programme, use Cottons-90 programme and select Additional Water or Extra Rinse auxiliary functions as well. Before starting the programme, put max.
4 Preparation Things to be done for energy saving Following information will help you use the product in an ecological and energyefficient manner. • Operate the product in the highest capacity allowed by the programme you have selected, but do not overload; see, “Programme and consumption table”. • Always follow the instructions on the detergent packaging. • Wash slightly soiled laundry at low temperatures. • Use faster programmes for small quantities of lightly soiled laundry.
Correct load capacity The maximum load capacity depends on the type of laundry, the degree of soiling and the washing programme desired. The machine automatically adjusts the amount of water according to the weight of the loaded laundry. Follow the information in the “Programme and consumption table”. When overloaded, machine’s washing performance will drop. Moreover, noise and vibration problems may occur. Laundry types and their average weights in the following table are given as examples.
Using detergent and softener • Detergent Drawer The detergent drawer is composed of three compartments: - (I) for prewash - (II) for main wash – (III) for softener – (*) in addition, there is siphon piece in the softener compartment. Wash your delicate clothes only with special detergents (liquid detergent, wool shampoo, etc.) used solely for delicate clothes. • When washing dark coloured clothes and quilts, it is recommended to use liquid detergent.
putting in the detergent cup. detergents may leave residues C Tablet in the detergent compartment. If you encounter such a case, place the tablet detergent between the laundry, close to the lower part of the drum in future washings. Use the tablet or gel detergent without selecting the prewash function. Using starch • Add liquid starch, powder starch or the dyestuff into the softener compartment as instructed on the package. • Do not use softener and starch together in a washing cycle.
• Oxygen based bleaches can be used together with detergents; however, if its thickness is not the same with the detergent, put the detergent first into the compartment nr. “II” in the detergent drawer and wait until the detergent flows while the machine is taking in water. Add the bleaching agent from the same compartment while the machine is still taking in water. Using limescale remover • When required, use limescale removers manufactured specifically for washing machines only.
Tips for efficient washing Clothes Light colours and whites Heavily Soiled Soiling Level (difficult stains such as grass, coffee, fruits and blood.
5 Operating the product Control panel 1 2 3 4 5 8 6 7 1 - Programme Selection knob (Uppermost position On / Off) 2 - Display 3 - Delayed Start button 4 - Programme Follow-up indicator 5 - Start / Pause button 6 - Auxiliary Function buttons 7 - Spin Speed Adjustment button 8 - Temperature Adjustment button Preparing the machine 1. Make sure that the hoses are connected tightly. 2. Plug in your machine. 3. Turn the tap on completely. 4. Place the laundry in the machine. 5.
2. Select the desired programme with the Programme Selection button. Programmes are limited with the highest spin speed appropriate for that particular type of fabric. When selecting a programme, always consider the type of fabric, colour, degree of soiling and permissible water temperature. Always select the lowest required temperature. Higher temperature means higher power consumption. For further programme details, see "Programme and consumption table".
sorting them. Special programmes For specific applications, select any of the following programmes. • Rinse Use this programme when you want to rinse or starch separately. • Spin+Drain Use this programme to apply an additional spin cycle for your laundry or to drain the water in the machine. Before selecting this programme, select the desired spin speed and press Start / Pause button. First, the machine will drain the water inside of it.
Programme and consumption table EN Auxiliary functions Water Consumption (l) Quick Wash Extra Rinse Anti-Creasing Rinse Hold Soaking Pet hair removal Cottons 90 6 65 2.00 1600 • • • • • • • Cold-90 Cottons 60 6 65 1.35 1600 • • • • • • • Cold-90 Cottons 40 6 65 0.70 1600 • • • • • • • Cold-90 Cottons Eco 60** 6 44 1.01 1600 • 40-60 Cottons Eco 60** 3 37 0.82 1600 • 40-60 Cottons Eco 40** 3 37 0.64 1600 • 40-60 Daily Quick 90 6 47 1.
• : Selectable * : Automatically selected, no canceling. ** : Energy Label programme (EN 60456 Ed.3) *** : If maximum spin speed of the machine is lower then this value, you can only select up to the maximum spin speed. - : See the programme description for maximum load.
auxiliary functions in the table C The may vary according to the model of your machine. Auxiliary function selection Select the desired auxiliary functions before starting the programme. Furthermore, you may also select or cancel auxiliary functions that are suitable to the running programme without pressing the Start / Pause button when the machine is operating. For this, the machine must be in a step before the auxiliary function you are going to select or cancel.
not use liquid detergents when C Do you set Delayed Start! There is the risk of staining of the clothes. 1. Open the loading door, place the laundry and put detergent, etc. 2. Select the washing programme, temperature, spin speed and, if required, the auxiliary functions. 3. Set the desired time by pressing the Delayed Start button. 4. Press Start / Pause button. The delayed start time you have set is displayed. Delayed start countdown starts.
appear on the display respectively while you keep the buttons pressed for 3 seconds. Then, "COFF" will appear on the display indicating that the Child Lock is deactivated. In addition to the method above, to deactivate the Child Lock, switch the Programme Selection knob to On / Off position when no programme is running, and select another programme. Child Lock is not deactivated after power failures or when the machine is unplugged.
programme has been canceled. Pump function is activated for 1-2 minutes regardless of the programme step, and whether there is water in the machine or not. After this period, your machine will be ready to start with the first step of the new programme. Depending on the step where the programme was canceled in, you may have to put detergent and softener again for the programme you have selected anew. C End of programme “End” appears on the display at the end of the programme. 1.
6 Maintenance and cleaning Service life of the product extends and frequently faced problems decrease if cleaned at regular intervals. (compartment nr. II). If the anti-limescale is in tablet form, put only one tablet into compartment nr. II. Dry the inside of the bellow with a clean piece of cloth after the programme has come to an end. Repeat Drum Cleaning process in every 2 months. Use an anti-limescale suitable for the washing machines.
cleaned as they do get dirty. of the water inside the A Temperature machine may rise up to 90 ºC. To avoid burning risk, filter must be cleaned after the water in the machine cools down. 2. Open the filter cap. If the filter cap is composed of two pieces, press the tab on the filter cap downwards and pull the piece out towards yourself. 1. Close the taps. 2. Remove the nuts of the water intake hoses to access the filters on the water intake valves. Clean them with an appropriate brush.
a. Pull the emergency draining hose out from its seat b. Place a large container at the end of the hose. Drain the water into the container by pulling out the plug at the end of the hose. When the container is full, block the inlet of the hose by replacing the plug. After the container is emptied, repeat the above procedure to drain the water in the machine completely. c. When draining of water is finished, close the end by the plug again and fix the hose in its place. d.
7 Troubleshooting Programme cannot be started or selected. • Washing machine has switched to self protection mode due to a supply problem (line voltage, water pressure, etc.). >>> Press and hold Start / Pause / Cancel button for 3 seconds to reset the machine to factory settings. (See "Canceling the programme") Water in the machine. • Some water might have remained in the product due to the quality control processes in the production. >>> This is not a failure; water is not harmful to the machine.
Loading door cannot be opened. • Door lock is activated because of the water level in the machine. >>> Drain the water by running the Pump or Spin programme. • Machine is heating up the water or it is at the spinning cycle. >>> Wait until the programme completes. • Child lock is engaged. Door lock will be deactivated a couple of minutes after the programme has come to an end. >>> Wait for a couple of minutes for deactivation of the door lock. Washing takes longer time than the one specified in the manual.
Machine does not switch to spinning step. • There might be an imbalance of laundry in the machine. >>> Automatic unbalanced load detection system might be activated due to the unbalanced distribution of the laundry in the drum. Machine does not switch to spinning step when the laundry is not evenly distributed in the drum to prevent any damage to the machine and to its surrounding environment. Laundry should be rearranged and re-spun. • The machine will not spin if water is not drained completely.
Colour of the clothes faded. • Excessive laundry was loaded in. >>> Do not load the machine in excess. • Detergent in use is damp. >>> Keep detergents closed in an environment free of humidity and do not expose them to excessive temperatures. • A higher temperature is selected. >>> Select the proper programme and temperature according to the type and soiling degree of the laundry. • Regular drum cleaning is not applied. >>> Clean the drum regularly.
Detergent residue in the detergent drawer. • Detergent is put in wet drawer. >>> Dry the detergent drawer before putting in detergent. • Detergent has gotten damp. >>> Keep detergents closed in an environment free of humidity and do not expose them to excessive temperatures. • Water pressure is low. >>> Check the water pressure. • The detergent in the main wash compartment got wet while taking in the prewash water. Holes of the detergent compartment are blocked.
Foam is overflowing from the detergent drawer. • Too much detergent is used. >>> Mix 1 tablespoonful softener and ½ l water and pour into the main wash compartment of the detergent drawer. Put detergent into the machine suitable for the programmes and maximum loads indicated in the “Programme and consumption table”. When you use additional chemicals (stain removers, bleaches and etc), reduce the amount of detergent.
8 Guarantee Your new Beko product is guaranteed against the cost of breakdown repairs for twelve months from the date of the original purchase. • What is covered? • Repairs necessary as a result of faulty materials, defective components or manufacturing defect. • The cost of functional replacement parts, but excluding consumable items. • The labour costs of a Beko approved repairer to carry out the repair. What is not covered? • Transit, delivery or accidental damage or misuse and abuse.
10 Service Please keep your purchase receipt or other proof of purchase in a safe place; you will need to have it should the product require attention under guarantee. You should also complete the details below; it will help us assist you when requesting service. (The model number is printed on the Instruction Booklet and the serial number is printed on the Rating Label affixed to the appliance) agreement document.
EN