
User Manual

14 / 62 EN
Range Hood / User Manual
4 Installng your applance
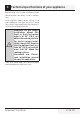
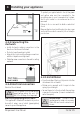
23 9/16 “ 48”
20 9/16” 42”
17 9/16 36”
14 9/16” 30”
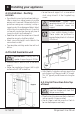
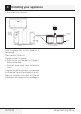
4.3.1 Install Transition Onto
Top of Hood
A
IMPORTANT:
Remove shipping
tape from damper and check that
damper moves freely.
• Place the transition piece over the hood exhaust
and secure with 4 screws provided.
• Use duct tape to seal the connection. Check to
be sure the damper moves freely.
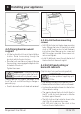
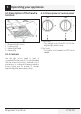
4.3 2 Mount hood onto ceiling
or cabinet
C
If mounting to the underside of a
cabinet with a recessed bottom,
install shims to fill the gap.
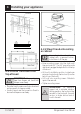
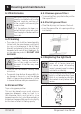
• Drive mounting screws into the studs until
they protrude 1/4”. The 1/4” gap will provide
clearance to engage the keyhole slots in the top
of the hood.
• Lift hood to installation position. Locate house
wiring and route trough the knockout (from the
back or top of the hood).
• Lift hood onto mounting screws. Slide back
against the rear wall.
• Tighten mounting screws.
A
IMPORTANT:
For additional
support and to minimize vibration
during operation, the hood must be
secured to the back wall. Use wall
anchors to fasten bottom back of
hood to the wall.