Condenser Sensor Dryer Dry & Save DP 8045 CW
Please read this user manual first! Dear Customer, We hope that you get the best results from the product which has been manufactured in state-of-the-art plants and passed through a strict quality control procedure. Therefore, please read the entire user manual carefully before using the product and keep it as a reference for future use. In case of transferring the product to someone else, give the manual as well. The user manual will help you use your product in a fast and safe way.
TABLE OF CONTENTS 1 Dryer 4 Overview..............................................4 Technical specifications........................5 2 Important safety instructions 6 General safety......................................6 Intended use........................................8 Children's safety...................................8 3 Installation 9 Appropriate installation location............9 Removing the transportation safety assembly..............................................
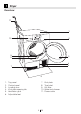
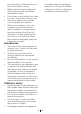
1 Dryer Overview 11 1 10 2 9 8 3 4 5 7 6 1. 2. 3. 4. 5. 6. Top panel Control panel Loading door Kick plate opening tab Ventilation grids Adjustable feet 7. 8. 9. 10. 11.
Technical specifications Congratulations on purchasing the new ‘Dry & Save’ tumble dryer from Beko. Using the latest energy efficient heat pump technology means it can dry the same load at around half the energy cost of popular Beko ‘C-rated’ Condenser models. The gentle drying will also take more care of even the most delicate garments. Height (adjustable) 84.6 cm Width 59.5 cm Depth 59.
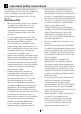
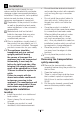
2 Important safety instructions This section contains safety instructions that will help protect from risk of personal injury or property damage. Failure to follow these instructions shall void any warranty. General safety • • • • • • • Never place the product on a carpetcovered floor; otherwise, lack of airflow beneath the machine will cause electrical parts to overheat. This will cause problems with your product. Do not operate the product if the power cable / plug is damaged.
• • • • A • • • • clearly suggested in the operating instructions or the published service manual. Otherwise, you will be putting your life and others' lives in danger. For failures that you cannot remedy by applying the procedures in safety instructions, turn off and unplug the product and call the Authorised Service Agent. Do not reach into the machine when the drum is spinning.
• • • • into the product. Check the drum of the product before using it. Make sure that original spare parts and accessories are used during maintenance works. Do not lean on the loading door when it is open. The product may tip over. Remove all objects from pockets such as lighters and matches. When your machine is not in use or when you unload the laundry after completion of drying process, turn the machine off with the On/ Off button.
3 Installation To make the product ready for use, make sure that the electricity and water drainage system are appropriate before installation. If they are not, call a qualified technician and plumber to have any necessary arrangements carried out. Preparation of the product’s location as well as the electrical and waste water installations is the customer’s responsibility. Manufacturer shall not be held liable for damages that may arise from procedures carried out by unauthorised persons.
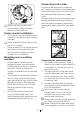
Connecting to the drain In products equipped with condenser unit, water accumulates in the water tank during the drying cycle. You should drain accumulated water after each drying cycle. You can directly drain accumulated water through the water drain hose supplied with the product instead of periodically draining the water collected in the water tank. A Make sure that no part of the transportation safety assembly remains inside the drum.
between the drain and the machine. to carry the machine in the upright position, we recommend carrying it by tilting towards the right side when looked from the front. After the product is moved to its new place, you should wait for 12 hours before starting it. Adjusting the feet In order to ensure that the product operates more silently and vibration-free, it must stand level and balanced on its feet. Balance the machine by adjusting the feet.
Warnings about sounds Water collected during operation is C It is normal to hear metallic noise from C pumped to water tank. It is normal the compressor sometimes during operation. to hear pumping noise during this process.
4 Electrical Connection Make sure that you have an earthed power outlet socket rated at 13 amps (minimum). Attention! If you use your dryer as built-in, the socket must be reachable after installation, or a separate switch (which can disconnect the two poles) must be used in the installation. Check for suitability. For a permanent connection, a master switch with at least 3mm contact clearance and minumum 13 A rating must be used.
5 Preparations for drying Things to be done for energy saving machine is not in use. Following information will help you use the product in an ecological and energyefficient manner. • Operate the product at a capacity suitable for the programme you have selected and pay attention not to overload. • Spin your laundry at the highest speed possible when washing them. Thus, the drying time is shortened and energy consumption is reduced. • Dry the same type of laundry together.
Items cleaned, washed or spotted with gasoil/fuel oil, dry-laundry solvents, industrial chemicals or other combustible or explosive materials should not be dried in the dryer. Items soiled with cooking oils, acetone, alcohol, fuel oil, kerosene, stain removers, turpentine, paraffin and paraffin removers must be washed in hot water with plenty of detergent before being dried in the dryer.
Loading the laundry 1. Open the loading door. 2. Place the laundry in the machine without compressing. 3. Push the loading door to close. Ensure that no items are caught in the door.
6 Selecting a Programme and Operating Your Machine Control panel 1 9 2 8 7 3 4 5 6 1. Washing Machine Spin Speed / Timer Programme Selection button 2. Display 3. Start / Pause / Cancel button 4. Programme Selection knob 5. On / Off button 6. Anti-creasing button 7. Dryness Level button 8. Cancel Audio Warning button 9.
Preparing the machine bathrobes, etc.). • Synthetics Dry less durable laundry with this programme. Recommended for synthetics. 1. Plug in the machine. 2. Place the laundry in the machine. 3. Press the On / Off button. Pressing the On / Off button does not necessarily mean that the programme has started. Press Start / Pause / Cancel button to start the programme. C Additional programmes C Programme selection 1. Decide the appropriate programme from the table below which includes drying levels. 2.
and soften your woollen laundry that can be washed in the washing machine. Do not use this programme to dry your laundry completely. Take out your laundry and ventilate them immediately after the programme is over. • Daily Quick This programme is used to dry cottons and synthetics daily, and lasts for 1.5 hour. • Baby Clothing This programme is used for baby clothes that bear machine dryable approval on its label.
Programme selection and consumption table EN 2 Programmes Capacity (kg) Spin speed in washing machine (rpm) Approximate amount of remaining humidity Drying time (minutes) Cottons / Coloureds A Extra dry 8 1000 60 % 190 A Cupboard dry 8 1000 60 % 175 A Iron dry 8 1000 60 % 150 Baby Clothing 3 1000 60 % 80 Shirts 1.5 1200 50 % 50 Jeans 4 1200 50 % 120 Daily Quick 4 1200 50 % 90 Mix 4 1000 60 % 115 Sportswear 4 1000 60 % 105 Xpress 45 min.
Auxiliary functions Audio Warning The machine will give an audio warning when the programme comes to an end. If you do not want the machine to give an audio warning, press the Volume Level button repeatedly until "x" appears on the display. Use the same button to adjust the volume level. You can activate this function either before or after the programme starts.
symbol will start to flash and machine will pause. Drain the water in the water tank and press Start / Pause / Cancel button to resume the programme. The warning symbol turns off and the programme resumes operating. period. At the end of the Time Delay countdown process, Time Delay symbol disappears, drying process starts and the programme duration is displayed. The time on the display is the total of normal drying time and delay time.
Starting the programme Child-proof Lock Press Start / Pause / Cancel button to start the programme. Start / Pause symbol will light up to indicate that the programme has started and ":" symbol between the remaining time will continue flashing. Progress of programme Drying Iron Anticreasing Wardrobe (Extra) Refresh Progress of a running programme is indicated on the display by means of a set of symbols.
programme instead of Iron Dry programme, press and hold the Start / Pause / Cancel button for 3 seconds to cancel the programme. 2. Select Extra Dry programme by turning the Programme Selection knob. 3. Press Start / Pause / Cancel button to start the programme. You can also select a new programme by turning the Programme Selection knob while the machine is operating. In this case, current programme is aborted and the new programme information appears on the display.
End of programme Lint Filter Cleaning and Water Tank warning symbols light up in the programme follow-up indicator and "End” label appears on the display when the programme comes to an end. The loading door can be opened and the machine becomes ready for a second cycle. Press On / Off button to switch off the machine. C If Anti-creasing function is activated C C and the laundry is not taken from the machine at the end of the programme, 2-hours Anti-creasing programme is activated.
7 Maintenance and cleaning Service life of the product extends and frequently faced problems decrease if cleaned at regular intervals. This product must be unplugged during maintenance and cleaning works (control panel, body, etc.). up on the lint filter surface. Dry the lint filter completely before reinstalling it. B Lint Filter / Loading Door Inner Surface Lint and fibres released from the laundry to the air during the drying cycle are collected in the Lint Filter.
There are dampness sensors in the machine that detect whether the laundry is dry or not. To clean the sensors: 1. Open the loading door of the machine. 2. Allow the machine to cool down if it is still hot due to the drying process. 3. Wipe the metal surfaces of the sensor with a soft cloth, dampened with vinegar and dry them. Clean metal surfaces of the sensors 4 times a year. Do not use metal tools when cleaning metal surfaces of the sensors.
2. Remove the filter drawer cover by turning it in the direction of arrow. 6. Clean lint, fibre, and cotton from the filter cloth by hand or with a soft piece of cloth. 3. Pull out the filter drawer. C When you notice a layer that may 4. Open the filter drawer by pressing the red button. lead to clogging on filter cloth, please clean the layer by washing in warm water. Let the filter cloth dry thoroughly before installing back the filter drawer. 7.
Cleaning the evaporator 10. Place the filter drawer back into its place, turn the filter drawer cower clockwise making sure that it is closed securely. Carefully clean the lints accumulated on the fins of the evaporator located behind the filter drawer with a vacuum cleaner. 11. Close the kick plate cover. C You can also clean by hand provided that you wear protective gloves. Do not attempt to clean with bare hands.
8 Troubleshooting Drying process takes too much time. • Pores of the lint filter are clogged. >>> Wash the lint filter with warm water. • Filter drawer is clogged. >>> Clean the sponge and the filter cloth in the filter drawer. • Ventilation grids on the front side of the machine are blocked. >>> Remove the objects (if any) that block ventilation in front of the ventilation grids. • Ventilation is not sufficient since the room where the machine is installed is very small.
Drum lighting does not turn on. (On models with lamp) • Dryer is not switched on with the On / Off button. >>> Make sure that the dryer is switched on. • Lamp is defective. >>> Call Authorised Service Agent to have the lamp replaced. End/Anti-creasing symbol is on. • Anti-creasing programme is activated in order to prevent laundry that has remained in the machine from creasing. >>> Turn off the dryer and take out the laundry. End symbol is on. • Programme is over.
9 Guarantee Your new product is guaranteed against the cost of breakdown repairs for 2 YEARS from the date of the original purchase. What is covered? • • • Repairs necessary as a result of faulty materials, defective components or manufacturing defect. The cost of functional replacement parts, but excluding consumable items. The labour costs of a approved repairer to carry out the repair. Important notes • • • • What is not covered? • Transit, delivery or accidental damage or misuse and abuse.
10 Service Please keep your purchase receipt or other proof of purchase in a safe place; you will need to have it should the product require attention under guarantee. You should also complete the details below; it will help us assist you when requesting service.