CN 151120 CN 151120 X Refrigerator
Please read this manual first! Dear Customer, We hope that your product, which has been produced in modern plants and checked under the most meticulous quality control procedures, will provide you an effective service. For this, we recommend you to carefully read the entire manual of your product before using it and keep it at hand for future references. This manual • Will help you use your appliance in a fast and safe way. • Read the manual before installing and operating your product.
CONTENTS 1 Refrigerator 3 2 Important Safety Warnings 4 Intended use...................................... 4 For products with a water dispenser;.. 6 Child safety......................................... 6 Compliance with WEEE Directive and Disposing of the Waste Product: ....... 6 Compliance with RoHS Directive:....... 6 Package information........................... 6 HCA Warning..................................... 7 Things to be done for energy saving... 7 Recommendations for freshfood compartment.
1 Refrigerator 1 13 14 12 2 *11 *3 *10 9 4 *8 *7 *6 15 5 5 1. 2. 3. 4. 5. 6. 7. Egg holder Fridge compartment shelf Sliding and Rotary storage containers Bottle shelf Freezer compartment drawers Ice container Ice machine 8. Drawer 9. Crisper 10. Adjustable glass shelves 11. Bottle holder 12. Illumination lens 13. Fan 14. Fridge compartment 15. Freezer compartment *OPTIONAL C Figures that take place in this instruction manual are schematic and may not correspond exactly with your product.
2 Important Safety Warnings Please review the following information. Failure to observe this information may cause injuries or material damage. Otherwise, all warranty and reliability commitments will become invalid. The usage life of the unit you purchased is 10 years. This is the period for keeping the spare parts required for the unit to operate as described.
• Do not pull by the cable when pulling off the plug. • Place the beverage with higher proofs tightly closed and vertically. • Never store spray cans containing flammable and explosive substances in the refrigerator. • Do not use mechanical devices or other means to accelerate the defrosting process, other than those recommended by the manufacturer.
• Do not overload your refrigerator with excessive amounts of food. If overloaded, the food items may fall down and hurt you and damage refrigerator when you open the door. Never place objects on top of the refrigerator; otherwise, these objects may fall down when you open or close the refrigerator's door. • As they require a precise temperature, vaccines, heat-sensitive medicine and scientific materials and etc. should not be kept in the refrigerator.
HCA Warning If your product's cooling system contains R600a: This gas is flammable. Therefore, pay attention to not damaging the cooling system and piping during usage and transportation. In the event of damage, keep your product away from potential fire sources that can cause the product catch a fire and ventilate the room in which the unit is placed. Ignore this warning if your product's cooling system contains R134a.
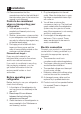
3 Installation B Please remember that the manufacturer shall not be held liable if the information given in the instruction manual is not observed. Points to be considered when re-transporting your refrigerator 1. Your refrigerator must be emptied and cleaned prior to any transportation. 2. Shelves, accessories, crisper and etc. in your refrigerator must be fastened securely by adhesive tape against any jolt before repackaging. 3.
Disposing of the packaging The packing materials may be dangerous for children. Keep the packing materials out of the reach of children or dispose of them by classifying them in accordance with the waste instructions. Do not dispose of them along with the normal household waste. The packing of your refrigerator is produced from recyclable materials. Disposing of your old refrigerator Dispose of your old refrigerator without giving any harm to the environment.
Water connection Depending on the model of the refrigerator, you can connect it either to a demijohn or water mains. First you must connect the water hose to the refrigerator. In cases where a demijohn is used, a separate pump must also be used. WARNING: Refrigerator and the pump, if any, must be unplugged during connection. Following parts may not be supplied with your product since they are not required when using a demijohn.
Connecting of the water hose to the cold water mains line (in some models) If you will use the refrigerator by connecting it to the cold water mains line, you must install a standard 1/2” valve connector to the cold water installation of your home. If this valve is not present or you are not sure, consult a qualified plumber. 1.Separate the union from the tap adaptor. 2.Install the tap adaptor to standard 1/2” valve connector. 3.
Water filter (in some models) Your refrigerator may be equipped with an external or internal filter depending on its model. To fit the water filter, follow the instructions below referring to the figures supplied: Mounting the external filter onto the wall 1. First, determine the location to mount the external filter. 2. Then, determine the distance between the filter and the tap and filter and the water inlet respectively. Prepare hoses at required lengths. 3.
4 Preparation C Your refrigerator should be installed C C C C C at least 300 mm away from heat sources such as hobs, ovens, central heater and stoves and at least 50 mm away from electrical ovens and should not be located under direct sunlight. The ambient temperature of the room where you install your refrigerator should at least be 10°C. Operating your refrigerator under cooler conditions is not recommended with regard to its efficiency.
5 Using your refrigerator Indicator Panel Indicator panels may vary depending on your product's model. Indicator panel aids in using your refrigerator with its audio and visual functions. 1 *2 7 *6 1. Freezer Compartment Temperature Indicator 2. Error Status Indicator 3. Fridge Compartment Temperature Indicator 4. Fridge Compartment Temperature Setting Button 5 3 4 5. Economy Mode Indicator 6. Ioniser Indicator 7.
1. Freezer Compartment Temperature Indicator It indicates the temperature set for Freezer compartment. 2. Error Status Indicator If your refrigerator does not cool adequately or if there is a sensor failure, this indicator will be activated. When this indicator is active, Freezer Compartment Temperature indicator will display “e” and Fridge Compartment Temperature Indicator will display numbers such as “1,2,3…”. These numbers on the indicator provides information about the error to the service personnel. 3.
Door Open Warning (This feature may vary depending on the door of the product and may not exist in some models.) An audio warning signal will be given when the door of your product is left open for at least 1 minute. This warning will be muted when the door is closed or any of the display buttons (if any) are pressed. Freezing fresh food • It must be preferred to wrap or cover the food before placing them in the refrigerator.
1. Do not freeze too large quantities of food at one time. The quality of the food is best preserved when it is frozen right through to the core as quickly as possible. 2. Placing warm food into the freezer compartment causes the cooling system to operate continuously until the food is frozen solid. 3. Take special care not to mix already frozen food and fresh food.
You can keep the freshness of food for many months (at -18°C or lower temperatures in the deep freeze). WARNING! A • Foodstuff must be divided into portions according to the family’s daily or meal based consumption needs. • Foodstuff must be packaged in an airtight manner to prevent them from drying even if they are going to be kept for a short time.
Water dispenser (OPTIONAL) Water dispenser is a very useful feature to obtain chilled water without opening the door of your fridge. Since you do not have to open the door of your fridge frequently, you also save on electricitiy. Using the water dispenser Push in the lever of the water dispenser with your glass. By releasing the lever, you cut off the dispensing. When operating the water dispenser, maximum flow is achieved by fully depressing the lever.
Cleaning the water tank Remove the water tank,and detach the top cover mechanism from the water tank. Clean the water tank with warm clean water, reinstall the top cover. When installing the water tank, make sure that hooks it fits securely into the hangers on the door. Make sure that parts removed during cleaning (if any) are installed correctly into their original locations. Otherwise, water may leak. 20 Important: Water tank and components of water dispenser are not dishwasher-proof.
Egg tray Rotary storage container You can install the egg holder to the desired door or body shelf. Never store the egg holder in the freezer compartment Sliding body shelf can be moved to left or right in order to allow you place long bottles, jars or boxes to a lower shelf (Fig. 1) You can reach the food that you have placed into the shelf by grabbing and turning it from its right edge (Fig.2).
Movable Body shelf: *OPTIONAL Adjustable body shelf is a feature at your refrigerator that help you to arrange the body shelves volume of freshfood compartment easily. If you want to put a thing into the refrigerator which height is bigger than between the two body shelves gap, you should move the slider right side to elevate the body shelf as shown at the picture below. You can elevate body shelf max 45 mm. While the body shelf is being elevated, the maximum load will be 12 kg on the body shelf.
Icematic and ice storage container Ice Machine (in some models) (in some models) Using the Icematic Fill the Icematic with water and place it into its seat. Your ice will be ready approximately in two hours. Do not remove the Icematic from its seating to take ice. Turn the knobs on it clockwise by 90 degrees. Ice cubes in the cells will fall down into the ice storage container below. You may take out the ice storage container and serve the ice cubes.
Description and cleaning of odor filter: Odor filter prevents unpleasant odor build-up in your refrigerator. Pull the cover, into which the odor filter is installed, downwards and remove as illustrated. Leave the filter under sunlight for one day. Filter will be cleaned during this time. Install the filter back to its place. Odor filter must be cleaned once in a year.
6 Maintenance and cleaning ANever use cleaning agents or water A Never use gasoline, benzene or similar substances for cleaning purposes. B We recommend that you unplug the appliance before cleaning. B Never use any sharp abrasive instrument, soap, household cleaner, detergent and wax polish for cleaning. C Use lukewarm water to clean the cabinet of your refrigerator and wipe it dry.
7 Recommended solutions for the problems Please review this list before calling the service. It might save you time and money. This list includes frequent complaints that are not arising from defective workmanship or material usage. Some of the features described here may not exist in your product. The refrigerator does not operate. • Is the refrigerator properly plugged in? Insert the plug to the wall socket.
The fridge is running frequently or for a long time. • Your new product may be wider than the previous one. This is quite normal. Large refrigerators operate for a longer period of time. • The ambient room temperature may be high. This is quite normal. • The refrigerator might have been plugged in recently or might have been loaded with food. Cooling down of the refrigerator completely may last for a couple of hours longer. • Large amounts of hot food might have been put in the refrigerator recently.
The operation noise increases when the refrigerator is running. • The operating performance of the refrigerator may change due to the changes in the ambient temperature. It is normal and not a fault. Vibrations or noise. • The floor is not even or it is weak. The refrigerator rocks when moved slowly. Make sure that the floor is strong enough to carry the refrigerator, and level. • The noise may be caused by the items put onto the refrigerator. Items on top of the refrigerator should be removed.
8 Beko Customer Care Before you call Beko for service or assistance... Refer to your User Guide and check the following: 1. 2. 3. 4. Your Appl iance is correctly installed. Your Appliance is connected to power. You are familiar with its normal mode of operation You have read the ‘Recommended solutions for the problems’ If after checking the points above, the problem still exists, please call our Beko Customer Care hotline as listed below:- If calling from Australia....
57 1824 0000/AH www.beko.com.