CWB 6601 X Hood User Manual
Please read this user manual first! Dear Customer, Thank you for prefering a Beko product. We hope that you get the best results from your product which has been manufactured with high quality and state-of-the-art technology. Therefore, please read this entire user manual and all other accompanying documents carefully before using the product and keep it as a reference for future use. If you handover the product to someone else, give the user manual as well.
TABLE OF CONTENTS 1 Important safety and environmental instructions 4 1.1 General Safety . . . . . . . . . . . . . . . . . . . . . . 4 1.1.1 Electrical safety . . . . . . . . . . . . . . . . . . . . 4 1.1.2 Product safety . . . . . . . . . . . . . . . . . . . . . 4 1.2 Intended purpose . . . . . . . . . . . . . . . . . . . . 5 1.3 Child safety . . . . . . . . . . . . . . . . . . . . . . . . 5 1.4 Compliance with the AEEE Directive and Disposal of Waste Products . . . . . . . . . . . . 5 1.
1 Important safety and environmental instructions This section contains safety instructions that will help you prevent injuries or material damages. Any warranty shall be void if you do not observe these instructions. 1.1.2 Product safety 1.1 General Safety •• Do not make connections to the flues connected with stoves, exhaust shafts or flues with rising flames. Observe the rules set by authorities on the discharge of exhaust air.
1 Important safety and environmental instructions •• We advise you to operate the unit a few minutes 1.3 Child safety before starting to cook in order to increase the suction power. Thus, you shall have a continuous •• Package materials are risky for children. Keep the package materials out of reach of the chiland stable suction power when the vapors occur. dren. •• Operate your appliance for 15 minutes more •• Electrical appliances are risky for children.
2 Your Hood 2.1 Appearance 6 5 4 1 3 2 9 7 8 2.1.1. Controls and components 2.2 Technical Specifications 1- Lamp 2- Aluminum filter lock 3- Aluminum filter 4- Hood body 5- Control panel 6- Flue connection element 7- 2 pcs of wall fittings 8- 1 pc of 120 mm flue connection adaptor 9- 1 air deflector (optional) Width Depth Height Supply voltage Control Suction power Motor power Lamp power Fuse Air outlet pipe diameter 600 mm 500 mm Min. 675 mm - Max.
3 Set-up 3.1 Preparation Information required for the preparation of the installation place for your hood is given below. (Dimensions are given in mm) A WARNING: Remove the protective film (if any) on the hood and flue surface after the installation. •• Perform the transport operations with the original package of the unit observing the markings on the package. Protect your unit against factors that may harm the package and the unit (humidity, water, impact etc.).
3 Set-up •• Observe the dimensions given in Figure 1 and drill 4 Ø 8 mm holes for X and Y and 4 Ø 6 mm holes for Z and H. •• Use the screws and dowels in the equipment of the appliance for installation of various parts.) Place the screws to the Z holes so that a clearance of 8 mm is left. (Figure 3) After hanging the hood to the Y holes, secure it to the wall using X holes inside the body. Tighten Y screws. (Figure 4) •• Secure the bracket (Figure 2-3) to the Z and H holes on the wall.
3 Set-up 3.4 Flue Set-up 1. Install 2 clamping screw seats to the left and right holes of the wall hanger. 2. Place the flue connection element freely on the body. 3. Pull the inner flue connection element upwards from the flue connection element placed over the body (Figure 4), and screw the brackets to Z and axes from left and right sides. (Figure 5) 3.4.1 Usage without flue connection Air is filtered by the carbon filter and returned to the room.
3 Set-up 3.4.2 Usage with flue connection Vapors are discharged with the flue pipe secured on the connection ring on the hood. Diameter of the flue pipe should be equal to the diameter of connection ring. Pipe should be installed slightly inclined (about 10°) in horizontal layouts to allow the air to go out of the room easily. A 4. Install air deflector. 5. Install the active carbon filter as follows. Follow the procedure in reverse order to remove.
4 Operation of the Appliance 4.1 Control panel 4.2 Operating the Hood •• Hood is equipped with a motor with various speed settings. For a better performance, we advise you to use low speeds in normal conditions, and high speeds when smell and vapors are intensified. A- Turning the lamp on/off B- Speed 1 C- Speed 2 D- Speed 3 E- Warning light 1. Press any of the speed setting buttons (B, C, D) to operate the hood in the required speed. 2. You can illuminate the cooking area by pressing button A. 3.
5 Cleaning and Care Prior to maintenance, unplug the appliance or turn the main switch off or loosen the fuse that supplies the hood or turn it off. Clean your stainless steel hood with cleaning agents specifically produced for this material. A A WARNING: Never use rubbing mate- rials (wire wool) or abrasive materials (brushes, the harder side of the scouring sponge etc.).
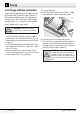
5 Cleaning and Care A WARNING: You may cause a fire if you do not follow the instructions on the cleaning and replacement of the filters of your hood. 5.3 Replacement of the lamp 2 pieces of 20 W halogen lamps are used in your hood. Prior to replacement of lamp, unplug the appliance or turn the main switch off or loosen the fuse that supplies the hood or turn it off. To remove the holder of the halogen lamp, take the lamp holder out by rotating it counterclockwise.
Beko Manufacturers Guarantee Congratulations on purchasing a quality Beko product. Beko automatically provide you with a 2 year Manufacturers Guarantee, covering parts and labour for servicing within the geographical limits of Australia and New Zealand. General Terms and Conditions For Australian Consumers goods come with guarantees that cannot be excluded under the Australian Consumer Law.
Terms and Conditions Beko Australia and New Zealand Pty Ltd guarantees to the original purchaser to repair, or at its option replace, without charge to the owner for any part which is not of ‘acceptable quality’ within two years of date of purchase. “No Lemon Guarantee” * if the product fails more than 2 times during the Guarantee period due to the same type failure caused by the same part, we will automatically replace the product with an equivalent product free of charge.
2. This Guarantee does not cover damage caused by: a. Misuse or abuse of the Beko Product b. Accidental damage of any kind c. Rust and Corrosion where the product is located within a corrosive environment d. Discolouration of burners or trivets on gas cooktops or chrome surrounds e. Incorrect operation or not following the operation instructions as stated in the user manual. f. Improper installation g. Failure to clean or improper cleaning h.
This Guarantee has been designed for Products used in normal domestic environment. Our products are not designed for commercial use. Any commercial use may affect this Product’s Guarantee. Service under this Manufacturer’s Guarantee is provided by the Beko Australia and New Zealand Authorised Repairer. The Guarantee is provided by Beko Australia and New Zealand Pty Ltd (ABN: 49 152 055 162) of 55 Blanck Street, Ormeau, QLD Australia 4208, P O Box 354 Ormeau QLD Australia 4208.