Droogautomaat Dryer Sèche-linge Trockner DCU 720030
Lees deze handleiding grondig door voor u het product in gebruik neemt! Geachte Klant We hopen dat uw product, dat in een moderne fabriek werd geproduceerd en dat de strengste kwaliteitscontroles heeft ondergaan, u zeer goede resultaten geeft. We adviseren u deze handleiding grondig door te lezen voor u het product voor het eerst gebruikt en deze bij te houden voor later gebruik. Deze gebruikershandleiding zal u helpen uw machine snel en veilig te gebruiken.
1 Belangrijke veiligheidsinformatie Deze sectie bevat veiligheidsinformatie die zal helpen om de risico’s op persoonlijke verwondingen of materiële beschadigingen te beperken. Indien u deze instructies niet opvolgt, vervalt elke garantie en vervalt de productaansprakelijkheid van de fabrikant. Algemene veiligheidsvoorzorgen • • • • • • • • • • • • • • Plaats de machine nooit op een vloer die met tapijt is bedekt.
worden gereinigd. • De verkeerde aansluiting van de aardingsgeleider kan elektrische schokken veroorzaken. Als u twijfels hebt over de aardaansluiting, laat deze dan nakijken door een gekwalificeerde elektricien, servicemedewerker of servicepersoneel. • Niet in de machine reiken wanneer de trommel draait. • Verwijder de stekker uit het stopcontact wanneer de machine niet in gebruik is.
2 Installatie Neem contact op met uw dichtstbijzijnde erkend servicepunt voor installatie van uw product. C Voorbereiding van de locatie en elektrische installatie voor het product is de verantwoordelijkheid van de klant. B Installatie en elektrische aansluitingen moeten worden uitgevoerd door gekwalificeerd personeel. A Controleer voor de installatie visueel of het product defecten heeft. Laat het in dat geval niet installeren. Beschadigde producten kunnen uw veiligheid in gevaar brengen.
Aansluiting op waterafvoer; Draai de voeten om ze aan te passen tot de machine waterpas en stevig staat. In producten die zijn uitgerust met een condensator, wordt het water dat tijdens de droogcyclus geaccumuleerd wordt, verzameld in een waterreservoir. U moet het geaccumuleerde water na elke droogbeurt verwijderen. C Draai de verstelbare poten nooit uit hun behuizing.
Verpakkingsmateriaal wegwerpen Verpakkingsmateriaal is gevaarlijk voor kinderen. Bewaar alle verpakkingsmateriaal op een veilige plaats buiten het bereik van kinderen. Het verpakkingsmateriaal van uw product is vervaardigd uit recycleerbaar materiaal. Sorteer ze en werp ze weg in overeenstemming met de instructies voor gerecycleerd afval. Gooi het verpakkingsmateriaal niet weg met normaal huishoudafval. Vervoer van de machine 1. Trek de stekker van de machine uit het stopcontact. 2.
3 Initiële voorbereidingen voor het drogen Dingen die u kunt doen om energie te besparen: • • • • • • • • • • • • Zorg ervoor dat u het product volledig gevuld gebruikt, maar let op dat u het niet te zwaar belaadt. Centrifugeer uw wasgoed op de hoogst mogelijke snelheid bij het wassen. Zo wordt de centrifugetijd verkort en neemt het energieverbruik af. Let op dat u dezelfde soorten wasgoed samen droogt. Volg de instructies in de gebruikershandleiding voor programmaselectie.
• • • • droger. Items die zijn vervuild door kookolie, aceton, alcohol, stookolie, ontvlekker, terpentijn, paraffine en paraffineverwijderaar moeten in heet water worden gewassen met een extra hoeveelheid wasmiddel voordat ze in de droogautomaat worden gedroogd. Kleding of kussens gevuld met schuimrubber (latexschuim), douchekapjes, waterproof textiel, materiaal met rubberen versterking en rubberen schuimkussentjes mogen niet in de droogautomaat worden gedroogd.
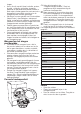
4 Een programma selecteren en uw machine bedienen Bedieningspaneel 1 8 7 2 4 3 6 5 1. Waarschuwingslampje filter reinigen Waarschuwingslampje gaat branden wanneer de filter vol is. 2. Programmaverloopindicator Wordt gebruikt om het verloop van het huidige programma op te volgen. 3. Audiowaarschuwing annuleren Wordt gebruikt om de audiowaarschuwing die aan het einde van het programma wordt gegeven te annuleren. 4 . Aan/Uit-knop Wordt gebruikt om de machine in en uit te schakelen. 10 5.
De machine inschakelen U kunt de machine klaarmaken om het programma te selecteren door op de knop “Aan/Uit” te drukken. C Drukken op de knop “Aan/Uit” betekent niet noodzakelijkerwijze dat het programma gestart is. Druk op de knop “Start/Pauze/ Annuleren” om het programma te starten. Programmaselectie Zoek het geschikte programma in de onderstaande tabel die de droogtemperatuur in graden aangeeft. Selecteer het gewenste programma met de programmaselectieknop.
•Verluchten Er wordt enkel gedurende 10 minuten geventileerd zonder warme lucht te blazen. U kunt uw kleding die gedurende lange tijd in een gesloten omgeving werd geplaatst, verluchten dankzij dit programma om onaangename geuren te deodoriseren. • Timerprogramma’s U kunt timerprogramma’s van 10, 20, 40 of 60 minuten kiezen om het gewenste droogniveau te verkrijgen bij lage temperaturen. Het programma droogt op de geselecteerde tijd ongeacht de droogtemperatuur.
Programmaselectie en verbruikstabel FL Programma’s Capaciteit (kg) Hoeveelheid Centrifugeersnelheid in resterende wasmachine (tpm) vochtigheid bij benadering Droogtijd (minuten) Katoen/Gekleurde was A Kastdroog 7 1000 % 60 116 A Confectie plus 7 1000 % 60 120 A Strijkdroog 7 1000 % 60 90 Xpress 35 Hemden Jeans Delicaat 2 1200 %50 35 1.5 1200 %50 40 4 1200 %50 80 1.75 600 %40 40 3.
Hulpfunctie Audiowaarschuwing annuleren Uw machine produceert een audiowaarschuwing wanneer het programma ten einde is. Indien u dit zoemend geluid niet wilt horen, moet u de knop “Audiowaarschuwing annuleren” indrukken. Het relevante LEDlampje zal branden wanneer deze knop ingedrukt is en u krijgt geen audiowaarschuwing te horen wanneer het programma beëindigd is. Waarschuwingslampjes C Waarschuwingslampjes kunnen verschillen afhankelijk van uw machinemodel.
draaien. 3. Druk op de knop “Start/Pauze/Annuleren” om het programma te starten. C Druk gedurende 3 seconden op de “Start/Pauze/Annuleer” -knop om het programma te annuleren of draai de programmaselectieknop in elke richting om het programma te beëindigen wanneer de machine bezig is. De lampjes voor het waterreservoir en de filterreiniging gaan branden om de gebruiker te waarschuwen wanneer het programma is geannuleerd door de “Start/Pauze/ Annuleer” -knop gedurende 3 seconden in te drukken.
Beëindigen door het programma te annuleren Om een geselecteerd programma te annuleren: Druk gedurende 3 seconden op de Starten/Pauze/Annuleren-knop. De waarschuwingslampjes “Filterreiniging”, “Waterreservoir” en “Einde/Antikreuk” beginnen ter herinnering te branden aan het einde van deze periode. A Omdat de binnenkant van de machine zeer heet zal zijn wanneer u een programma annuleert tijdens de werking van de droogautomaat, moet u het ventilatieprogramma activeren om de droogautomaat af te koelen.
5 Onderhoud en reiniging Filter-cartridge / Binnenoppervlak deur De pluizen en vezels die in de lucht vrijkomen van het wasgoed tijdens de droogbeurt, worden verzameld in de “filter-cartridge”. Er bevinden zich vochtigheidssensors in uw droogautomaat die detecteren wanneer het wasgoed droog is of niet. Om de sensor te reinigen: 1. Open de vuldeur van de droogautomaat. 2. Laat de droogautomaat afkoelen na elke droogbeurt. 3.
2. Maak het waterreservoir leeg. 3. Trek de condensor eruit. 3. Indien er pluizen zitten in de trechter van het waterreservoir, spoel dit dan weg onder stromens water. 4. Plaats het waterreservoir terug in zijn behuizing. 4. Reinig de condensor door gebruik van een douchekop met water onder druk en wacht tot het water is weggelopen. Voor de condensor; De hete en vochtige lucht in de condensor wordt afgekoeld door de koude kamerlucht.
6 Voorgestelde probleemoplossing Het droogproces duurt te lang • De netstructuur van de filter kan verstopt raken. Met water wassen. Het wasgoed is nat aan het einde van de droogbeurt. • • De netstructuur van de filter kan verstopt raken. Met water wassen. Mogelijk werd er teveel was in de machine geladen. De droogautomaat niet overladen. De droogautomaat gaat niet aan of het programma start niet. De droogautomaat is niet geactiveerd wanneer ingesteld.
Read this manual prior to initial operation of the product! Dear Customer, We hope that your product, which has been manufactured in modern facilities and passed through a strict quality control procedure, will give you very good results. We advise you to read through this manual carefully before using your product and keep it for future reference. This User Manual will • Help you use your machine in a fast and safe way. • Read the User Manual before installing and starting your product.
1 Important safety information This section includes safety information that will help protection from risks of personal injuries or materialistic damages. Failure to follow these instructions shall cause any warranty and reliability commitment to become void. General safety • • • • • • • • • • • • • • • • Never place the machine on a carpetcovered floor, otherwise, lack of airflow beneath the machine may cause electrical parts to overheat. This will cause problems with your machine.
• • • • • • • • • • • • Unplug the machine when it is not in use. Never wash down the appliance with water! There is the risk of electric shock! Always disconnect by unplugging from the mains before cleaning. Never touch the plug with wet hands. Never unplug by pulling on the cable, always pull out by grabbing the plug only.
2 Installation Refer to the nearest Authorised Service Agent for installation of your product. C Preparation of location and electrical installation for the product is under customer’s responsibility. BInstallation and electrical connections must be carried out by a qualified personnel. A Prior to installation, visually check if the product has any defects on it. If so, do not have it installed. Damaged products will cause risks for your safety.
that will arise when the machine is used on a circuit without grounding. • Connection must comply with national regulations. • If the current value of the fuse or breaker in the house is less than 16 Amps, have a qualified electrician install a 16 Amp fuse. • Power cable plug must be within easy reach after installation. • The voltage and allowed fuse or breaker protection are specified in the “Technical Specifications” section. • The specified voltage must be equal to your mains voltage.
Technical specification EN 2 Height (adjustable) 84.6 cm Width 59.5 cm Depth 53 cm Capacity (max.) 7 kg Weight (net) 36 kg Voltage Rated power input See type label Model code Type label is located behind the loading door.
3 Initial preparations for drying hings to be done for energy saving: • Make sure that you operate the product at its full capacity but pay attention to not exceeding it. • Spin your laundry at the highest speed possible when washing them. Thus, the drying time is shortened and energy consumption is decreased. • Pay attention to dry same types of laundry together. • Follow the instructions in the user manual for programme selection.
• Items soiled with cooking oils, acetone, alcohol, fuel oil, kerosene, stain remover, turpentine, paraffin and paraffin removers must be washed in hot water with plenty of detergent before being dried in the dryer. • Garments or pillows bolstered with rubber foam (latex foam), shower bonnets, water resistant textiles, materials with rubber reinforcement and rubber foam pads should not be dried in the dryer.
4 Selecting a Programme and Operating Your Machine Control panel 1 8 7 2 4 3 6 5 1. Filter cleaning warning light Warning light turns on when the filter is full. 2. Program follow-up indicator Used to follow-up the progress of the current programme. 3. Cancel audio warning Used to cancel the audio warning given at the end of the programme. 4. On/Off button Used to turn on and off the machine. 5. Programme selection knob Used to select a programme. 6.
Preparing the machine 1. Plug in your machine. 2. Place the laundry in the machine. 3. Press the “On/Off” button. C Pressing the “On/Off” button does not necessarily mean that the programme has started. Press “Start/Pause/Cancel” button of the machine to start the programme. Programme selection Decide the appropriate programme from the table below which includes drying temperatures in degrees. Select the desired programme with the programme selection button.
Program selection and consumption table EN Spin speed Capacity (kg) in washing machine (rpm) Programs Approximate amount of remaining humidity Drying time (minutes) Cottons / Coloreds A Ready to Wear 7 1000 % 60 116 A Ready to Wear + 7 1000 % 60 120 A Ready to Iron 7 1000 % 60 90 2 1200 % 50 35 1.5 1200 % 50 40 4 1200 % 50 80 1.75 600 % 40 40 3.
operating. Time delay If you wish to dry your clothes at a later time, thanks to the time delay function, you can delay the program start up to 3 hours, 6 hours or 9 hours. 1. Open the loading door and put the laundry in. C Make sure that all air outlets are open, door filter is cleaned and the water tank is empty. 2. Set the drying program and, if required, the auxiliary functions. 3. When the time programming button is pressed once, a 3 hour delay is selected and the relevant led lights.
and the result will be wet laundry after the drying process is over. C Laundry may be added or taken out as much as desired during a drying process, but this process will extend the programme duration and increase energy consumption since the drying will be interrupted continuously. Therefore, it is recommended to add laundry before the drying programme has started.
5 Maintenance and cleaning Filter Cartridge / Door Inner Surface Lint and fibres released from the laundry to the air during the drying cycle are collected in the “Filter Cartridge”. There are humidity sensors in your dryer that detect whether the laundry is dry or not. To clean the sensor: 1. Open the loading door of the dryer. 2. Allow the machine to cool down if drying has been carried out. 3. Wipe the metal sensors with a soft cloth, dampened with vinegar and dry them.
4-Place the water tank into its seat. For the condenser; Hot and humid air in the condenser is cooled with the cold air from the room. Thus, the humid air circulating in your dryer is condensed and then pumped into the tank. C Clean the condenser after every 30 drying cycles or once a month. To clean the condenser: 1. If a drying process has been carried out, open the door of the machine and wait until it cools down. 4.
6 Suggested solutions for problems Drying process takes too much time • Meshes of the filter may be clogged. Wash with water Laundry comes out wet at the end of drying. • Meshes of the filter may be clogged. Wash with water. • Excessive laundry might have been loaded in. Do not load the dryer in excess. Dryer does not switch on or the programme does not start. Dryer is not activated when set. • It might have not been plugged in. Make sure that the machine is plugged in. • The loading door may be ajar.
Veuillez lire ce manuel avant la première utilisation de votre appareil ! Chère cliente, cher client, Nous espérons que ce produit, fabriqué dans des usines modernes et soumis à des procédures strictes d’assurance qualité, vous donneront des résultats optimaux. Nous vous conseillons de lire ce manuel attentivement avant d’utiliser votre appareil et de le conserver à titre de référence. Ce manuel d’utilisation va • vous aider à utiliser votre machine de manière rapide et sécurisante.
1 Consignes importantes de sécurité Cette section comprend des informations relatives à la sécurité qui vous aideront à vous protéger contre les risques de blessures corporelles ou de dégâts matériels. Le non respect de ces instructions entraînera l’annulation de la garantie et de toute responsabilité. • Sécurité générale • • • • • • • • • • • • • • • N’installez jamais votre appareil sur un sol recouvert de moquette.
• • • • • • • • • • • • • • • Ne jouez pas avec les commandes. Ne réalisez aucune opération de réparation ou de remplacement sur le produit, même si vous savez ou possédez les capacités pour les effectuer, sauf si cela est expressément mentionné dans les instructions d’utilisation ou dans le manuel de service fourni. Le conduit d’échappement et l’intérieur du produit doivent être nettoyés par du personnel qualifié régulièrement.
2 Installation Consultez votre agent de service agréé le plus proche pour l’installation de votre produit. C La préparation du site et de l'installation électrique du produit relève de la responsabilité du client. B L'installation et les branchements électriques doivent être réalisés par du personnel qualifié. A Avant l'installation, vérifiez visuellement si le produit présente des défauts. Si c'est le cas, ne procédez pas à l'installation.
Branchement électrique Branchez le produit à une prise équipée d’une mise à la terre protégée par un fusible de capacité adaptée, tel qu’indiqué dans le tableau des caractéristiques techniques. Notre société ne pourra pas être tenue responsable pour tous les dommages qui pourraient survenir si la machine est utilisée sur un circuit électrique sans mise à la terre. • Le branchement doit être conforme à la réglementation en vigueur dans votre pays.
Mise au rebut de l’ancienne machine Débarrassez-vous de votre vieil appareil d’une manière qui soit respectueuse de l’environnement. Vous pouvez consulter votre agent local ou le centre de collecte des déchets solides de votre municipalité pour en savoir plus sur la procédure à suivre concernant la mise au rebut de votre machine. Avant de jeter votre ancienne machine, coupez la prise secteur et rendez le verrou de la porte inutilisable pour éviter des situations de risque pour les enfants.
3 Préparations du linge Mesures à adopter pour économiser de l’énergie: • • • • • • • • • • • • Assurez-vous de faire fonctionner l’appareil à pleine charge sans surcharger la machine. Toutefois, veillez à ne pas surcharger la machine. Essorez le linge à la vitesse maximale au cours du lavage. Cela permet de réduire le temps de séchage et la consommation énergétique. Veillez à sécher les mêmes types de linge ensemble.
Préparation du linge au séchage • • • • • Vérifiez tous les articles avant de les charger dans l’appareil pour vous assurer qu’il ne reste pas de briquets, pièces de monnaie, objets métalliques, aiguilles, etc. dans les poches ou accrochés à ces articles. Les adoucissants ou produits similaires doivent être utilisés selon les instructions fournies par le fabricant de ces produits. Le linge doit être essoré à la machine, à la plus grande vitesse possible admise par le type de textile.
4 Sélection d’un programme et utilisation de votre appareil Bandeau de commande 1 8 7 2 4 3 6 1. Témoin d’avertissement de nettoyage du filtre Le témoin d’avertissement s’allume lorsque le filtre est plein. 2. Indicateur de suivi du programme Utilisé pour suivre la progression du programme en cours. 3. Annulation de l’alerte sonore Utilisé pour annuler l’avertissement sonore retentissant à la fin du programme. 4. Bouton Marche/Arrêt Utilisé pour la mise en marche et l’arrêt de la machine 5 5.
Mise en marche de la machine 1. Branchez la machine. 2. Introduisez le linge dans la machine. 3. Appuyez sur le bouton « Marche/Arrêt ». C Le fait d’appuyez sur le bouton « Marche/ Arrêt » ne signifie pas que le programme est lancé. Appuyez sur le bouton « Départ/ Pause/Annulation » pour lancer le programme. Sélection des programmes Sélectionnez le programme approprié à partir du tableau ci-dessous dans lequel sont indiquées les températures de séchage en degrés.
Sélection de programmes et tableau de consommation FR 4 Programmes Quantité Durée de séchage approximative (minutes) d’humidité résiduelle Capacité (kg) Vitesse d’essorage du lave-linge (tr/min) 7 1000 % 60 116 Coton / Couleur A Prêt-à-porter A Prêt-à-porter plus 7 1000 % 60 120 A Prêt-à-repasser 7 1000 % 60 90 Xpress 35 2 1200 % 50 35 Chemises 1.5 1200 % 50 40 Jeans 4 1200 % 50 80 Délicat 1.75 600 % 40 40 3.
Réservoir plein Le témoin d’avertissement commence à clignoter lorsque le réservoir est rempli d’eau. La machine cessera de fonctionner si le témoin d’avertissement s’allume et qu’un programme est en cours. Videz l’eau du réservoir pour redémarrer la machine. Appuyez sur le bouton « Départ/Pause/Annulation » pour relancer le programme après avoir vidé le réservoir. Le témoin d’avertissement s’éteint et le programme se relance.
Ajout/retrait du linge en mode de veille Pour ajouter ou retirer du linge après le démarrage du programme : 1. Appuyez sur le bouton « Départ/Pause/ Annulation » pour mettre la machine en mode « Pause ». Le processus de séchage sera interrompu. 2. Ouvrez la porte en position Pause et refermez-la après avoir ajouté ou retiré du linge. 3. Appuyez sur le bouton « Départ/Pause/ Annulation » pour lancer le programme.
5 Entretien et nettoyage Cartouche filtrante / Surface intérieure de la porte Les peluches et fibres qui se dégagent du linge dans l’air au cours du cycle de séchage sont récupérées par la « cartouche filtrante Votre machine est équipée de capteurs d’humidité qui détectent si le linge est sec ou non. Pour nettoyer le capteur : 1. Ouvrez la porte de chargement du sèchelinge. 2. Laissez la machine se refroidir si un séchage vient d’être réalisé. 3.
2-Videz l’eau du réservoir 3. Retirez le condenseur. 3- Si des peluches sont présentes sur l’entonnoir du réservoir d’eau, nettoyez-les sous l’eau courante. 4-Réinstallez le réservoir plein sa place 4. Nettoyez le condenseur en appliquant de l’eau sous pression à l’aide d’une armature de douche et attendez que l’eau s’écoule. Condenseur L’air chaud et humide à l’intérieur du condenseur est refroidi par l’air froid provenant de la pièce.
6 Suggestions de solutions aux problèmes Le processus de séchage est excessivement long. • Les mailles du filtre peuvent être obstruées. Lavez-les à l’eau. Le linge est mouillé à la fin du séchage • Les mailles du filtre peuvent être obstruées. Lavez-les à l’eau. • Un excès de linge pourrait avoir été introduit dans la machine. Ne chargez la machine à l›excès. Le sèche-linge ou le programme ne se met pas en marche. Le sèche-linge n›est pas activé alors qu›il est lancé.
Le témoin « Nettoyage du condenseur » est allumé. • Il se peut que le condenseur n›ait pas été nettoyé. Nettoyez les filtres dans le condenseur situés sous la plaque de protection. A Contactez le service de maintenance agréé si le problème persiste.
Bitte lesen Sie diese Anleitung gut durch, bevor Sie Ihr neues Gerät benutzen! Sehr geehrter Kunde, Wir wünschen uns, dass unser Produkt, das in modernen Betrieben hergestellt wurde und strikte Qualitätskontrollen durchlaufen hat, bei Ihnen optimal und zu Ihrer vollsten Zufriedenheit arbeitet. Daher möchten wir Ihnen ans Herz legen, diese Anleitung aufmerksam durchzulesen, bevor Sie das Produkt benutzen. Bewahren Sie die Anleitung bitte auf, damit Sie in Zukunft darin nachschlagen können.
1 Wichtige Sicherheitshinweise In diesem Abschnitt finden Sie wichtige Sicherheitshinweise, die Sie vor Verletzungen und Sachschäden bewahren. Bei Nichtbeachtung dieser Hinweise erlöschen sämtliche Garantie- und Haftungsansprüche. • • • Allgemeine Sicherheitshinweise • • • • • • • • • • • • Stellen Sie die Maschine niemals auf Teppichboden und ähnlichen Unterlagen auf; andernfalls kann die Maschine nicht richtig belüftet werden und sich dadurch überhitzen.
• • • • • • • • • • • • • • • nur dann aus, wenn diese ausdrücklich in der Bedienungs- oder Wartungsanleitung empfohlen werden. Die Luftein- und Luftauslässe des Gerätes müssen in regelmäßigen Abständen von qualifizierten Fachkräften gereinigt werden. Eine falsch angeschlossene Erdungsleitung des Gerätes kann zu einem Stromschlag führen.
2 Installation Lassen Sie Ihr Gerät vom autorisierten Kundendienst in Ihrer Nähe installieren. C Die Vorbereitung des Aufstellungsortes und der elektrischen Gegebenheiten obliegt dem Kunden. B Installation und elektrischer Anschluss müssen von qualifizierten Fachleuten ausgeführt werden. A Schauen Sie sich das Gerät vor der Installation genau an, achten Sie auf Defekte. Falls Defekte vorliegen, lassen Sie das Gerät nicht installieren. Beschädigte Geräte stellen immer ein Sicherheitsrisiko dar.
Anschluss an den Wasserablauf; Bei Produkten, die mit einem Kondensator ausgestattet sind, sammelt sich das beim Trocknen anfallende Wasser in einem Wassertank. Das gesammelte Wasser sollte nach jedem Trocknen abgelassen werden. Sie können das gesammelte Wasser auch direkt über den mitgelieferten Ablaufschlauch ablaufen lassen, statt den Wassertank regelmäßig zu leeren. So schließen Sie den Wasserablaufschlauch an: die Maschine aus, indem Sie die Füße entsprechend einstellen.
• Achten Sie darauf, dass der Stromanschluss des Produktes wie in den entsprechenden Abschnitten dieser Bedienungsanleitung erläutert ausgeführt wird. Verpackungsmaterial entsorgen Verpackungsmaterialien können für Kinder gefährlich werden. Lagern Sie Verpackungsmaterialien daher an einem sicheren Ort und außerhalb der Reichweite von Kindern. Das Verpackungsmaterial Ihres Gerätes wurde aus recyclingfähigen Materialien hergestellt. Achten Sie auf eine ordnungsgemäße Entsorgung der Materialien.
3 Vorbereitungen vor dem Trocknen Hinweise zum Energiesparen: • • • • • • • • • • • • Versuchen Sie das Gerät möglichst voll beladen zu nutzen, überladen Sie es jedoch nicht. Schleudern Sie sämtliche Textilien beim Waschen mit der höchstmöglichen Drehzahl. Dadurch verkürzt sich die Trocknungszeit, der Energieverbrauch sinkt. Achten Sie darauf, ähnliche Textilien gemeinsam zu trocknen. Halten Sie sich bei der Programmauswahl an die Bedienungsanleitung.
• • • • • Trocknen Sie keine ungewaschenen Textilien mit Ihrem Gerät. Textilien, die mit Speiseöl, Azeton, Alkohol, Benzin, Kerosin, Fleckentferner, Terpentin, Paraffin oder Paraffinentferner verunreinigt wurden, müssen zunächst mit reichlich Reinigungsmittel in heißem Wasser gewaschen werden, bevor sie im Trockner getrocknet werden dürfen.
4 Programm auswählen und mit der Maschine arbeiten Bedienfeld 1 8 7 2 4 3 6 5 1. Filter reinigen-Leuchte Leuchtet auf, wenn der Filter voll ist. 2. Programmfolgeanzeige Zeigt den Fortschritt des derzeit ausgeführten Programms. 3. Tonsignale abschalten Zum Abschalten des Tonsignals am Ende des Programms. 4. Ein-/Ausschalter Zum Ein- und Ausschalten des Gerätes. 5. Programmauswahlknopf Zum Auswählen des gewünschten Programms. 6.
Gerät vorbereiten 1. Stecken Sie den Netzstecker der Maschine ein. 2. Geben Sie die Wäsche in die Maschine. 3. Drücken Sie die Ein-/Austaste. C Durch die bloße Betätigung des Ein-/ Ausschalters wird das Programm noch nicht gestartet. Starten Sie das Programm mit der Start/Pause/Abbrechen-Taste. Programmauswahl Wählen Sie ein geeignetes Programm aus der nachstehenden Tabelle; dort finden Sie auch die Trocknungstemperatur in °C. Wählen Sie das gewünschte Programm mit dem Programmauswahlknopf.
•Auffrischen Hierbei wird die Wäsche lediglich 10 Minuten lang durchlüftet; dabei wird keine Heißluft eingesetzt. Dieses Programm können Sie zum Beispiel einsetzen, um Wäsche von unangenehmen Gerüchen zu befreien, wenn diese lange im Schrank gehangen hat. Timerprogramme Sie können eines der 10, 20, 40 oder 60 Minuten dauernden Timerprogramme wählen, um den gewünschten Trocknungsgrad bei niedrigen Temperaturen zu erreichen.
Programmauswahl- und Verbrauchstabelle DE Programme 3 Kapazität (kg) Schleudergeschwindigkeit Waschmaschine (U/min) Ungefähre Restfeuchte Trocknungszeit (Minuten) Baumwolle/Buntwäsche A Schranktrocken 7 1000 % 60 116 A Schranktrocken plus 7 1000 % 60 120 A Bügeltrocken 7 1000 % 60 90 2 1200 % 50 35 1.5 1200 % 50 40 4 1200 % 50 80 1.75 600 % 40 40 3.
Zusatzfunktionen Tonsignale abschalten Beim Abschluss eines Programms informiert Sie das Gerät durch ein Tonsignal. Wenn Sie auf akustische Signale verzichten möchten, drücken Sie die „Tonsignale abschalten“-Taste. Wenn Sie diese Taste drücken, leuchtet die entsprechende LED auf, beim Abschluss des Programms werden keine akustischen Signale mehr ausgegeben. C Diese Funktion können Sie vor und nach dem Programmstart auswählen.
aber in das „Extratrocken“-Programm ändern. Dazu halten Sie die Start/Pause/ Abbrechen-Taste 3 Sekunden lang gedrückt, um das laufende Programm abzubrechen. 2. Wählen Sie nun das „Extratrocken“Programm mit der Programmauswahltaste. 3. Starten Sie die Maschine mit der “Start/ Pause/Abbrechen”-Taste.
Programmabschluss durch Programmabbruch So brechen Sie ein Programm ab: Halten Sie die Start/Pause/Abbrechen-Taste etwa 3 Sekunden lang gedrückt. Die Leuchten „Filter reinigen“, „Wassertank“ und „Ende/ Knitterschutz“ leuchten zur Erinnerung auf. ADa das Innere des Trockners nach dem Abbrechen eines Programms noch sehr heiß ist, lassen Sie das DurchlüftenProgramm zum Abkühlen durchlaufen.
6 Wartung und Reinigung Filterkassette/Türinnenseite Beim Trocknen lösen sich Fusseln und einzelne Fasern von der Wäsche. Diese Rückstände sammeln sich in der Filterkassette. C Fusseln und ähnliche Rückstände entstehen übrigens beim Tragen und beim Waschen der Wäsche. C Reinigen Sie den Filter und die Abdeckung nach jedem Trocknen. C Den Filter und den Bereich darum herum können Sie z. B. mit einem Staubsauger reinigen. So reinigen Sie den Filter: 1. Öffnen Sie die Gerätetür. 2.
2. Leeren Sie den Wassertank aus. 4. Reinigen Sie den Kondensator unter einem kräftigen Wasserstrahl (z. B. mit dem Duschkopf), lassen Sie das Wasser komplett ablaufen. 3. Falls sich Fusseln im Trichter des Wassertanks angesammelt haben sollten, entfernen Sie diese unter fließendem Wasser. 4. Setzen Sie den Wassertank wieder an seinen Platz. Kondensator: Die heiße und feuchte Luft im Kondensator wird mit kühler Raumluft abgekühlt.
6 Lösungsvorschläge bei Problemen Das Trocknen dauert zu lange • Die Filterporen können sich mit der Zeit zusetzen. Mit Wasser auswaschen. Die Wäsche ist nach Abschluss des Trocknens noch feucht. • • Die Filterporen können sich mit der Zeit zusetzen. Mit Wasser auswaschen. Zuviel Wäsche geladen. Überladen Sie den Trockner nicht. Die Maschine lässt sich nicht einschalten oder das Programm startet nicht. Die Maschine ist nicht eingeschaltet. • • • • Der Netzstecker ist eventuell nicht eingesteckt.