Vented Time Dryer DRVT 61 W
Read this manual prior to initial operation of the product! Dear Customer, We hope that your product, which has been manufactured in modern facilities and passed through a strict quality control procedure, will give you very good results. We advise you to read through this manual carefully before using your product and keep it for future reference. This User Manual will • Help you use your machine in a fast and safe way. • Read the User Manual before installing and starting your product.
TABLE OF CONTENTS 1 Your Dryer Programme selection and consumption table........................ 15 Auxiliary function........................... 16 Warning indicators........................ 16 Starting the Programme............... 16 Timer follow-up indicator.............. 16 Changing the programme after the programme has started................ 16 Child-proof lock............................ 16 Ending the programme through canceling...................................... 17 End of programme.............
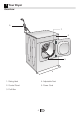
1 Your Dryer Overview 5 1 2 3 4 1- Rating label 4- Adjustable Feet 2- Control Panel 5- Power Cord 3- Fluff filter 4 EN
Technical Specifications EN 2 Height (adjustable) 85.0 cm Width 59.5 cm Depth 54 cm Capacity (max.) 6 kg Weight (net) 31 kg Voltage Rated power input See rating label Model code Type label is located behind the loading door. Specifications of this appliance may change without notice to improve the quality of the product. Figures in this manual are schematic and may not match your product exactly.
2 Important safety information TThis section includes safety information that will help protection from risks of to power supply in order to decrease personal injuries or materialistic damages. the risk of electric shock. Failure to follow these instructions • Do not make any changes on the plug shall cause any warranty and reliability supplied with the product. If it is not commitment to become void.
• • • • • • • • • • • • • in places where it will be exposed to outdoor conditions. Do not tamper with the controls. Do not perform any repair or part replacing procedures on the product even if you know or have the ability to perform unless it is clearly suggested in the operating instructions or the published service manual. Inside and exhaust duct of the product must be cleaned by the qualified service personnel periodically.
3 Installation Refer to the nearest Authorised Service Agent for installation of your product. C Preparation of location and electrical installation for the product is under customer’s responsibility. B Installation and electrical connections must be carried out by a qualified personnel. A Prior to installation, visually check if the product has any defects on it. If so, do not have it installed. Damaged products will cause risks for your safety.
2. Fit the plastic parts on to the front adjustable feet. Press on the plastic parts to snap them into their seating. 3. Check the balance of your product again and readjust the adjustable feet if necessary. First use B The air ventilation hose should not be connected to the chimney of a stove or a fireplace. B Do not operate your machine at the same time with heaters such as a coal or gas stove. Airflow may cause the chimney to flare up. Airflow may cause the chimney to flame up.
4 Electrical Connection Make sure that you have an earthed power outlet socket rated at 13 amps (minimum). Attention! If you use your dryer as built-in, the socket must be reachable after installation, or a separate switch (which can disconnect the two poles) must be used in the installation. Check for suitability. For a permanent connection, a master switch with at least 3mm contact clearance and minumum 13 A rating must be used.
3 Initial preparations for drying Things to be done for energy saving: • Make sure that you operate the product at its full capacity but pay attention to not exceeding it. • Spin your laundry at the highest speed possible when washing them. Thus, the drying time is shortened and energy consumption is decreased. • Pay attention to dry same types of laundry together. • Follow the instructions in the user manual for programme selection.
emit flammable or explosive vapor. • Do not dry items cleaned with industrial chemicals in the dryer. • Do not dry your unwashed laundry in the dryer. • Items soiled with cooking oils, acetone, alcohol, fuel oil, kerosene, stain remover, turpentine, paraffin and paraffin removers must be washed in hot water with plenty of detergent before being dried in the dryer.
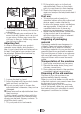
6 Selecting a Programme and Operating Your Machine Control panel 1 2 3 4 6 5 1. Filter cleaning warning light Warning light turns on when the filter is full. 2. Programme follow-up indicator Use to follow-up the progress of the current programme. 3. Low temperature Use to dry in low temperatures. 13 4. On/Off button Use to turn on and off the machine. 5. Programme selection knob Use to select a programme. 6. Start/Pause/Cancel button Use to start, pause or cancel the programme.
Preparing the machine 1. Plug in your machine. 2. Place the laundry in the machine. 3. Press the “On/Off” button. C Pressing the “On/Off” button does not necessarily mean that the programme has started. Press “Start/Pause/ Cancel” button of the machine to start the programme. Main programmes •Anti-creasing A 2-hour anti creasing programme to prevent laundry from creasing will be activated if you do not take the laundry out after the programme has come to an end.
Programme selection and consumption table Programmes table Programmes Capacity )(kg Spin speed in washing )machine (rpm Drying time )(minutes 1200-1000 900-800 1200-1000 900-800 1200-1000 900-800 1200-1000 900-800 110 130 80-60 110-80 110-80 110 60-40 80-60 800 600 800 600 60-40 80-60 40-20 60-40 1.5 800 40 Capacity )(kg Spin speed in washing )machine (rpm 6 6 3 1000 1000 800 Cottons / Coloureds 6 Ready to Wear A 3 6 Ready to Iron A 3 Synthetics 3 Ready to Wear B 1.
Auxiliary function Low temperature This function allows for drying at lower temperatures and therefore saves energy. Warning LED will light up when you select the function. C You must use this function when you dry your synthetic or delicate laundry. Warning indicators C Warning indicators may differ according to the model of your machine. Filter cleaning A warning LED will light up to remind filter cleaning after the programme finishes.
To start a new programme after the programme is over or to interrupt the programme, the childproof lock should be deactivated. To deactivate the childproof lock, press the same buttons for 3 sec. C One of the LEDs on the program follow-up indicator starts flashing when the child-proof lock is activated. C Child-proof lock is deactivated when the machine is restarted by pressing the On/Off button.
7 Quick instructions for daily use Preparation and starting 1. Press the “On/Off” button. 2. Place the laundry in the machine. 3. Select the programme. 4. Close the loading door. 5. Press “Start/Pause/Cancel” button. Cancelling a programme A new programme can be selected and started after “Programme cancel” is activated in order to change the drying programme. In order to cancel the selected programme, press “Start/Pause/Cancel” button for about 3 seconds.
8 Maintenance and cleaning Fluff filter Lint and fibres released from the laundry to the air during the drying cycle are collected in the “Fluff Filter”. C Such fibre and lint are generally formed during wearing and washing. C Always clean the filter after each Drying process. C You can clean the filter and filter area by vacuum cleaner. For Filter cleaning; 1. Open the cover 2. Remove the fluff filter by pulling it up and open the filter. 3.
9 Solution suggestions for problems Problem Cause Explanation / Suggestion Drying process takes too much time. The filter might have not been cleaned. * Meshes of the filter may be clogged. Wash with water. Laundry comes out wet at the end of drying. Machine does not switch on or the programme does not start. Machine is not activated when set. * The filter might have not been cleaned. * Excessive laundry might have been loaded in. * It might have not been plugged in. * The loading door may be ajar.
10 Door Reversal 1. Unplug the dryer. 2. Open the door. 3. Turn the contact pin in the upper part of door by 90° in the anti-clockwise direction and remove it. 4. Unscrew the 2 screws of each door hinge and remove the door. 5. Removing the door lock: Using a flat screwdriver release the snap-fitted door lock. 6. Remove 2 plugs for the hinges and one for the door-lock on the opposite side. 7. Insert the door lock system on the opposite side of the hinge and be sure it is properly fitted. 8.
11 Guarantee Your new product is guaranteed against the cost of breakdown repairs for twelve months from the date of the original purchase. What is covered? • Repairs necessary as a result of faulty materials, defective components or manufacturing defect. • The cost of functional replacement parts, but excluding consumable items. • The labour costs of a approved repairer to carry out the repair. What is not covered? • Transit, delivery or accidental damage or misuse and abuse.
12 Service Please keep your purchase receipt or other proof of purchase in a safe place; you will need to have it should the product require attention under guarantee. You should also complete the details below; it will help us assist you when requesting service.
EN