VAATWASSER
Lees eerst deze gebruikershandleiding! Beste klant, We hopen dat u de beste resultaten zult krijgen met dit product, dat in ultramoderne fabrieken is geproduceerd en een strikte kwaliteitscontroleprocedure heeft doorlopen. Lees daarom eerst zorgvuldig de volledige gebruikershandleiding voordat u het product gebruikt en bewaar het als referentie voor toekomstig gebruik. Indien u het product overdraagt aan iemand anders, geef hen dan ook deze handleiding.
INHOUD 22 5 5 6 Inklapbare draden voor bovenrek De hoogte van het geladen bovenrek aanpassen De hoogte van het geladen bovenrek aanpassen De hoogte van het lege bovenrek aanpassen 7 5. Onderhoud en reiniging 25 1. Vaatwasser 3 2. Belangrijke veiligheidsinstructies 5 Algemene veiligheid 9RRUJHQRPHQ gebruik 9HLOLJKHLG van kinderen 3.
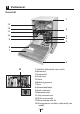
1 Vaatwasser Overzicht 2 24 23 22 3 21 4 5 : 6 9 8 7 25 1.Tafelblad (afhankelijk van model) 2.Bovenrotor 3.Ondermand 4.Onderrotor 5.Filters 6.Bedieningspaneel 7.Deur 8.Afwasmiddellaatje 9.Sleuf onderrotor 10.Bestekmandje 11.Klep zoutreservoir 12.Rail bovenmandje 13.Bovenmandje met rek 14.
Technische specificaties Dit product voldoet aan de volgende EU-richtlijnen: Ontwikkeling, productie en verkoopfasen van dit product voldoen aan de veiligheidsregels opgenomen in alle betreffende wetgevingen van de Europese Gemeenschap.
2 Belangrijke veiligheidsinstructies Dit gedeelte bevat veiligheidsinstructies waarmee u risico’s op persoonlijk letsel of eigendomschade kunt beperken. Indien u deze instructies niet opvolgt, komt de garantie te vervallen. x Algemene veiligheid x Plaats het product nooit op een x x x x x x x vloer met vloerbedekking. Anders raken de elektrische onderdelen oververhit door een gebrek aan luchtstroom onder het product. Dit veroorzaakt problemen met uw product.
x periode, zijn oorspronkelijke reserveonderdelen beschikbaar zodat het apparaat goed kan worden bediend. Dit product mag niet worden gebruikt door personen met fysieke, zintuiglijke of mentale handicaps of door onbedreven of onervaren personen (waaronder kinderen) tenzij ze onder toezicht staan van een persoon die instaat voor hun veiligheid of die hun instructies geeft over het gebruik van het product.
3 Installatie Raadpleeg de dichtstbijzijnde erkende serviceagent voor de installatie van uw product. Om het product klaar voor gebruik te maken, moet u ervoor zorgen dat de elektriciteitsaansluiting, watervoorziening en waterafvoer juist zijn voordat u de erkende serviceagent belt. Als dit niet het geval is, moet u een erkende technicus en loodgieter bellen om de nodige werkzaamheden uit te voeren.
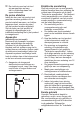
Aansluiting op de afvoer 211 :1 91 81 1 1011 21 31 41 51 njo!5dn 71 njo!61!dn 61 nby!211!dn 221 De waterafvoerslang kan direct op de afvoeropening of de afvoer van de gootsteen worden aangesloten. De lengte van deze aansluiting moet minstens 50 cm en maximaal 100 cm van de vloer zijn. Ù !2 9 Ù !3 2 De vaatwasser mag niet worden aangesloten op open warmwatertoestellen of waterverwarmers. y Gebruik geen oude of gebruikte watertoevoerslang op het nieuwe product.
C De rioolbuis moet op het riool Elektrische aansluiting zijn aangesloten en mag niet in verbinding staan met oppervlaktewater. De poten afstellen Indien de deur van het product niet goed kan worden gesloten of het product wiebelt wanneer u er lichtjes tegenaan duwt, moeten de poten van het product worden afgesteld. Stel de poten van het product af volgens de afbeeldingen in de installatiehandleiding die bij het product is meegeleverd.
y C Laat de machine eerst in het kortste programma werken met vaatwasmiddel terwijl hij leeg is, om het product voor te bereiden RP GH YDDW WH GRHQ 9XO WLMGHQV KHW eerste gebruik het zoutreservoir met 1 liter water voordat u het met zout vult. Er kan enig water in het product zijn achtergebleven door kwaliteitscontroles tijdens de productie. Dit is niet schadelijk voor het product. Verpakkingsmateriaal verwijderen 9HUSDNNLQJVPDWHULDDO LV gevaarlijk voor kinderen.
4 Voorspoelen Tips voor energiebesparing De volgende informatie helpt u het product op een ecologische en energiebesparende manier te gebruiken. x 9HHJ JURYH YRHGVHOUHVWHQ RS de vaat weg voordat u ze in het product plaatst. x Gebruik het product andat het volledig is gevuld. x Raadpleeg de “Programmatabel” wanneer u een programma selecteert. x Plaats niet meer afwasmiddel dan staat aangegeven op de verpakking van het afwasmiddel. Onthardingssysteem C De vaatwasser vereist zacht water.
Zout toevoegen +HW RQWKDUGLQJVV\VWHHP PRHW worden geregenereerd zodat het product voortdurend dezelfde SUHVWDWLHV EOLMIW OHYHUHQ +LHUYRRU ZRUGW vaatwasserzout gebruikt. C Gebruik alleen speciaal onthardingszout dat specifiek is geproduceerd voor gebruik in vaatwassers in uw product. C We raden aan om korrel- of poederzout te gebruiken. Gebruik geen zout met onoplosbare stoffen zoals tafelzout of gewoon zout in de machine. De prestaties van het onthardinssysteem kunnen mettertijd teruglopen.
5. Indien u het wasprogramma niet onmiddellijk start nadat u het water hebt toegevoegd, laat de machine dan leeg in het kortste programma lopen om het zout dat in de machine is verspreid weg te spoelen. C Aangezien verschillende merken zout op de markt verschillende korrelgroottes hebben en de hardheid van het water kan variëren, kan het enkele uren duren totdat het zout in het water is opgelost. De Zoutindicator blijft daarom enige tijd aan nadat zout in de machine is toegevoegd.
3. Sluit de deksel van het doseerbakje door er lichtjes op te duwen. U hoort een "klik" wanneer de deksel sluit. C In programma’s met voorwassen en hoge temperaturen, waarin u een vaatwastablet kunt gebruiken, moet u ervoor zorgen dat het deksel van het doseervakje goed gesloten is. C Gebruik vaatwaspoeder voor korte programma's zonder voorwassen, aangezien de oplosbaarheid van de vaatwastabletten afhankelijk is van de temperatuur en de tijd.
Glansspoelmiddel C Glansspoelmiddel dat in vaatwassers wordt gebruikt is een speciale combinatie gebruikt om de droogefficiëntie te verhogen en om te voorkomen dat waterof kalkvlekken op de vaat verschijnen. Daarom moet erop worden gelet dat glansspoelmiddel in het bijbehorende reservoir is geplaatst en dat glansspoelmiddel wordt gebruikt dat specifiek voor vaatwassers is geproduceerd. Controleer de indicator voor glansspoelmiddel om te controleren of er nog voldoende glansspoemiddel aanwezig is (3).
evenals koperen en vertinde containers in de vaatwasser. C Decoratieve afdrukken van porselein en aluminium en zilveren voorwerpen kunnen verkleuren of aanslaan door ze in de vaatwasser te wassen, net als bij afwassen met de hand. Sommige gevoelige glastypes en soorten kristal kunnen mettertijd dof worden. Wij raden u sterk aan om te controleren of het vaatwerk dat u koopt geschikt is om specifiek in de vaatwasser af te wassen.
Voorbeelden van andere mogelijke plaatsingen van de rekken Onderrek Bovenrek Verkeerde plaatsing 17 NL Verkeerde plaatsing
Bestekmandje Verplaatsbaar bestekmandje (afhankelijk van het model) +HW EHVWHNPDQGMH LV RQWZRUSHQ RP XZ bestek als vork, lepel, enz. schoner af te wassen. (afhankelijk van het model) Aangezien het bestekmandje verplaatst kan worden (A, B), kunt u meer ruimte maken door uw vaatwerk in het onderrek te plaatsen en ruimte te maekn voor uw vaatwerk van verschillende groottes. 1029_redaksiyon C B4-3B Mandje voor lang Onderdeel bestekmandje (afhankelijk van het model) U kunt uw vorken, lepels enz.
maken door iedere draad individueel op te vouwen of allemaal tegelijk. Breng de inklapbare draden omlaag door op de klink te drukken (A). Inklapbare draden voor onderrek (2 onderdelen) (afhankelijk van het model) De inklapbare draden uit twee onderdelen in het onderrek van de machine zijn ontworpen zodat grote voorwerpen zoals pannen, schalen, enz. gemakkelijker kunnen worden geplaatst (1,2).
Multifunctioneel/verstelbaar rek onderrek E D (afhankelijk van het model) Met deze accessoire in het onderrek van de machine kunt u voorwerpen zoals extra glazen, lange lepels en broodmessen gemakkelijk afwassen. E E B C De hoogte van de rekken aanpassen: 1. Klap het rek op (E). 2. Schuif het rek omhoog (F). 3. Open het rek op het gewenste niveau (G). H F G 1019 Controleer of de rotor het vaatwerk dat u op de rekken hebt geplaatst niet raakt.
Lade in bovenrek (afhankelijk van het model) U kunt gemakkelijk extra dessertlepels, kleine vorken en messen in de lade plaatsen, geïnstalleerd in het bovenrek van uw machine. Indien u grotere voorwerpen in het bovenrek wilt plaatsen, verwijder dan het klepje van de glassteun van de draad aan het bovenrek waaraan het is bevestigd. Zo kunt u meer ruimte creëren.
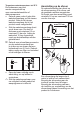
verplaatsen zonder het uit de machine te verwijderen. Inklapbare draden voor bovenrek (afhankelijk van het model) +HW UHN RPKRRJ EUHQJHQ 1. Pak een van de draden van het bovenrek (rechts of links) vast en breng hem omhoog (A). Druk op de klink (1) om de inklapbare draden op het bovenrek van de machine in horizontale positie te 1021 eps 2 B brengen. Plaats uw grotere potten en pannen in de ruimte (2). Breng de draden weer in verticale positie door ze op te tillen.
+HUKDDO GH]HOIGH VWDSSHQ RP GH andere kant van het rek omlaag te brengen. 3. Zorg ervoor dat beide kanten van het afstellingsmechanisme van het rek op hetzelfde niveau zijn (omhoog of omlaag). +HW UHN RPODDJ EUHQJHQ 1. Druk op de klink op het afstellingsmechanisme (rechts of links) om het rek omlaag te brengen (B).
De hoogte van het lege bovenrek aanpassen (afhankelijk van het model) U kunt de hoogte van het bovenrek aanpassen aan de grootte van het vaatwerk. Gebruik rekrollers om de hoogte van het rek te wijzigen. 1. Draai de nokken aan de uiteinden van de rails van het bovenrek door ze opzij te draaien (A). 9HUZLMGHU KHW UHN % 3. Wijzig de positie van de rollers, plaats het rek op de rails en sluit de nokken (C).
5 Onderhoud en reiniging De levensduur van het product kan worden verlengd en veelvoorkomende problemen nemen af als het product regelmatig wordt gereinigd. A +DDO GH VWHNNHU YDQ KHW SURGXFW XLW het stopcontact en draai de kraan dicht voordat u reiniginigsprocedures uitvoert. C Gebruik geen schuurmiddelen voor het reinigen. C Reinig de filters en rotorbladen minstens een keer per week. 1. Draai de microfilter (3) en grove filter (2) tegen de klok in en trek ze uit de zitting (A).
3. Druk de twee pallen op de grove filter naar binnen en haal de grove filter uit de montage (C). De rotoren reinigen Reinig de rotoren minstens een keer per week om de machine goed te laten werken. Onderrotor Controleer of de gaten op de onderrotor (1) verstopt zijn. Als deze verstopt zitten: verwijderen de rotor en reinig hem. Trek de onderrotor omhoog om hem te verwijderen (A, B). D 4. Reinig alle drie filters onder kraanwater met een borstel. 5. Plaats de metalen/plastic filter terug. 6.
Bovenrotor Controleer of de gaten op de bovenrotor (2) verstopt zijn. Als deze verstopt zitten: verwijderen de rotor en reinig hem. Draai de moer naar links om de bovenrotor te verwijderen (C,D). Zorg ervoor dat de moer goed is bevestigd bij het installeren van de bovenrotor.
6 Problemen oplossen De machine start niet. 9RHGLQJVNDEHO LV QLHW DDQJHVORWHQ !!! Controleer of de voedingskabel is aangesloten. =HNHULQJ LV JHVSURQJHQ !!! Controleer de zekeringen in uw huis. :DWHU LV DIJHVORWHQ !!! Controleer of de kraan open staat. 'HXU YDQ GH PDFKLQH VWDDW RSHQ !!! Controleer of u de deur van van de machine hebt gesloten. $DQ 8LW NQRS LV QLHW LQJHGUXNW !!! Controleer of u de machine hebt ingeschakeld door op de Aan-/Uit-knop te drukken.
Vaatwerk is niet droog aan het einde van de cyclus 9DDWZHUN LV QLHW JRHG LQ GH PDFKLQH JHSODDWVW !!! Plaats het vaatwerk op een manier dat er geen water in ophoopt. 2QYROGRHQGH JODQVVSRHOPLGGHO !!! Controleer de indicator van het glansspoelmiddel en voeg indien nodig glansspoelmiddel toe. Verhoog de instelling voor het glansspoelmiddel als er genoeg glansspoelmiddel in de machine zit.
Er blijft kalkaanslag op de vaat achter en het glaswerk ziet er dof uit 2QYROGRHQGH JODQVVSRHOPLGGHO !!! Controleer de indicator van het glansspoelmiddel en voeg indien nodig glansspoelmiddel toe. Verhoog de instelling voor het glansspoelmiddel als er genoeg glansspoelmiddel in de machine zit. 'H LQVWHOOLQJ YDQ GH ZDWHUKDUGKHLG LV ODDJ RI KHW ]RXWQLYHDX LV RQYROGRHQGH !!! Meet de hardheid van het kraanwater en controleer de instelling van de waterhardheid.
Er treedt roest, verkleuring of aantasting oppervlakte van het vaatwerk op (U OHNW ]RXW !!! Zout kan aantasting en oxidatie op metalen oppervlaktes veroorzaken. Let op dat u geen zout morst rondom het zoutvulgat terwijl u zout toevoegt. Zorg ervoor dat de deksel van het zoutreservoir goed wordt gesloten na het vullen. Laat het voorspoelprogramma draaien om het zout te verwijderen dat in de machine is gemorst.
Er blijft vaatwasmiddel in het doseerbakje achter. +HW GRVHHUEDNMH ZDV YRFKWLJ WRHQ YDDWZDVPLGGHO ZHUG WRHJHYRHJG !!! Zorg ervoor dat het doseervakje goed gedroogd is voor u het met vaatwasmiddel vult. 9DDWZDVPLGGHO ZRUGW ODQJ YRRU KHW DIZDVVHQ WRHJHYRHJG !!! Let op dat u het vaatwasmiddel kort voor het opstarten van het programma toevoegt.
Er blijft een laagje achter op glazen dat lijkt op een melkvlek die niet wordt verwijderd wanneer deze met de hand wordt weggeveegd. Er verschijnt een blauwige/regenbooggloed wanneer het glas in het licht wordt gehouden. (U ZRUGW WH YHHO JODQVVSRHOPLGGHO JHEUXLNW !!!Verlaag de instelling van het glansspoelmiddel. Reinig het glansspoelmiddel wanneer u het glansspoelmiddel toevoegt.
NL 17 7944 04 00_AG
GEBRUIKSAANWIJZINGEN NL ! Let op: U dient de handleiding te lezen voordat u de machine voor de eerste keer gebruikt. 8 7 3 21 1 2 3 4 5 2 3 4 5 6 4 6 7 9 5 6 : 2 Hoe uw vaatwasser te gebruiken: v v v v v v v v Draai de waterkraan open. Sluit aan op de netspanning. Open de deur en plaats de vaat in de vaatwasser. Controleer of de sproeiarmen zowel boven als onder vrij kunnen bewegen. Doe voldoende vaatwasmiddel in het reservoir en sluit de deur.
GEBRUIKSAANWIJZINGEN 8 7 3 nogmaals de vertragingsknop in te drukken. Druk opnieuw de Start/ Stop-knop in om de instelling te bewaren.