
User`s manual


3 / 68 EN
Washing Machine / User’s Manual
2 Installation
RefertothenearestAuthorisedServiceAgentforinstallation
oftheproduct.Tomaketheproductreadyforuse,review
the information in the user manual and make sure that the
electricity,tapwatersupplyandwaterdrainagesystemsare
appropriatebeforecallingtheAuthorizedServiceAgent.Ifthey
arenot,callaqualifiedtechnicianandplumbertohaveany
necessary arrangements carried out.
C
INFORMATIONS
Preparationofthelocationandelectrical,tapwaterandwaste
water installations at the place of installation is under customer’s
responsibility.
Make sure that the water inlet and discharge hoses as well as the
powercablearenotfolded,pinchedorcrushedwhilepushingthe
product into its place after installation or cleaning procedures.
B WARNING
Installationandelectricalconnectionsoftheproductmustbe
carriedoutbytheAuthorizedServiceAgent.Manufacturershallnot
beheldliablefordamagesthatmayarisefromprocedurescarried
outbyunauthorizedpersons.
A WARNING
Priortoinstallation,visuallycheckiftheproducthasanydefectson
it.Ifso,donothaveitinstalled.Damagedproductscauserisksfor
your safety.
2.1 Appropriate installation location
• Placethemachineonarigidfloor.Donotplaceitonalong
pile rug or similar surfaces.
• Totalweightofthewashingmachineandthedryer-with
full load- when they are placed on top of each other
reachestoapprox.180kilograms.Placetheproductona
solid and flat floor that has sufficient load carrying capacity!
• Donotplacetheproductonthepowercable.
• Donotinstalltheproductatplaceswheretemperaturemay
fallbelow0ºC.
• Placetheproductatleast1cmawayfromtheedgesof
other furniture.
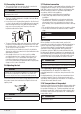
2.2 Removing packaging reinforcement
Tiltthemachinebackwardstoremovethepackaging
reinforcement.Removethepackagingreinforcementby
pullingtheribbon.
2.3 Removing the transportation locks
A WARNING
Donotremovethetransportationlocksbeforetakingoutthe
packaging reinforcement.
Removethetransportationsafetyboltsbeforeoperatingthe
washingmachine!Otherwise,theproductwillbedamaged.
Loosenalltheboltswithasuitablespanneruntiltheyrotate
freely(C).Removetransportationsafetyboltsbyturningthem
gently.AttachtheplasticcoverssuppliedintheUserManual
bagintotheholesontherearpanel.(P)
C
INFORMATIONS
Keepthetransportationsafetyboltsinasafeplacetoreusewhen
thewashingmachineneedstobemovedagaininthefuture.
Nevermovetheproductwithoutthetransportationsafetybolts
properly fixed in place!
2.4 Connecting water supply
C
INFORMATIONS
Thewatersupplypressurerequiredtoruntheproductisbetween
1to10bars(0.1–1MPa).Itisnecessarytohave10–80liters
of water flowing from the fully open tap in one minute to have your
machinerunsmoothly.Attachapressurereducingvalveifwater
pressure is higher.
Ifyouaregoingtousethedoublewater-inletproductasasingle
(cold)water-inletunit,youmustinstallthesuppliedstopperto
thehotwatervalvebeforeoperatingtheproduct.(Appliesforthe
productssuppliedwithablindstoppergroup.)
Ifyouwanttousebothwaterinletsoftheproduct,connectthe
hot water hose after removing the stopper and gasket group from
thehotwatervalve.(Appliesfortheproductssuppliedwithablind
stopper group.)
A WARNING
Modelswithasinglewaterinletshouldnotbeconnectedtothe
hotwatertap.Insuchacasethelaundrywillgetdamagedorthe
product will switch to protection mode and will not operate.
Donotuseoldorusedwaterinlethosesonthenewproduct.Itmay
cause stains on your laundry.
Connectthespecialhosessuppliedwiththeproducttothe
waterinletsontheproduct.Redhose(left)(max.90ºC)isfor
hotwaterinlet,bluehose(right)(max.25ºC)isforcoldwater
inlet.
A WARNING
Ensure that the cold and hot water connections are made correctly
wheninstallingtheproduct.Otherwise,yourlaundrywillcomeout
hot at the end of the washing process and wear out.
Tightenallhosenutsbyhand.Neveruseawrenchwhen
tightening the nuts. Open the taps completely after making the
hose connection to check for water leaks at the connection
points.Ifanyleaksoccur,turnoffthetapandremovethenut.
Retighten the nut carefully after checking the seal. To prevent
waterleakagesanddamagescausedbythem,keepthetaps
closed when the machine is not in use.