Refrigerator User manual UR584APW - UR584APS - UR4584S - UR4584W EN / 57 1012 0000/AT
Please read these instructions first before using your appliance Thank you for choosing a Beko appliance. Please take some time to read this user manual before using your appliance, to ensure you know how to safely operate the controls and functions. Carefully follow all unpacking and installation instructions to ensure the appliance is correctly connected and fitted prior to use.
1 Your refrigerator 2 Warnings 3 4 Electrical requirements........................... 5 Warning! This appliance must be earthed .......................................................... 5 Energy saving tips .....................................6 Compliance with WEEE Directive and Disposing of the Waste Product: ....... 7 Compliance with rohs directive: ......... 7 Package information ................................
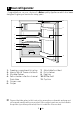
1 Your refrigerator Congratulations on your choice of a Beko quality Appliance which has been designed to give you service for many years. 11 1 8 2 9 3 4 5 6 10 7 Freezing compartment & ice tray Interior light & Thermostat knob Movable shelves Defrost water collection channel Drain tube 5. Crisper cover 6. Crisper 1. 2. 3. 4. C 7. 8. 9. 10. 11.
2 Warnings Do not connect your appliance to the electricity supply until all packing and transit protectors have been removed. If transported horizontally leave to stand upright for at least 4 hours before switching on to allow compressor oil to settle If you are discarding an old refrigerator with a lock or latch fitted to the door, disable the lock/latch, ensure that it is left in a safe condition to prevent the entrapment of young children.
We suggest you keep these instructions in a safe place for easy reference. This appliance can be used by children aged from 8 years and above and persons with reduced physical, sensory or mental capabilities or lack of experience and knowledge if they have been given supervision or instruction concerning use of the appliance in a safe way and understand the hazards involved. Children shall not play with the appliance. Cleaning and user maintenance shall not be made by children without supervision.
Important! Fitting A Energy saving tips Different Plug 1. As the colours of the wires 1. Ensure your appliance is in the mains lead of this installed in a well ventilated appliance may not correspond area. with the coloured markings 2. Ensure the time between identifying the terminals in buying chilled/frozen food your plug proceed as follows: and placing them in your (See diagram). appliance is kept at minimum, 2. Connect the green-yellow particularly in summer.
Compliance with WEEE Directive and Disposing of the Waste Product: This product complies with EU WEEE Directive (2012/19/ EU). This product bears a classification symbol for waste electrical and electronic equipment (WEEE).This product has been manufactured with high quality parts and materials which can be reused and are suitable for recycling. Do not dispose of the waste product with normal domestic and other wastes at the end of its service life.
3 Installation Transportation Instructions 1. The appliance should be transported only in a vertical upright position. The packing as supplied must be intact during transportation. 2. If during the course of transport the appliance has to be transported horizontally, it must only be laid on its right hand side when standing in the frontof the appliance. After bringing it to upright position,it must not be operated for at least 4 hours to allow the system to settle. 3.
4. The appliance should be located on a smooth surface. The two front feet can be adjusted as required. To ensure that, your appliance is standing upright adjust the two front feet by turning clockwise or anti-clockwise, until the product is in firm contact with the floor. Correct adjustment of feet avoids excessive vibration and noise. 5. Refer to “Cleaning and Care” section to prepare your appliance for use. 6.
1. Switch off at the socket outlet and pull out the mains plug. 2. Remove all food, loose items and fittings from inside the appliance and door shelves. 3. Carefully tilt the appliance on its back side. (1) (You may need somebody to help you.) Take care not to damage the appliance by laying on some protective material (e.g. its original packaging). Make sure that you tilt the appliance on its back side, otherwise compressor oil may block the pipes and you may damage the appliance. 4.
REPOSITIONING THE DOOR Follow the step by step instructions and the diagram below. Numbers in brackets refer to diagrams.
4 Before operating Final Check Before you start using the fridge/ freezer check that: 1. For a freestanding appliance; ‘this refrigerating appliance is not intended to be used as a built-in appliance’ . 2. The feet have been adjusted for perfect levelling. 3. The interior is dry and air can circulate freely. 4. Clean the interior as recommended under “Cleaning And Care.” 5. Insert the plug into the wall socket and switch on the electricity supply. When the door is open the interior light will come on. 6.
5 Using your refrigerator 1 2 3 . .. . .. 4 Arrangement Examples (See diagram). 1. 4-star freezer compartment 2. Baked, chilled cooked food, dairy products. 3. Meat, sausages, cold cuts, cans. 4. Fruit, vegetables, salads. 5. Tubes, small bottles and cans. 6. Egg tray. 7. Butter, cheese, dairy products. 8. Beverages, large bottles. The following guidelines and recommendations are suggested to obtain the best results and storage hygiene. 1.
8. Keep the food packed, wrapped or covered. Allow hot food and beverages to cool before placing them in the fridge. Do not store explosive substances in the refrigerator. High proof alcohol must be stored upright in sealed containers. Left over canned food should not be stored in the can. 9. Side handle to be fitted by the user (Supplied in the appliance) 10. Some fruit and vegetables suffer damage if kept at temperatures near 0 degrees centigrade.
Defrosting Freezer Compartment The larder fridge defrosts automatically. The defrosting water runs to the drain tube via a collection channel and is evaporated in a special container (1)at the back of the appliance (see diagram). During defrosting water droplets may format the back of the larder fridge where concealed evaporator is located. Some droplets may remain on the liner and refreeze when defrosting is completed.
Changing the illumination lamp To change the Bulb/LED used for illumination of your refrigerator, call your AuthorisedService. The lamp(s) used in this appliance is not suitable for household room illumination. The intended purpose of this lamp is to assist the user to place foodstuffs in the refrigerator/ freezer in a safe and comfortable way.The lamps used in this appliance have to withstand extreme physical conditions such as temperatures below -20 °C.
6 Maintenance and cleaning Check door seals regularly to ensure they are clean and free from food particles.. Never : Clean the worktop with unsuitable material; eg petroleum based products. Subject it to hot temperatures in any way, Scour, rub etc., with abrasive material. We recommend that you switch off the appliance at the socket outlet and pull out the mains plug before cleaning. Never use any sharp abrasive instrument, soap, household cleaner, detergent and wax polish for cleaning.
7 Do's and Don'ts Do- Clean and defrost your appliance regularly (See "Defrosting") Do- Keep raw meat and poultry below cooked food and dairy products. Do- Take off any unusable leaves on vegetables and wipe off any soil. Do- Leave lettuce, cabbage, parsley and cauliflower on the stem. DoWrap cheese firstly in greaseproof paper and then in a polythene bag excluding as much air as possible. For best results take out of the fridge compartment an hour before eating.
Don't- Exceed the maximum freezing loads (4 kg in any 24 hours) when freezing fresh food. Don't- Give children ice-cream and water ices direct from the freezer. The low temperature may cause 'freezer burns' on lips. Don't- Freeze fizzy drinks. Don't- Try to keep frozen food which has thawed, it should be eaten within 24 hours or cooked and refrozen. Don't- Remove items from the freezer with wet hands.
BEKO UK AND IRELAND STANDARD MANUFACTURER GUARANTEE TERMS AND CONDITIONS Your new Beko product is guaranteed against faulty materials, defective components or manufacturing defects. The standard guarantee starts from the date of original purchase of the product, and lasts for a period of twelve (12) months unless Beko plc (the “Manufacturer”) agrees to extend the guarantee for the product in writing.
Repairs to a product operated at any time on commercial or non-residential household premises (unless we have previously agreed to the installation environment). This guarantee is limited to the cost of repairing the product. To the extent permitted by law, the Manufacturer does not accept and will not be held liable for any financial loss incurred in connection with the failure of any product to operate in accordance with the expected standards.
Does Beko offer replacements? This is a repair-only guarantee. On occasion, the Manufacturer may at its sole discretion, replace your product with a new product instead of carrying out a repair. Where a replacement is offered, this would normally be an identical model but when this is not possible, a model of similar specification will be provided. The Manufacturer will cover the costs and arrange for the delivery of the new product and for the return of the old product.
If you are resident in the Republic of Ireland, this guarantee will be governed by Irish law and the Irish courts will have jurisdiction. This guarantee is provided by Beko plc. Beko House, 1 Greenhill Crescent, Watford, Hertfordshire. WD18 8QU.
For service under guarantee or for product advice please call our Contact centre Before requesting service please check the troubleshooting guide in the Operating Instructions booklet, as a charge may be levied where no fault is found, and even though your product may still be under guarantee. After arranging service the area around the product must be easily accessible to the Engineer, without the need for cabinets or furniture to be removed or moved.
Contact us though our website Send us a secure message through our online contact us form. Please visit our website, click Contact Us and choose a product support topic from the list of options. Complete the required details and click send message. Product registrations For UK registrations please visit beko.co.uk/register and for the Republic of Ireland visit beko.ie/register.