Automatic washing machine WM 6167 W WM 6167 S
Please read this manual first! Dear Customer, We hope that your product which has been manufactured in modern facilities and passed through a strict quality control procedure will give you the best results. Therefore, we advise you to read through this manual carefully before using your product and keep it for future reference. This operation manual will… …help you use your machine in a fast and safe way. • Please read the Operation Manual before installing and starting your machine.
TABLE OF CONTENTS 1 Your Washing Machine 4 Overview . . . . . . . . . . . . . . . . . . . . . . 4 Specifications . . . . . . . . . . . . . . . . . . . 5 2 Warnings 6 General Safety . . . . . . . . . . . . . . . . . . 6 First Use . . . . . . . . . . . . . . . . . . . . . . . 6 Intended use . . . . . . . . . . . . . . . . . . . 6 Safety instructions . . . . . . . . . . . . . . . 6 If there are children in your house... . . 7 Electrical connection. . . . . . . . . . . . . .
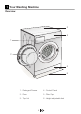
1 Your Washing Machine Overview � � � � � � 1 - Detergent Drawer 4 - Control Panel 2 - Door 5 - Filter Cap 3 - Top Lid 6 - Height-adjustable feet 4 EN
Specifications Models WM6167W WM6167S Maximum dry laundry capacity (kg) 6 6 Height (cm) 84 84 Width (cm) 60 60 Depth (cm) 50 50 Net Weight (kg) 69 69 Electricity (V/Hz.) 230 V / 50Hz 230 V / 50Hz Total Current (A) 10 10 Total Power (W) 2200 2200 Spinning cycle (rpm max.) 1600 1600 Specifications of this appliance may change without notice to improve the quality of the product. Figures in this manual are schematic and may not match your product exactly.
2 Warnings Please read the following information. Otherwise, there may be the risk of personal injury or material damage. Moreover, any warranty and reliability commitment will become void. may be caused by the software. Press “Start/Pause/Cancel” button for 3 seconds to cancel the program set in your machine before calling the authorized service. General Safety • • • • • • • Never place your machine on a carpet covered floor.
• • • • • • • • • The supply and draining hoses must always be securely fastened and remain in an undamaged state. Fit the draining hose to a washbasin or waste system securely before starting up your machine. There may be a risk of being scalded due to high washing temperatures! Never open the door or remove the filter while there is still water in the drum. Otherwise, there may be the risk of flooding and possible injury due to the hot water.
need to be replaced an ASTA approved BS1362 fuse of the same rating must be used. Do not forget to refit the fuse cover. In the event of losing the fuse cover, the plug must not be used until a replacement fuse cover has been fitted. Colour of the replacement fuse cover must be the same colour as that visible on the pin face of the plug. Fuse covers are available from any good electrical store.
3 Installation Removing packaging reinforcement with the Operation Manual) into the holes on the rear panel. (“P”) Tilt the machine to remove the packaging reinforcement. Remove the packaging reinforcement by pulling the ribbon. C Keep the transportation safety bolts in a safe place to reuse when the washing machine needs to be moved again in the future.
again. • Open the taps completely after making the hose connection to check if there is any water leakage at the connection points. Turn off the tap and remove the nut in case of any leakage. Retighten the nut carefully after checking the seal. To prevent any water leakage and any other damage to be caused by it, keep the taps closed when the machine is not in use. • Models with a single water inlet should not be connected to the hot water tap.
national regulations. Power cord plug must be within easy reach after installation. • The voltage and the allowed fuse protection are specified in the section “Technical Specifications”. • The specified voltage must be equal to your mains voltage. • Connection via extension cords or multi-plugs should not be made. B A damaged power cable must be replaced by a qualified electrician.
4 Initial preparations for washing • Sorting the laundry • Sort the laundry according to type of fabric, color, and degree of soiling and permissible water temperature. Always follow the advice on the garment labels. • • Non machine Do not wash Washing water Wash with washable temperature sensitive, short programs.
Detergent, softener and other cleaning agents Add detergent and softener before starting the washing program. Never open the detergent dispenser drawer while the washing program is running! When using a program without prewash, no detergent should be put into the pre-wash compartment (Compartment no. I). A program without pre-wash should be selected if a detergent bag or a dispensing ball is going to be used. You can place the detergent bag or the dispensing ball directly among the laundry in your machine.
for prewashing for main washing with hard water follow the instructions on the package. Detergent quantity 1/2 measure 1 measure an additional 1/2 measure Softener Put the softener into the softener compartment of the detergent dispenser. • Use the proportions recommended on the packet. • Never exceed the (> max <) level marking; otherwise, the softener will be wasted without being used. • If the softener has lost its fluidity, dilute dense softener with water before placing it in the detergent drawer.
5 Selecting a program and operating your machine Control panel Figure 2 7 8 13 11 9 12 10 7 - Spin Speed Adjustment Button 8 - Time Delaying Button (+/-) 9 - Temperature Adjustment Button 10 - Start/Pause/Cancel Button 11 - Auxiliary Function Buttons 12 - Program Selection Knob 13 - Display 14 - On / Off Button 15 EN 14
Display symbols Figure 3 13.a - Spin Speed Indicator 13.b – Temperature Indicator 13.c – Spinning Symbol 13.d – Temperature Symbol 13.e – Remaining Time and Delaying Time Indicator 13.f – Program Indicator Symbols (prewash/mainwash/rinsing/softener/ spinning) 13.g – Economy Symbol 13.h – Time Delaying Symbol 13.i – Door Locked Symbol 13.j – Start Symbol 13.k – Pause Symbol 13.l – Auxiliary Function Symbols 13.
not be put in the prewash compartment. Less detergent should be put in the main wash compartment as the veil foams too much because of its meshed structure. Woollens You can wash your machine-washable woollen garments at this program. Wash by selecting the proper temperature according to the labels of your clothes. It is recommended to use appropriate detergents for woolens. which you cannot use the “Cotton 60°C” program. Intensive You can wash your durable and heavily soiled clothes at this program.
Cold selection is shown with “-” symbol. When the “Temperature” button is pressed after coming to the Cold selection, the maximum temperature of the program you have selected will be displayed. To decrease the temperature, press the “Temperature” button again. 90˚C Normally soiled, white cottons and linens. (Ex.: coffee table covers, tablecloths, towels, bed sheets) 60˚C Normally soiled, fade proof colored linens, cottons or synthetic clothes (Ex.
Program selection and consumption table Auxiliary functions 1.48 max. • • • • • • • • • • • Cottons 60** 6 144 49 1.02 max. • • • • • • • • • • • Prewash Quick Rinse Plus Anti-Creasing Rinse Hold 90-80-70 60 50 40 30 Cold 49 Spin speed (rpm) Water Consumption (l) 153 90 Energy Consumption (kWh) Programme Duration (~min) 6 Programme Cottons Temperature Max. Load (kg) EN Cottons 40 6 124 49 0.80 max. • • • • • • • • • • • A Class 40 Super 40 6 159 49 0.87 max.
Auxiliary functions Auxiliary function selection keys 11a • • • • 11b 11c 11d Depending on the program, you can select the desired auxiliary function by pressing the buttons. Select the required auxiliary functions before starting the program. Some combinations cannot be selected together. (Ex.: Prewash and Quick Wash. Symbol of the selected auxiliary function (Figure 3-2l) will light up.
Time delay With the “Time delay” function you can delay the program start up to 24 hours. Setting can be made in intervals of 30 minutes. 1. Open the loading door, place the laundry inside and fill with detergent. 2. Set the washing program, temperature, spin speed and, if required, select the auxiliary functions. 3. Press “Time delaying” buttons “+” and “-” (Figure 2-6) to set your desired time delay. Time delaying symbol (Figure 3-2h) will flash. 4. Press “Start/Pause/Cancel” button (Figure 2-8).
Main wash Main wash symbol will light up to indicate that the main wash cycle has started. Rinse Rinse symbol lights up at the beginning of the rinse step. Softener Softener symbol lights up at the beginning of softener step. Spin Spin symbol will light up at the beginning of the final spin, during “Spin” and “Pump” special programs.
on the screen whenever any button is pressed while the machine is childlocked. To deactivate the child-proof lock, press the 2nd and 4th auxiliary function buttons for 3 sec. “C:OFF” (Child lock is deactivated) label appears on the screen. without spinning: Press “Start/Pause/Cancel” button (Figure 2-8). Standby symbol (Figure 3-2k) will fade. Start symbol (Figure 3-2j) will light up. The program continues and only pumps out the water.
6 Quick instructions for daily use Preparation 1. Turn the tap on completely. Check if the hoses are connected tightly. 2. Place the laundry in the machine. 3. Add detergent and softener. Starting 1. Press the “On/Off” button. 2. Select the program and the temperature. 3. If desired (according to your machine’s model): – select any auxiliary function, – adjust the spin speed, – set the time delay, 4. Close the loading door. 5. Press “Start/Pause/Cancel” button.
After the program is finished Program indicator symbols on the screen will remain lit after the program is finished. “End” will appear on the screen. 1. Open the loading door and take out the laundry when the door locked symbol on the display fades out. 2. Press the “On/Off” button. 3. Turn the water tap off. 4. Remove any folds in the rubber seal on the loading door and check for debris. 5. Leave the loading door and detergent drawer open to dry.
7 Cleaning and care Detergent drawer Remove any powder residue buildup in the drawer. To do this; 1. Press the dotted point on the siphon in the softener compartment and pull towards you until the compartment is removed from the machine. C If more than a normal amount of water and softener mixture starts to gather in the softener compartment, the siphon must be cleaned. 2. Wash the dispenser drawer and the siphon with plenty of lukewarm water in a washbasin.
• • • If the filters are very dirty, you can pull them out by means of pliers and clean them. Take out the filters on the flat ends of the water intake hoses together with the gaskets and clean thoroughly under streaming water. Replace the gaskets and filters carefully and tighten the hose nuts by hand.
• • • • from the filter. Loosen pump filter (anticlockwise) until water starts to flow out of it. Direct the flowing water into the container you have placed in front of the filter. You can use a piece of cloth to absorb any spilled water. When there is no water left, turn the pump filter until it is completely loose and remove it. Clean any residues inside the filter as well as fibers, if any, around the propeller region.
8 Solution suggestions for problems Cause Explanation / Suggestion Program cannot be started or selected. Machine may have switched to self protection mode due to an infrastructure problem (such as line voltage, water pressure, etc.). Bring your machine to factory settings by turning the program selection knob. (see, Ending the program through canceling) Water in the machine. There may be some water in your machine when you receive it.
No water can be seen in the machine during washing. This is not a problem. The water level is not visible from the outside of the machine. The door is jammed. - Water level might be above the lower level of the door. - Machine might be heating up the water or it may be at the spinning - Run either the “Pump” or “Spin” program. cycle. - Wait until the process is over. - Due to an electrical mechanism, - Wait until the process is over. the door can only be opened a few minutes after the program has stopped.
It continuously washes. Remaining time does not count down. In the case of a paused countdown while taking in water: - Timer will not countdown until the machine is filled with the correct amount of water. (On models with display) - Time might have gotten stuck during heating step. (On models with display) In the case of a paused countdown at the spinning step: There may be an imbalance of laundry in the machine.
- Washing performance is poor: Oily stains appear on laundry. - Washing performance is poor: Bad odor - Oily accumulations on the drum may have stuck to the laundry. - Oily accumulations on the drum may have stuck to the laundry. - Such odors and bacteria layers are formed on the drum as a result of continuous washing at lower temperatures and/or in short programs. - Leave the detergent dispenser drawer as well as the loading door of the machine ajar after each washing.
Clothes do not smell like the softener. - If the water hardness is higher, using insufficient amount of detergent can cause the laundry to become stiff in time. Use appropriate amount of according to the water hardness. - Insufficient amount of detergent used.
The plug might not be plugged in the mains outlet. Fuse may have blown. Machine does work. Nothing is displayed on Electricity may be cut the screen. off. The “On/Off” button might have not been pressed. The machine did not start after the program The front door may be was selected and the ajar. «Start/Pause/Cancel» button was pressed. The Rinse Symbol amongst the Program Indicator Symbols is may have been flashing. (Subject to the Water cut off.
9 Guarantee Your new Beko product is guaranteed against the cost of breakdown repairs for twelve months from the date of the original purchase. What is covered? Repairs necessary as a • result of faulty materials, defective components or manufacturing defect. The cost of functional • replacement parts, but excluding consumable items. The labour costs of a Beko • approved repairer to carry out the repair. What is not covered? Transit, delivery or • accidental damage or misuse and abuse.
10 Service Please keep your purchase receipt or other proof of purchase in a safe place; you will need to have it should the product require attention under .guarantee You should also complete the details below; it will help us assist you when requesting service.