Washing Machine Lave-linge WMB 91242 LC
1 Important safety instructions This section contains safety instructions that will help protect from risk of personal injury or property damage. Failure to follow these instructions shall void any warranty. • • • • • • • • • • • • • • • • Intended use • This product has been designed for domestic use. It is not suitable for commercial use and it must not be used 8 years and older children and people with reduced out of its intended use.
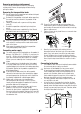
Removing packaging reinforcement Tilt the machine backwards to remove the packaging reinforcement. Remove the packaging reinforcement by pulling the ribbon. Removing the transportation locks A A 1. 2. 3. C C Do not remove the transportation locks before taking out the packaging reinforcement. Remove the transportation safety bolts before operating the washing machine, otherwise, the product will be damaged. Loosen all the bolts with a spanner until they rotate freely (C).
• • • To prevent flowing of dirty water back into the machine and to allow for easy discharge, do not immerse the hose end into the dirty water or drive it in the drain more than 15 cm. If it is too long, cut it short. The end of the hose should not be bent, it should not be stepped on and the hose must not be pinched between the drain and the machine. If the length of the hose is too short, use it by adding an original extension hose. Length of the hose may not be longer than 3.2 m.
C • Never move the product without the transportation safety bolts properly fixed in place! Disposing of the old product Dispose of the old product in an environmentally friendly manner. Refer to your local dealer or solid waste collection centre in your area to learn how to dispose of your product. For children's safety, cut the power cable and break the locking mechanism of the loading door so that it will be nonfunctional before disposing of the product.
nr. I). Do not select a programme with prewash if you are using a detergent bag or dispensing ball. Place the detergent bag or the dispensing ball directly among the laundry in the machine. • If you are using liquid detergent, do not forget to place the liquid detergent cup into the main wash compartment (compartment nr. II). Choosing the detergent type The type of detergent to be used depends on the type and colour of the fabric. • Use different detergents for coloured and white laundry.
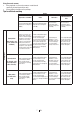
Using limescale remover • When required, use limescale removers manufactured specifically for washing machines only. • Always follow instructions on the package. Tips for efficient washing Clothes Light colours and whites Colors (Recommended temperature range based on soiling level: cold-30C) Powder and liquid detergents recommended for colours can be used at dosages recommended for heavily soiled clothes.
4 Operating the product Control panel 1 6 1 2 3 4 - 2 3 7 8 Spin Speed Adjustment button Display Temperature Adjustment button Programme Selection knob Display symbols 4 5 6 7 8 - 5 On / Off button Delayed Start buttons (+ / -) Auxiliary Function buttons Start / Pause / Cancel button Preparing the machine Make sure that the hoses are connected tightly. Plug in your machine. Turn the tap on completely. Place the laundry in the machine. Add detergent and fabric softener. Programme selection 1.
C C Always select the lowest required temperature. Higher temperature means higher power consumption. For further programme details, see "Programme and consumption table". Main programmes Depending on the type of fabric, use the following main programmes. • Cottons Use this programme for your cotton laundry (such as bed sheets, duvet and pillowcase sets, towels, bathrobes, underwear, etc.). Your laundry will be washed with vigorous washing action for a longer washing cycle.
Special programmes For specific applications, select any of the following programmes. • Rinse Use this programme when you want to rinse or starch separately. • Spin + Drain Use this programme to apply an additional spin cycle for your laundry or to drain the water in the machine. Before selecting this programme, select the desired spin speed and press Start / Pause / Cancel button. The machine will spin the laundry with the set spin speed and drain the water coming out of them.
Programme and consumption table EN Auxiliary functions Max. Load (kg) Water Consumption (l) Energy Consumption (kWh) Max. Speed*** Prewash Quick Wash Rinse Plus Anti-Creasing Rinse Hold Pet hair removal 2 Cottons Cottons Cottons 90 60 40 9 9 9 87 85 85 2.70 1.80 1.00 1600 1600 1600 • • • • • • • • • • • • • • • • • • Babycare 90 9 80 2.70 1600 Programme (°C) * Selectable temperature range °C 90-Cold 90-Cold 90-Cold • 90-30 Cotton Economic 60** 9 55 1.
Auxiliary function selection Select the desired auxiliary functions before starting the programme. Furthermore, you may also select or cancel auxiliary functions that are suitable to the running programme by pressing the Start / Pause / Cancel button when the machine is operating. For this, the machine must be in a step before the auxiliary function you are going to select or cancel. Depending on the programme, press a, b, c or d buttons to select the desired auxiliary function.
flashes. Decrease the delayed start time by pressing the Delayed Start - button. Programme duration appears after 30 minutes. Press Start / Pause / Cancel button to start the programme. Starting the programme Press Start / Pause / Cancel button to start the programme. Start symbol showing the startup of the programme will turn on. Loading door is locked and Door Locked symbol appears on the display.
If you only want to drain the water without spinning: Just press Start / Pause / Cancel button. Pause symbol disappears. Start symbol appears. Programme resumes and discharges the water only. End of programme “End” appears on the display at the end of the programme. Symbols of the programme steps remain lit. Auxiliary function, spin speed and temperature that were selected at the beginning of the programme remain selected.
Pull the emergency draining hose out from its seat Place a large container at the end of the hose. Drain the water into the container by pulling out the plug at the end of the hose. When the container is full, block the inlet of the hose by replacing the plug. After the container is emptied, repeat the above procedure to drain the water in the machine completely. When draining of water is finished, close the end by the plug again and fix the hose in its place. Turn the pump filter to take it out.
6 Technical specifications WMB 91242 LC Models (EN) Maximum dry laundry capacity (kg) 9 Height (cm) 84 Width (cm) 60 Depth (cm) 59 74 Net weight (±4 kg.) 220-240 V / 50Hz Electrical input (V/Hz) Total current (A) 10 Total power (W) 2000-2350 Spin speed (rpm max.) 1200 Stand-by mode power (W) 1.40 Off-mode power (W) 0.20 C C C Technical specifications may be changed without prior notice to improve the quality of the product.
7 Troubleshooting Programme cannot be started or selected. • Washing machine has switched to self protection mode due to a supply problem (line voltage, water pressure, etc.). >>> Press and hold Start / Pause button for 3 seconds to reset the machine to factory settings. (See “Canceling the programme”) Water in the machine. • Some water might have remained in the product due to the quality control processes in the production. >>> This is not a failure; water is not harmful to the machine.
1 Consignes importantes de sécurité • Cette section contient des consignes relatives à la sécurité qui vous aideront à prévenir les risques de blessure corporelle ou de dommage matériel. Le non-respect de ces consignes annulera toute garantie.
C Vérifiez que les tuyaux d'arrivée d'eau et de vidange, ainsi que le câble d’alimentation, ne sont pas pliés, pincés, ou écrasés lorsque vous poussez le produit en place après les procédures d'installation ou de nettoyage. Emplacement d’installation approprié • • • • • Installez la machine sur un sol solide. Ne la placez pas sur une moquette ou sur des surfaces similaires.
• • Le tuyau doit être attaché à une hauteur comprise entre 40 et 100 cm. Si le tuyau est élevé après l’avoir posé sur le niveau du sol ou près de celui-ci (moins de 40 cm au-dessus du sol), l’évacuation d’eau devient plus difficile et le linge peut se mouiller considérablement. C'est pourquoi les hauteurs décrites dans le schéma doivent être respectées. A N'utilisez aucun outil pour dévisser les contre-écrous. Sinon, vous pouvez les endommager.
C C Utilisez un anti-détartrant adapté aux lave-linge. Il pourrait rester de l’eau dans votre machine suite aux processus d’assurance qualité menés au cours de la production. Ceci n’affecte pas votre machine. • Préparation du linge pour le lavage • Mise au rebut des matériaux d’emballage Les matériaux d'emballage sont dangereux pour les enfants. Conservez tous les matériaux d'emballage dans un endroit sûr, hors de portée des enfants.
• C A Poussez la porte de chargement pour la fermer jusqu’à ce que vous entendiez un bruit de verrouillage. Veillez à ce qu’aucun article ne soit coincé dans la porte. La porte de chargement est verrouillée pendant le fonctionnement d'un programme. La porte ne peut être ouverte que quelque temps après la fin du programme. Si le linge est mal disposé dans la machine, celle-ci peut émettre des bruits et vibrer.
• Si l'aspect de la lessive en gel est fluide et votre machine ne contient aucun réservoir pour lessive liquide spéciale, versez la kessive en gel dans le compartiment à produits de lavage principal pendant la première admission d'eau. Si votre machine est dotée d'un réservoir pour lessive liquide, versez-y la lessive avant de démarrer le programme. • Si l'aspect de la lessive en gel n'est pas fluide ou sous forme de capsule liquide, versez-la directement dans le tambour avant de procéder au lavage.
Astuces pour un lavage efficace Vêtements Couleurs claires et blanc Degré de saleté (Températures recommandées en fonction du degré de saleté: 40-90C) Il peut être nécessaire de pré-traiter les taches ou d'effectuer un prélavage. Les lessives en poudre et liquides Très sale recommandées pour le blanc peuvent être (taches utilisées aux dosages difficiles, conseillés pour les par exemple vêtements très sales. d'herbe, de Il est recommandé café, de fruit et d'utiliser des lessives en poudre pour de sang.
4 Fonctionnement de l’appareil Bandeau de commande 1 6 1 2 3 4 - 2 3 7 8 Bouton de réglage de la vitesse d'essorage Affichage Bouton de réglage de la température Sélecteur de programmes Symboles d'affichage 4 5 6 7 8 - 5 Bouton « Marche/Arrêt » Boutons de départ différé (+ / -) Boutons de fonction optionnelle Bouton Départ / Pause / Annulation Préparation de la machine Veillez à ce que les tuyaux soient bien serrés. Branchez votre machine. Ouvrez le robinet complètement.
C C la température d’eau autorisée. Sélectionnez en permanence la température nécessaire la plus basse. Une température plus élevée est synonyme de consommation d’énergie plus importante.
C Evitez d’exécuter le programme quand la machine contient un quelconque linge. Si vous essayez de le faire, la machine détectera la présence d’une charge à l’intérieur du lave-linge et suspendra l’exécution du programme. Pour une explication de ces options, veuillez vous reporter à la section "Sélection des fonctions optionnelles". Rinçage d'attente est indiquée par le symbole C L'option “ ” et l'option "Pas d’essorage" est indiquée par le symbole “ ”.
Tableau des programmes et de consommation FR Fonction optionnelle Charge maximale (kg) Consommation d’eau (l) Consommation d’énergie (kWh) Vitesse Max.*** Lavage express Rinçage Plus Repassage Facile Arrêt cuve pleine Nettoyage des poils d’animaux domestiques Gamme de température sélectionnable °C Prélavage 7 90 60 40 9 9 9 87 85 85 2.70 1.80 1.
Sélection des fonctions optionnelles Sélectionnez les fonctions optionnelles souhaitées avant de lancer le programme. De plus, vous pouvez aussi sélectionner ou annuler les fonctions optionnelles qui sont adaptées au programme en cours d’exécution en appuyant sur le bouton "Départ/Pause/Annuler" pendant le fonctionnement de la machine. Pour cela, la machine doit se trouver dans une phase avant la fonction optionnelle que vous allez sélectionner ou annuler.
Changement de la période de départ différé Si vous souhaitez changer le temps pendant le compte à rebours: Appuyez sur le bouton Départ/Pause/Annulation. “:” le signe au milieu du temps de départ différé à l'écran arrête de clignoter. Le symbole de pause apparaît. Le symbole de départ différé clignote. Le symbole de départ disparaît. Réglez le temps de départ différé souhaité en appuyant sur le boutons Départ différé + ou - . Appuyez sur le bouton Départ/ Pause/Annulation.
Le même mot apparaîtra à l'écran si vous appuyez sur une touche lorsque le mode Sécurité enfants est activé. Pour désactiver la sécurité enfants : Appuyez sur les boutons de fonction optionnelle 2 et 4 et maintenez-les enfoncés pendant 3 secondes. “COFF” apparaît à l'écran. pas de désactiver le mode Sécurité enfants à C laN'oubliez fin du programme s'il a été activé. Si vous ne le faites pas, la machine ne vous permettra pas de sélectionner un nouveau programme.
Débranchez la machine afin de couper l’alimentation électrique. température de l'eau contenue dans la machine peut A La monter jusqu'à 90 ºC. Pour éviter tout risque de brûlure, le filtre doit être nettoyé après le refroidissement de l'eau qui se trouve dans la machine. Ouvrez le bouchon du filtre. Si celui-ci comprend deux pièces, appuyez sur l’onglet qui se trouve sur le bouchon du filtre vers le bas et tirez la pièce vers vous. fibres, s’il y en a, autour de la zone de la turbine. Installer le filtre.
6 Caractéristiques techniques WMB 91242 LC Modèles (FR) Charge maximale de linge sec (kg) 9 Hauteur (cm) 84 Largeur (cm) 60 Profondeur (cm) 59 Poids net (±4 kg.) 74 220-240 V / 50Hz Consommation électrique (V/Hz) 10 Courant total (A) 2000-2350 Puissance totale (W) Vitesse d'essorage (tr/min max.) 1200 Puissance en mode veille (W) 1.40 Puissance en mode éteint (W) 0.
7 Diagnostic Impossible de lancer ou de sélectionner le programme. • La machine est passée en mode de sécurité à cause des problèmes liés à l’alimentation (tension du circuit, pression d’eau, etc.). >>>Appuyez sur le bouton « Départ/Pause » et maintenez-le enfoncé pendant 3 secondes pour rétablir les réglages par défaut de la machine. (Voir "Annulation du programme") Eau dans la machine. • Il pourrait rester de l’eau dans votre machine suite aux processus d’assurance qualité menés au cours de la production.
FR
7استكشاف األخطاء وإصالحها ال يمكن بدء تشغيل البرنامج أو اختياره. انتقال الغسالة إلى وضع الحماية الذاتية بسبب مشكلة في اإلمداد (على سبيل المثال جهد التيار أو ضغط الماء ،وغير ذلك)>>> . • ثوان إلعادة ضبط الغسالة على إعدادات المصنع. اضغط مطوال ً على الزر ( Startبدء التشغيل)( Pause /اإليقاف) لمدة ٍ 3 (انظر "إلغاء البرنامج") يوجد ماء في الغسالة. قد يتبقى بعض الماء في الغسالة نتيجة عمليات مراقبة الجودة >>> .ال يعد هذا األمر عطل ،فالماء غير ضار بالغسالة.
6المواصفات الفنية WMB 91242 LC الموديالت ()AR 9 أقصى سعة غسيل جاف (بالكيلوجرام) االرتفاع (سم) 84 العرض (سم) 60 العمق (سم) 59 الوزن الصافي ( -/+كجم) 74 220-240 V / 50Hz التيار الكهربي (فولت/هرتز) إجمالي التيار (باألمبير) 10 2000-2350 الطاقة الكلية (وات) C C C سرعة الدوران (حد أقصى دورة بالساعة) 1200 نظام االستعداد للطاقة (وات) 1.40 نظام إيقاف للطاقة (وات) 0.
5الصيانة والتنظيف تمتد فترة خدمة الغسالة وتقل مواجه المشكالت المتكررة إذا تم تنظيفها على فترات منتظمة. تنظيف درج المنظف قم بتنظيف درج المنظف على فترات منتظمة (كل 4إلى 5دورات غسيل) كما هو موضح باألسفل لمنع ترسب مسحوق الغسيل بمرور الوقت. اضغط على الدائرة المنقطة في قسم رش الماء (السيفون) بقسم المُنعم واسحبه باتجاهك حتى يخرج هذا القسم من الغسالة. Cفي حالة بدء تجمع كمية من الماء والمُنعم بشكل زائد في قسم المُنعم ،ينبغي تنظيف السيفون.
الباب مغلق على الشاشة .رمز الخطوة التي بدأ منها تشغيل البرنامج يظهر على الشاشة (الغسيل التحضيري والغسيل الرئيسي والشطف والمنعم والعصر). تقدم البرنامج تتم اإلشارة إلى تقدم البرنامج على الشاشة بعدة رموز. يظهر الرمز ذو الصلة على الشاشة في بداية كل خطوة برنامج وستظل كل الرموز مضيئة في نهاية البرنامج .يشير الموجود في أقصى اليمين إلى خطوة البرنامج الحالي. الغسيل التحضيري إذا تم اختيار الوظيفة اإلضافية "الغسيل التحضيري" .
اختيار الوظائف اإلضافية قم بتحديد الوظائف اإلضافية المطلوبة قبل بدء تشغيل البرنامج. عالمة على ذلك ،يمكنك أيضًا اختيار أو إلغاء الوظائف اإلضافية المناسبة للبرنامج قيد التشغيل بالضغط على الزر "Start / Pause ( "/ Cancelبدء التشغيل /إيقاف مؤقت /إلغاء) عند تشغيل الغسالة .لذا ،يجب أن تكون الغسالة في خطوة قبل الوظيفة اإلضافية التي تريد تحديدها أو إلغائها. وفقا للبرنامج ،اضغط على الزر aأو bأو cأو dالختيار الوظيفة اإلضافية المطلوبة .
جدول البرامج واالستهالك AR وظيفة مساعدة 9 الحد األقصى للحمل (كجم) استهالك المياه (لتر) استهالك الطاقة (كيلو وات ساعة) السرعة القصوى *** الغسيل المبدئي الغسيل السريع الشطف المضاعف ضد التجعيد إيقاف الشطف قطن قطن قطن مالبس األطفال 2.70 1.80 1.00 2.
(ضبط درجة الحرارة). رمز التوفير يشير هذا الرمز إلى البرامج ودرجات الحرارة التي توفر استهالك الطاقة. ال يمكن اختيار رمز التوفير في برامج الغسيل المكثف C أو الصحي نظرا ألن عملية الغسيل تتم في أوقات طويلة وبدرجات حرارة عالية لتوفير السالمة الصحية .وبالمثل ،ال يمكن اختيار رمز التوفير في برامج غسيل مالبس األطفال أو التنضير أو تنظيف حلة الغسالة أو العصر أو الشطف. تحديد سرعة العصر عند تحديد برنامج جديد ،يتم عرض سرعة عصر الموصى بها للبرنامج المحدد على مؤشر سرعة العصر.
البرامج الرئيسية وف ًقا لنوع األقمشة ،استخدم البرامج الرئيسية التالية. • قطن استخدم هذا البرنامج لألقمشة القطنية (على سبيل المثال أغطية السرير واللحاف وأكياس المخدات والفوط وبرنس الحمام والمالبس الداخلية وما إلى ذلك) .يتم غسل حمولة الغسيل بحركات غسل قوية باإلضافة إلى دورة غسيل أطول. • ألياف صناعية استخدم هذا البرنامج مع المالبس المصنوعة من األلياف الصناعية (القمصان والبلوزات والمالبس المصنوعة من خليط القطن/األلياف الصناعية وما إلى ذلك) .
4 تشغيل الغسالة لوحة التحكم 5 1 2 3 4 - 4 5 6 7 8 زر ضبط سرعة العصر شاشة العرض زر ضبط درجة الحرارة مقبض اختيار البرنامج رموز الشاشة - 3 2 8 7 1 6 زر التشغيل /إيقاف التشغيل زرا بدء التشغيل المتأخر ()- / + أزرار الوظائف اإلضافية زر بدء التشغيل /إيقاف مؤقت /إلغاء إعداد الغسالة تأكد من إحكام ربط الخراطيم .قم بتركيب قابس الغسالة .افتح الصنبور بالكامل .
إرشادات للغسيل الجيد المالبس األلوان الفاتحة والمالبس البيضاء (نطاق درجة الحرارة المُوصى بها بناء على مستوى االتساخ- 40( : 90درجة مئوية) اتساخ شديد ( بقع صعبه مثل العشب والقهوة والفواكه والدم). مستوى االتساخ مستوى االتساخ العادي (على سبيل المثال ،البقع الناتجة من الجسم على الياقات واألساور) المالبس قليلة االتساخ (ال توجد بقع مرئية).
حدد برنامج مع الغسلة التحضيرية وأضف مواد التبييض في • بداية الغسلة التحضيرية .ال ينبغي وضع المنظف في قسم مرحلة الغسلة التحضيرية .وكتطبيق بديل ،حدد برنامج مع تصريف زائد وأضف مواد التبييض أثناء سحب الغسالة للماء من قسم المنظف أثناء خطوة التصريف األولى. ال تستخدم مواد التبييض والمنظف مخلوطين. • استخدم كمية قليلة فقط ( 50مل تقريبًا) من مواد التبييض • وقم بتصريف المياه من المالبس جي ًدا حيث أنها تسبب تهيج الجلد .
ذلك ،قد تحدث مشكالت االهتزاز والضوضاء. تحميل الغسيل • • • C A افتح باب تحميل الغسيل. ضع الغسيل في الجهاز. ادفع الباب إلغالقه حتى تسمع صوت قفل .وتأكد من عدم تعلق أي شيء بالباب. يتم قفل باب التحميل أثناء تشغيل البرنامج .يمكن فتح الباب فقط بعد فترة قصيرة من انتهاء البرنامج. في حالة الخطأ في وضع الغسيل ،قد تحدث ضوضاء أو اهتزاز في الغسالة.
التوصيالت الكهربية 3اإلعداد قم بتوصيل الغسالة بمنفذ تيار كهربي أرضي محمي بمصهر متوافق مع القيم في جدول "المواصفات الفنية" .لن تكون الشركة مسئولة عن أي تلفيات قد تنشأ عند استخدام الغسالة بدون طرف أرضي بما يتفق مع اللوائح المحلية. ينبغي أن يتوافق التوصيل مع التشريعات المحلية. • ويجب أن يظل قابس كبل الطاقة في مكان سهل الوصول إليه • بعد التركيب. الجهد الكهربي والحماية بمصهر أو بقاطع التيار المسموح • بها موضحان في القسم "المواصفات الفنية" .
C ال تقم مطل ًقا بتحريك الغسالة بدون تثبيت مسامير تأمين النقل في مواضعها جي ًدا! C ضغط إمداد الماء المطلوب لتشغيل الغسالة يتراوح من 1إلى 10بار ( 10 – 0.1مللي باسكال) .يلزم تدفق من 10إلى 80لتر ماء في الدقيقة من الصنبور مفتوح بشكل كامل لكي تعمل الغسالة بطريقة سلسة .قم بتوصيل صمام خفض ضغط الماء إن كان ضغط الماء أعلى من ذلك.
1 معلومات السالمة المهمة يحتوى هذا القسم على إرشادات السالمة التي تساعد في الحماية من اإلصابات الشخصية واألضرار المادية .وقد يؤدي عدم إتباع هذه اإلرشادات إلى إلغاء الضمان.
الغسالة WMB 91242 LC