User's Guide and Warranty Information PRePro™ Home Theater PReamplifier/Processor Bel Canto Design, LTD. 212 Third Avenue North Minneapolis, MN 55401 Phone: (612) 317.4550 Fax: (612) 359.9358 www.belcantodesign.com Info@belcantodesign.
Congratulations! truly unique blend of craftsmanship, style and performance. Though the PRePro is easy to use and set up, we do recommend that you read this manual in its entirety. Please follow the instructions contained in this manual in order to achieve optimum performance, flexibility and enjoyment from your new Bel Canto product.
Recommendations • Take note of the listed Precautions BEFORE you begin setting up the PRePro, we strongly recommend that you take a moment to: • Familiarize yourself with the Controls and Functions of the unit LISTENING RECOMMENDATIONS Please note that your new PRePro will improve sonically over the course of the first week.
Speaker Size QUICK SETUP SPEAKER SIZE This menu section defines how the PRePro treats the audio signal that goes to the speakers. On larger full range speakers where no bass signal limiting is needed you will select LARGE. For small speakers needing a high pass crossover, SMALL should be selected. 1. From MAIN MENU press selection 1. 2. Press 1 to set up FRONT speakers. Size selection will blink (SMALL or LARGE). 3.
Speaker Distance QUICK SETUP SPEAKER DISTANCE This section enables you to quickly set proper delay values to output channels. This is necessary to insure proper playback of surround sound effects and improve audio coherency. Before you begin the following steps measure and write down the distance rounded to the nearest foot (1 foot = 30cm) from each speaker to the main listening position. 1. From MAIN MENU press selection 2.
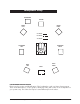
Loudspeaker Setup SUBWOOFER CENTER FRONT RIGHT FRONT LEFT 5.1 SETUP 6.1 SETUP 7.1 SETUP SURROUND RIGHT SURROUND LEFT BACK RIGHT BACK LEFT BACK LOUDSPEAKER IDENTIFICATION Please note the position and identification of the loudspeakers used in a Home Cinema system. These are detailed above, use this guide to identify the name and location of the loudspeakers in your system setup. The Subwoofer may be located differently from the above. © 2002/2003 bel canto design, Ltd.
LOUDSPEAKER SIZE AND SUBWOOFER SETUP LOUDSPEAKER SIZE SELECTION When choosing loudspeaker sizes it is important to take into consideration the low frequency energy and demands of the home cinema system. Generally loudspeakers using a single 8 inch or smaller low frequency driver need to be specified as SMALL for home theater use with a crossover of 80 Hz. Further details of this requirement can be found on the Dolby Labs web site.
Input Audio Assignment To change DEFAULT digital input assignments (DIG 1-8), or activate ANALOG inputs. 1. From MAIN MENU press selection 3. 2. Press number of input to be changed from the DEFAULT settings, assignment will blink. 3. To change a digital input assignment from the current DIG # or ANALOG setting, press SELECT button repeatedly until input assignment scrolls to desired assignment. 4. Press EXIT to store settings and return to the MAIN MENU.
Bass Trim The BASS TRIM setting allows you to increase or reduce the amount of low frequency information sent to the subwoofer for each input selection. Use this feature to level match or tailor the bass character from source components. 1. From MAIN MENU press selection 5. 2. Press 1: the VCR 1 level will blink, press the volume up button 3 times. This will raise the bass level 3dB. 3. Press EXIT to get back to the MAIN MENU.
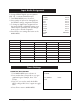
Calibration The CALIBRATION setting allows you to match the volume level of front and surround speakers with the CENTER channel speaker from the main listening position. When a channel is selected a pink noise signal is generated to best enable you to set the level by using an SPL meter or by ear. 1. From MAIN MENU press selection 6. 1 FRONT LEFT 2 CENTER 3 FRONT RIGHT 4 SURROUND RIGHT 5 BACK RIGHT 6 BACK LEFT 7 SURROUND LEFT 8 SUBWOOFER EXIT 2. Press 2 and the CENTER will play a pink noise signal.
Compression This utility is used to limit and narrow the dynamic range of the output signal. Use this option to enhance dialog when listening at low levels or to limit the difference between quiet and loud segments of a broadcast feed or video. This feature is not recommended for consistent use for compression significantly reduces overall fidelity. 1. From MAIN MENU press selection 7. 2. Press SELECT to toggle between the On or Off setting.
DVD Audio Full Range This sets the analog bass management selection for the 7.1 audio through-put. When in DVD AUDIO FULLRANGE with YES selected there are no filters in the path. When DVD AUDIO FULLRANGE shows NO, filters will be set according to the settings in the QUICK SETUP SPEAKER SIZE menu. 1. From MAIN MENU press selection 9. 2. Press SELECT to toggle between the NO (bass filters) or YES (no filters) setting. 3. Press EXIT to get back to the MAIN MENU.
Advanced Setup Advanced Setup/Input Name Change This is used to change INPUT ASSIGNMENT names with the REMOTE control. 1. Press MENU. 2. Press 3, INPUT screen is displayed. 3. Press the # of the input to change. 4. Press guide on the remote control, the rename screen will come up. At the top the default name for that input will be displayed, then the current name and XXXXX for the new name. 5. Use the curser arrows on the remote to move up, down, right, left.
Hardware Setup It is strongly recommended that your PRePro be properly installed and all connections completed before programming the SET UP MENU. First, all OUTPUT connections, either singleended or XLR, have a 1:1 output gain and may be used at the same time or intermixed depending on usage. The PRePro connection configuration and back panel design was strongly influenced by professional installers and is organized into logical zones of use.
Video Monitor Connection The main video out section accommodates 1Component, 1-S and 2-Composite connectors. The Component connection will only output video from each of the three component inputs. S-Video inputs can be viewed from the S output or composite outputs since the PRePro will down mix S to COMPOSITE. The programming MENU can be viewed from S-Video or Composite video output. For best video quality use component or S-Video connections when available.
Multi-Channel Output Connection Connecting the PRePro to your amplification and subwoofer systems can be done using the single ended (RCA) connections, the XLR connections or both, in combination or parallel. If you require extra outputs, for example when using 2 subwoofers, the PRePro’s outputs provide the same gain on both the XLR and RCA connectors and are properly buffered for simultaneous use. 1. Connect the FRONT Left and Right to the main L and R of your amplification. 4.
Digital Source Set-up & Connection This section describes how to connect a digital audio or video source, such as DVD, DISH, SAT, GAME, CABLE BOX. We will use the SAT INPUT and a satellite receiver as an example for this instruction. 1. Using high quality video cable connect the COMPONENT VIDEO OUT from the satellite receiver to the SAT COMPONENT VIDEO IN. Also connect a S-video cable to the input so that the front panel screen can be used. 3.
To Change Input Assignment a) Press the number of the input to be changed from the DEFAULT settings, assignment will blink. b) To change a digital input assignment from the current DIG # or ANALOG setting, press SELECT button repeatedly until input assignment scrolls to DIG3 or any desired input. c) Press EXIT to store settings and return to the main menu. To Change Input Assignment Name i) Press guide on the remote control, the rename screen will come up.
Analog Source Set-up & Connection In this example we will use VCR1 input. 1. Connect a high quality S-Video cable from your VCR S-VIDEO OUT to the S-Video input of VCR1 on back of PRePro. If your VCR does not have an S-Video output use the composite video out with a high quality RCA video cable. 2. Connect high quality RCA audio cables from the audio out L and R of the VCR to the analog RCA input L and R of the VCR1 INPUT on back of PRePro. ANALOG AUDIO INPUTS © 2002/2003 bel canto design, Ltd.
NOTE: You must connect the analog, video or digital output of all sources you want to record to the PRePro. 3. Connect high quality RCA audio cables from the analog AUDIO OUT L and R of the RECORD OUT of the PRePro to the analog RCA AUDIO input L and R of the VCR. 1. RECORD OUT on back of PrePro can be used to record any selected input provided the source is connected to the analog input. 4. To record digital audio connect a digital out to your digital recorder.
Setting up Zone 2 SET UP ZONE 2 INPUT SOURCE Zone 2 can access CD, TAPE, TUNER inputs as well as the Zone 2 AUX INPUT. To set up a source unique to Zone 2 use the following instructions. Main zone will have no effect on this source. 1. Connect high quality RCA audio cables from the AUDIO OUT L and R of the Zone 2 source to the analog RCA input L and R of the ZONE 2 INPUT on back of PRePro. 2.
General Operation of Unit 5. 7.1 input. When you press 7.1 from front panel or remote the unit will select the DVD video input and the 7.1 audio input. 6. To put 7.1 audio in the full range mode (no filters) press MENU and press 9 to toggle full range YES or NO press SELECT when YES or NO is blinking. Power up unit 1. Press MASTER power button all the way in. This turns on the power and puts the unit in standby. Do not turn the unit off by pressing this button.
13 PRePro FRONT PANEL 14 15 16 7 9 3 1 2 5 6 11 18 20 19 17 8 10 12 4 1. POWER SWITCH This is the MASTER power switch and should only be used to reset the unit or to shut off all power to the unit. For day to day use, use the OFF button to put the unit into standby and the INPUT buttons to power the unit from standby. NOTE: Do not use the master power switch to turn the system off. Press the OFF button. This button selects the 7.1 Multi-Channel audio input and the DVD Video input. 7.
12. SURROUND, MUSIC 7 AND STEREO 17. REMOTE This button scrolls through surround modes, set music 7 (party mode) and stereo modes. IR remote input lens. 18. MENU This button is used to bring up the system setup menu. 13. 1-0 These buttons are used for set-up menu, selection and turner presets. 19. GUIDE This button is used to bring up the on-screen status display. 14. TFT DISPLAY 15. TFT This button toggles TFT display on and off. 20. EXIT 16.
Rear Panel Connections 4 17 18 7 13 14 15 9 19 8 20 16 10 12 3 11 1 20 5 2 6 12. FIREWIRE INPUT 1. DIGITAL AUDIO INPUTS (DIG 1, DIG 2, DIG 3 and DIG 4) and Toslink (DIG 5 and DIG 6) digital inputs. For future expansion. 13. TRIGGER, MAIN TIME DELAYED DRY CONTACT 2. DIGITAL AUDIO OUTPUT (TOSLINK) 1 amp relay, dry contact 5 sec delay 3. AUDIO INPUTS (CD AND TAPE) 14. TRIGGER, MAIN TIME DELAY (12V) 12V trigger. Main time delay 5 sec. 4.
Controls and Functions Remote Control The supplied remote control can operate up to eight (8) different components and is programmable via a learning mode. The eight (8) buttons located on the top 2 rows allow you to select the component you wish to operate. Please refer to the next section “Remote Control Programming” for instructions on how to manually program this remote control. To operate the PRePro with this remote control you must first pressthe button labeled ‘AVC’ on the top left corner.
Remote Control Learning Mode is to be taught the new command. The orange Status LED will begin to flash continuously. The Device LED will turn off. This remote control allows you to transfer a command from a button on your source remote control (original equipment remote control) to a button on the Stargate remote control. New commands can be taught to any button in the CD, DVD, AUX, SAT, TV, VCR and CBL device modes, except on the LIGHT button. Step 3.
REMOTE CONTROL LEARNING MODE CONT. Step 2. Erasing a Learned Command From a Button Press and hold the LIGHT button. The red Status LED will flash five times. Release the LIGHT button. The Status LED will then flash green twice and then the Device button will turn off. The Status LED will go to a constant orange indicating that all the learned information on buttons in the Device mode have been erased. The Device button will turn on. Step 1.
REMOTE CONTROL LEARNING MODE CONT. Volume Punch Through Step 1. You can set the audio volume controls (VOL , VOL and MUTE) to operate on any of the eight (8) Device modes. Press a Device button (AVC or SAT) and the MUTE button simultaneously. Hold both buttons until the red light under the Device button turns on. Step 1. Step 2. Press the Device and MUTE buttons, simultaneously. Press one of the five macro buttons (M1, M2, M3, M4 or Power) that you wish to program.
REMOTE CONTROL LEARNING MODE CONT. Example for Programming a Macro Sequence To program the M1 button in the AVC mode to power on the receiver, power on the CD, power on the TV and power on the VCR: Step 1. Press the AVC button and MUTE buttons simultaneously. Hold both buttons until the red light under the AVC button turns on. The red light will blink once during each subsequent press of a button. Step 2. Press the M1 button to select the M1 macro. Step 3.
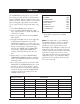
Listening Mode Definitions The various listening modes affect signals from any input except the 7.1-channel analog input. Not all listening modes are available for every type of input. For example, modes that generate surround signals from stereo sources cannot be used with DTS or Dolby Digital signals that have discrete digital surround channels, and decoding modes for such digital surround signals won’t work with stereo signals.
DTS Neo:6 Music: Similar to Neo:6 Cinema, but for music. It feeds stereo signals directly to the front channels, bypassing the decoder, while feeding the center, surround side, and surround back channels with ambient information derived from the recording, to add spaciousness. DTS Neo:6: Extracts rear surround information from DTS 3/2.1 tracks, Not available for other signals. DTS Neo:6 / Matrix: Extracts rear surround information from DTS-ES Matrix signals.
Troubleshooting Guide Trouble Shooting the Basics PROBLEM SOLUTION NO sound, LED is OFF Check if AC power cord is securely plugged in. Check AC power fuse, replace if necessary. Check all RCA cables for proper connections. Verify correct source is selected. Verify power amplifiers are turned on. NO sound, LED is ON NO remote control function and LED is OFF Press Power button on the front panel. Verify the Status LED is ON.
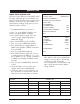
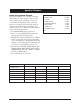
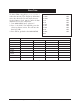
Specifications AUDIO/VIDEO SECTION Nominal Input Level Maximum Output Level Input Impedance Total Harmonic Distortion Frequency Response Stereo Bypass mode Processed Channels Signal-to-Noise Ratio Digital Inputs Analog Inputs and Video inputs Second Zone Select Outputs Record outputs Second Zone Outputs Weight (lb / kg) Dimensions (W x D x H*) TUNER SECTION Range Usable Sensitivity 50 dB Quieting Sensitivity Capture Ratio AM Rejection THD at 1 kHz I.F.