User's Guide and Warranty Information PRe6 ™ Multi-Channel Analog Pre-Amplifier Bel Canto Design, LTD. 212 Third Avenue North Minneapolis, MN 55401 Phone: (612) 317.4550 Fax: (612) 359.9358 www.belcantodesign.com Info@belcantodesign.
Thank you for purchasing the Bel Canto Design PRe6. As the proud owner of a PRe6 you can expect high quality performance for years to come. The PRe6 presented in the following pages is designed to maintain very high value, setting the benchmark for design, quality and sonic accuracy while maintaining our heritage of musicality and realism. PRe6 ™ Multi-Channel Analog Control Pre-Amplifier © 2002 bel canto design, Ltd.
Unpacking your new PRe6 PRe6 box contents include the following: 1 (one) - PRe6 Analog Preamplifier 1 (one) - PRe6 User’s Guide 1 (one) - Power cord [6.6’ - 2 meters long] 1 (one) - Remote Control 1 (one) – Warranty Sheet Carefully unpack each piece and check for shipping damage. If there is any damage, or if anything is missing, please contact your dealer, distributor or Bel Canto Design.
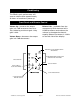
Placement and Initial Setup Single Ended RCA and Balanced XLR connectors are available. XLR jacks allow balanced hookup using the standard North American pin configuration: Because the PRe6 runs so cool it can be placed in many system locations without compromise. We do not recommend placing weights or other objects directly on the PRe6. This may mar or scratch the chassis finish. Do not use harsh chemicals when cleaning the outside of your PRe6.
Conditioning The PRe6’s sonic performance will start to stabilize after approximately 40 hours of continuous power up. Front Panel and Remote Control Balance Left - (available from the remote only) Shifts balance left in 0.5dB increments and reduces the volume in the opposite channel equally. Balance increment is visible on the left side of the display. Volume Up - Increases the output gain in 0.5 dB increments from 0 to 100, 100 being maximum gain. Unity gain is 84.0.
Balance Right - (available from the remote only) Shifts balance right in 0.5dB increments and reduces the volume in the opposite channel equally. Balance level is visible on the right side of the display. appears on the right side of the display. The listening level can again be lowered while muted and then taken out of mute at the desired level. Mute shuts off the audio output. Coming out of either mute mode, the volume quickly ramps back up to the displayed level.
When the tape input of a tape deck is connected to the tape output of the PRe6, you may record any selected source (CD, Phono, Tuner, etc) except the TAPE input. When the tape output of a tape deck is connected to the TAPE IN of the PRe6 you may monitor your recording. TAPE – On both the remote and the front panel, the TAPE button will cycle through the inputs, selecting the input to be routed to the Tape Out. If 7.
PRe6 Setup and Options arrow buttons: CONFIGURATION (of) INPUTS, CONFIGURATION (of) OFFSETS, SAVE CONFIG? and ERASE CONFIG?. Factory Configuration: The PRe6 has the following factory input settings: Input 1: 5.1 Surround Input 4, 5 and 6: Stereo Input 7: 5.1 Surround Input 10: Stereo Input 11: Stereo TAPE: Stereo CONFIGURATION (of) INPUTS: Using the down arrow button, CONFIGURATION (of) INPUTS menu allows you to customize your PRe6 in the following ways: Define Input (5.1, 7.
SAVE CONFIG ? and will be skipped when cycling through inputs, as they now are defined as being part of Input 1. On the back panel of the unit, these numbered inputs are also labeled according to their Surround Speaker: Input 1 - F for Front left and right. Input 2 - C for center and LFE for subwoofer. Input 3 - S for surrounds and Input 4 - SB for Surround Back. You will notice that inputs 6-9 follow a similar format. Green LEDs on the back panel show which inputs are selected to aid in cable connection.
Zone 2 Function the RIGHT and LEFT arrow keys to select the desired input and then press ENTER to adjust level. Use the UP and DOWN arrow keys to adjust volume level accordingly and press ENTER again to exit. When a 7.1 input is not enabled in Configuration Inputs, the SB (Surround Back) outputs (both RCA and XLR) are used as an additional volume controlled output for use in a second zone. If you have an external volume control for your second zone, adjust Zone 2 volume level to 84.
PRe6 Offset Configuration 7.1 Configuration Press Enter Button for 2 Seconds or Remote Enter Button 8 Times Press Enter To Edit Any Screen Configuration Inputs Press LEFT/RIGHT Button Press LEFT/RIGHT Button Configuration Offset? Press UP/DOWN Button Press UP/DOWN Button IN 1: Press UP/DOWN Button Press LEFT/RIGHT Button Input 1 5.
PRe6 Input Configuration Map Press Enter Button for 2 Seconds or Remote Enter Button 8 Times Press Enter To Edit Any Screen Configuration Inputs Press UP/DOWN Button IN 1: Input 1 5.
IN 7 Press LEFT/RIGHT Button Input 7 5.1 Surround IN 10: Input 10 STEREO Press LEFT/RIGHT Button Press UP/DOWN Button Input 7 STEREO Press LEFT/RIGHT Button Press UP/DOWN Button IN 7: Input 7 1 DISABLED 5.
Factory Settings Map Press LEFT/RIGHT Button IN 1: Input 1 5.1 SURROUND Press LEFT/RIGHT Button Press UP/DOWN Button Press LEFT/RIGHT Button Press UP/DOWN Button Press LEFT/RIGHT Button Set Volume Input 1 65.0 SOFT MUTE OFFSET Input 1 -20.0 Press LEFT/RIGHT Button SET ZONE2 Volume Input 1 65.0 © 2002 bel canto design, Ltd. Set Volume Input 4 65.0 Press LEFT/RIGHT Button SOFT MUTE OFFSET Input 4 -20.0 Press LEFT/RIGHT Button SET ZONE2 Volume Input 4 65.
IN 7 INPUT 7 5.1 Surround Press LEFT/RIGHT Button Press UP/DOWN Button Press UP/DOWN Button Set Volume Input 7 65.0 Press LEFT/RIGHT Button 65.0 Set Volume Input 10 65.0 Press LEFT/RIGHT Button SOFT MUTE OFFSET Input 10 -20.0 Press LEFT/RIGHT Button SET ZONE2 Volume Input 10 © 2002 bel canto design, Ltd. 65.0 Press LEFT/RIGHT Button Edit Input Name IN 11: Balanced Set Volume Balanced 65.0 Press LEFT/RIGHT Button SOFT MUTE OFFSET Balanced -20.0 SET ZONE2 Volume Balanced page 15 65.
Bel Canto Design, LTD. 212 Third Avenue North Minneapolis, MN 55401 Phone: (612) 317.4550 Fax: (612) 359.9358 www.belcantodesign.com Info@belcantodesign.