Air Compressor Manual For questions concerning this air compressor, please call: 1-877-861-2722. Rev.
TABLE OF CONTENTS PAGE 1 Safety Guidelines - Definitions Before Using the Air Compressor 2 When Installing or Moving the Compressor Before Each Use 3 Follow Safety Precautions for Electrical Connection Plan Ahead to Protect Your Eyes, Hands, Face & Ears When Operating 4 Spraying Precautions Perform These Maintenance Operations 5 Typical Compressor Installation Glossary 6 Wiring Starting the Compressor (Electric Compressors) 7 Starting the Compressor (Gasoline) 8 Elite and QP Compressor Sectio
SAFETY GUIDELINES - DEFINITIONS Safety is a combination of common sense, staying alert and knowing how your compressor works. Read this manual to understand this compressor.
When installing or moving the compressor WARNING 6. A minimum clearance of 18 inches between the compressor and a wall is required because objects could obstruct airflow. This compressor is extremely top heavy. The compressor must be bolted to the floor with vibration pads before operating to prevent equipment damage, injury or death. Do Not tighten bolts completely as this may cause stress to the tank welds. 7. The compressor should be located where it can be directly wired to a circuit breaker.
Follow the safety precautions for electrical connections 1. Follow all local electrical and safety codes, as well as the National Electric Code (NEC) and the Occupational Safety and Health Act (OSHA). 3. Protect wires from contact with sharp objects. CAUTION 2. Wiring and fuses should follow electrical codes, current capacity and be properly grounded. All electrical connections should be made by a qualified electrician. Plan ahead to protect your eyes, hands, face and ears Dress for safety 1.
Spraying precautions WARNING 1. Do Not spray in the vicinity of open flames or other places where a spark can cause ignition. Do Not smoke when spraying paint, insecticides, or other flammable substances. Never point a spray gun at yourself or any other person or animal. Accidental discharge may result in serious injury. Reduce the risk of dangerous environment Be informed about the materials you use 1.
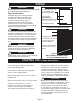
TYPICAL COMPRESSOR INSTALLATION To Air System Flex Hose Regulator Air Dryer Vibration Pads GLOSSARY OF TERMS Air Filter Pressure Switch Porous element contained within a metal or plastic housing attached to the compressor cylinder head which removes impurity from the intake air of the compressor. Device which automatically controls the on/off cycling of the compressor.
WIRING For Models Without Magnetic Starter WARNING ALL ELECTRICAL WIRING SHOULD BE DONE BY A QUALIFIED ELECTRICIAN General Information Adequate wiring and motor protection should be provided for all stationary compressors. Wiring used for other machinery should not be used. A qualified electrician familiar with local electrical codes in your area should be used. Size supply wiring per NEC (National Electric Code) requirements.
Starting Your Compressor (Gas Drive Models) Electric start models: (See Engine Manual for More Detailed Instructions) Make Sure There is Gas in the Gas Tank Honda: Turn the gas lever to the “on” position. Turn the choke lever to the left. Turn key to the “on” position, then to the “start” position. Once the engine is running, turn the choke lever to the original “right hand” position. Kohler: Turn the gas lever clockwise to the “on” position. Push the choke lever to the right.
QP Compressors You have purchased a state of the art BelAire QP compressor. The QP comes equipped with sound attenuating enclosure. For maintenance, the canopy and side foam pieces will need to be removed. To remove the canopy, simply remove the 6 fasteners and lift the canopy straight up and off. QP and Elite Compressors BelAire ELITE and QP models come equipped with low oil level switches and automatic tank drains. The QP models also include protection against over-heating.
TROUBLESHOOTING GUIDE Low discharge pressure 1. Compressor too small for application 2. Air leaks 3. Restricted intake air 4. Blown gasket(s) 5. Broken or misaligned valves 1. Reduce air demand or use a compressor with more air capacity. 2. Listen for air leaks. Apply a soap solution to all fittings and connections. Bubbles will form at points of leakage. Tighten or replace fittings or connections. 3. Clean or replace air filter. 4. Replace necessary gaskets. 5.
TROUBLESHOOTING GUIDE (Continued) Pressure switch unloader constantly leaking air 1. Malfunctioning check valve Pressure switch not unloading 1. Malfunctioning pressure switch 1. Replace check valve if unloader bleeds constantly. ! 1. Replace pressure switch if it does not release air pressure briefly when unit shuts off. ! Excessive vibration 1. Improper installation 2. Loose belts 3.
Notes
Notes
Warranty Statement The Company warrants that the Equipment manufactured by it and delivered hereunder shall be free from defects in material and workmanship for a period of twelve (12) months from the date of initial start-up, or eighteen (18) months from the date of shipment from the manufacturer, whichever occurs first.